Data Acquisition 6 | An Introduction to the Computer Network
Data Acquisition 6 | An Introduction to the Computer Network

- Pipe vs. Socket
(1) Pipe in Bash
Pipes are fast and reliable because they are implemented in memory on a single host where both communicating processes run. Recall we have already built a command-line pipe in the command line part. Now, let’s build another instance.
First of all, let’s write a file to the /tmp path,
$ echo 'hello world' > /tmp/text.txt
$ echo 'world' >> /tmp/text.txt
Then, we can use a pipe to get the lines in this file with the word hello,
$ cat /tmp/text.txt | grep hello
The output will be,
hello world
This is the same as putting the /tmp/text.txt file directly in the stdin,
grep hello /tmp/text.txt
The pipe is actually a way that communicates different processes in a host.
(2) Socket in Bash
Sockets are slower and less reliable but are much more flexible since they allow communication between processes on different hosts. Now, let’s build a socket in order to communicate between two hosts.
Before we set up the socket, we have to first install Netcat on this host,
(macos) $ brew install nc
then we type in the command,
$ nc -l 11211
this command will set a process that listens to port 11211.
Then we open another terminal and write,
$ nc localhost 11211
By this command, we will create a socket that can be used to communicate the different processes.
2. Protocols
(1) SSL
SSL (Secure Sockets Layer) or TLS (Transport Layer Security) provides security to network traffic when used properly.
(2) TCP
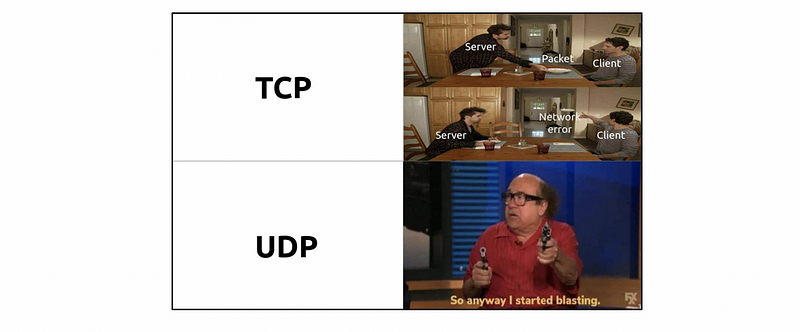
TCP, the Transmission Control Protocol, is the reliable protocol that underlies a great deal of Internet traffic. Netcat makes TCP connections by default. TCP may be combined with SSL.
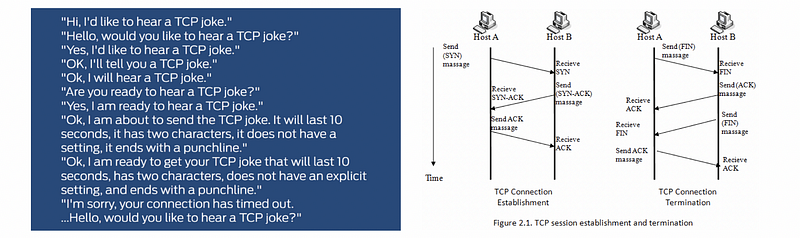
(3) UDP
UDP, the User Datagram Protocol, is an unreliable protocol often used by applications that can’t afford the overhead of TCP.
(4) IPv4
IPv4, the Internet Protocol version 4, is the most popular version of the Internet Protocol in use.
Let’s, first of all, install the netifaces package of python,
$ pip install netifaces
Then, in order to see our local IP address (default by DHCP, which means to give an IP address by the router automatically),
import netifaces as ni
ni.ifaddresses('en0')[ni.AF_INET][0]['addr']
Also, we can also check our DNS server IP address by,
$ nslookup www.google.com
this will tell us the IP address of the DNS server and the google.com, for me, the output is,
Server:  8.8.8.8
Address: 8.8.8.8#53
Non-authoritative answer:
Name: www.google.com
Address: 67.228.235.93
We can also get the IP address of google by python package socket,
import socket
socket.gethostbyname("www.google.com")
To see the localhost name of our personal computer, we can run,
socket.gethostname()
Another way to check our local IP address is by,
$ ifconfig en0
(5) Use Ncat to Communicate by SSL
In the first terminal, let’s write,
$ ncat -v --listen --ssl localhost 11211
In the second terminal, suppose we use
$ nc localhost 11211
then we can connect to the server but we can not communicate. If we type in anything, it will give us an error because we are not using SSL for connection,
Ncat: Failed SSL connection
In order to connect by the SSL protocol, we have to use,
$ ncat -C --ssl localhost 11211
in the second terminal.
(6) Use Ncat to Execute Command
In the first terminal, let’s write,
$ ncat -l --sh-exec "echo Successfully Connected" 11211
In the second terminal, let’s write,
$ ncat localhost 11211
(7) Use Ncat to Transfer File
Host #1:
$ ncat -l 11211 > outputfile
Host #2:
$ echo Hello > inputfile
$ ncat --send-only localhost 11211 < inputfile
Check the result: in host #1,
$ cat outputfile
(8) Different Internet Concepts in a Nutshell

(9) Build a Silly Chatter with Socket
Now, we are going to use python to build a silly chatter. This is really silly because this server can not understand what you mean. No matter what you reply to this server, it will reply ‘What?’ to you. Our python code for the server is,
To set the server up, in the first terminal, we run,
$ python server.py
Then it will give us the IP address for connection,
server listening at <ip address>:8000
To connect to the server, in the second terminal window, we can use either telnet or netcat,
$ telnet <ip address> 8000
or,
$ nc <ip address> 8000
At any time, we can quit the connection and close the server by pressing q,
q
3. Ports
(1) Common Ports to Remember
- 80: HTTP (web)
- 443: HTTPS (web)
- 110: POP (mail)
- 25: SMTP (mail)
- 22: SSH (remote shell connections)
Looking for more ports? See a reference here!
(2) Use telnet to Send HTTP Requests
Before we use telnet, we have to install it,
$ brew install telnet
then, we can run the telnet to connect to the 80 port of the openpayments.com, (because it is using the HTTP protocol)
$ telnet www.openpayments.us 80
GET / HTTP/1.1
Host: www.openpayments.us
then the whole page of the page openpayments.com will be sent to us.
Suppose we want to connect to the stackoverflow.com
$ telnet stackoverflow.com 80
GET / HTTP/1.1
Host: stackoverflow.com
If wee use this one, it will send us an error of 300 Moved Permanently,
HTTP/1.1 301 Moved Permanently
This is because the stackoverflow.com no longer uses the HTTP protocol and we are going to be redirected. But how about we try this one?
$ telnet stackoverflow.com 80
GET / HTTPS/1.1
Host: stackoverflow.com
Actually, this will also send us an error, which is the 400 Bad Request. This is because the telnet can not use the HTTPS protocol,
HTTP/1.1 400 Bad Request
(3) Use Openssl to Send HTTPS Requests
If we want to connect with HTTPS protocol, we have to use the openssl command. For example, suppose we want to connect to the stackoverflow.com
$ openssl s_client -connect stackoverflow.com:443
Note that the port for HTTPS connection is 443. Then we are going to see something like this,
---
Server certificate
-----BEGIN CERTIFICATE-----
MIIHJTCCBg2gAwIBAgISA/c80WOrBS1B0YKU1WnbOIwuMA0GCSqGSIb3DQEBCwUA
MEoxCzAJBgNVBAYTAlVTMRYwFAYDVQQKEw1MZXQncyBFbmNyeXB0MSMwIQYDVQQD
ExpMZXQncyBFbmNyeXB0IEF1dGhvcml0eSBYMzAeFw0yMDEwMDUxMzAyNDRaFw0y
MTAxMDMxMzAyNDRaMB4xHDAaBgNVBAMMEyouc3RhY2tleGNoYW5nZS5jb20wggEi
MA0GCSqGSIb3DQEBAQUAA4IBDwAwggEKAoIBAQDgvEf4788HVB81wIAnFbY556Qb
7BOB5IhjozLwLS9OsOAn2Dmr+P/456nysCXQAFw/Y98R+INfjTScScZa+WfKM9tk
TSLrrHuPyFQ0IEwpy59+cdnPoJQWrAu6Y0RGRv27yOOVRyeAqge2pArDiYqrc0sE
...
This is the RSA certificate of the server that is used to prove the information is reliable. Then we type in,
GET / HTTP/1.1
Host: stackoverflow.com
This is going to give us the webpage code for the stackoverflow.com page.
(4) Use Python to Get a Web Page
Recall what we have used for Beautifulsoup,
import requests
cnn = requests.get('http://www.cnn.com')
print(cnn.text)
(5) Use curl and get to Get a Web Page
Similarly, we can download a webpage by,
$ curl https://www.cnn.com > cnn.html
or,
$ wget -O cnn.html https://www.cnn.com
(6) Common HTTP Status Codes
In the previous discussion, we have encountered different HTTP status codes (i.e. 400, 301, 200). Here’s a meme for us to understand the common HTTP status codes,

4. Python Based Websites with Flask
(1) What’s the Flask?
Flask provides annotations that map URL paths to Python function. Every URL for which you want the server to respond requires an annotation/function combination.
(2) A Stater with Hello World
Here is the easiest instance of the flask.
Note that we can’t name the file by flask.py because there will be a conflicting problem with the package we import. To set the server up, we can use,
$ python flaskpage.py
Then we can go to http://127.0.0.1:5000/ and see the page of Hello World.
(3) HTML for Flask
We can also add Html code to the python script. For example,
$ python flaskpage.py
Then we can go to
http://127.0.0.1:5000/index
(4) Use Part of URL as the Parameter
$ python flaskpage.py
Then we can go to
http://127.0.0.1:5000/index
to check the usage of the parameter.
We can also use,
http://127.0.0.1:5000/index/Adam
to check the other names.
(5) Return by Argument
$ python flaskpage.py
Then we can go to
http://127.0.0.1:5000/index
to check the usage of the parameter.
We can also use,
http://127.0.0.1:5000/data?format=idontknow
to check the data.
7. AWS and Remote Communication
(1) Launch AWS Instance
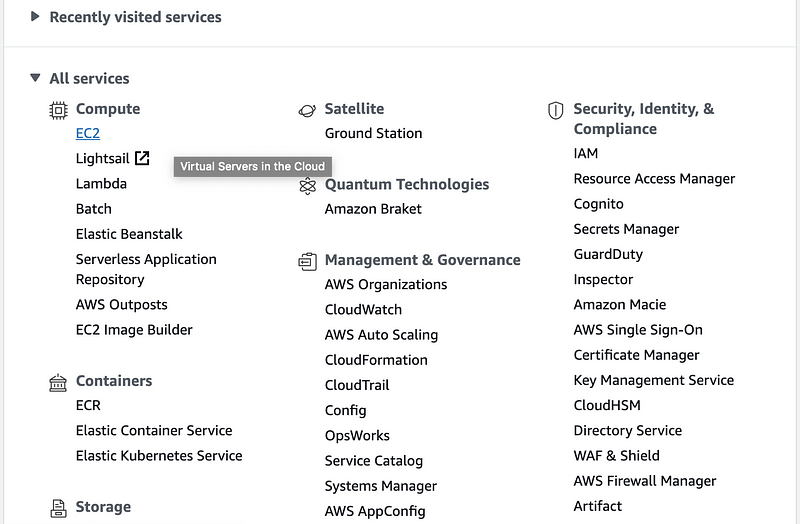
Firstly, let’s go to the AWS console and select EC2,
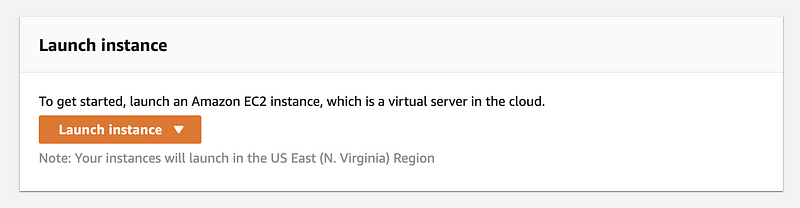
Then choose Launch instance,
Find the Amazon Linux and click on Select,
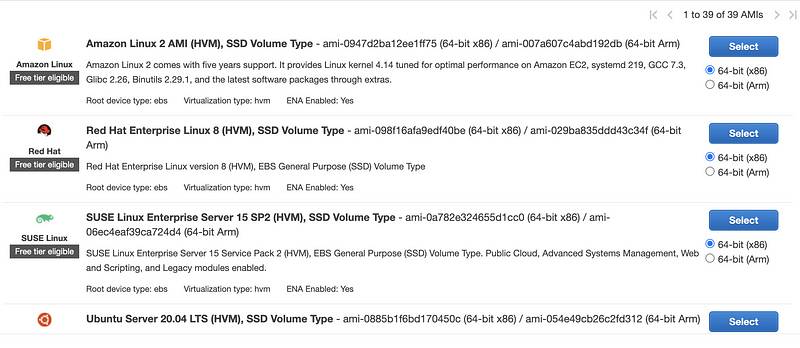
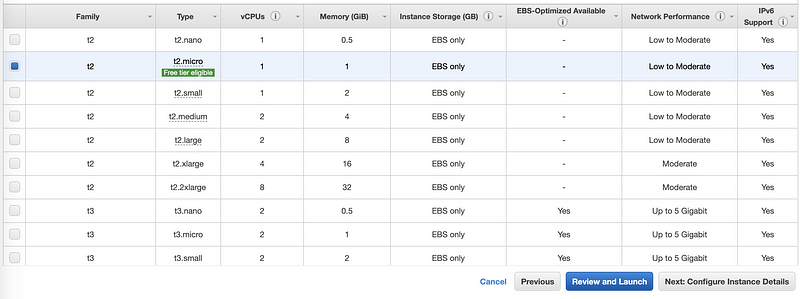
Make sure you are choosing the free version, and then click on Review and Launch > Launch,
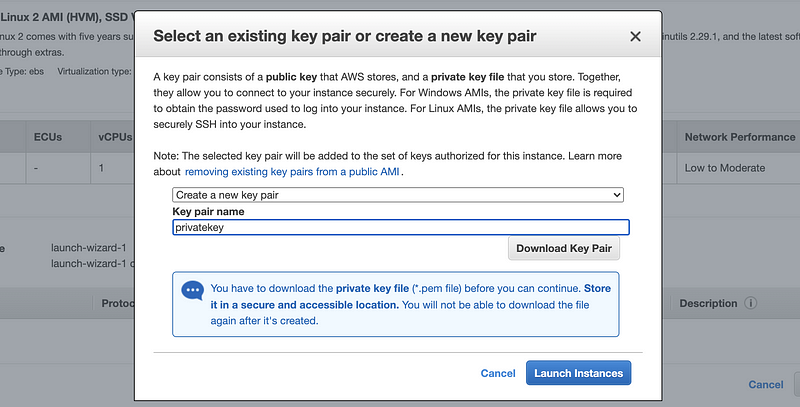
Then in the popped-up window, select create a new key pair and enter the key pair name as ‘privatekey’. Click on the Download Key Pair Button and then download the certificate file privatekey.pem to our computer. Finally, click on the launch instances to launch our EC2 server.
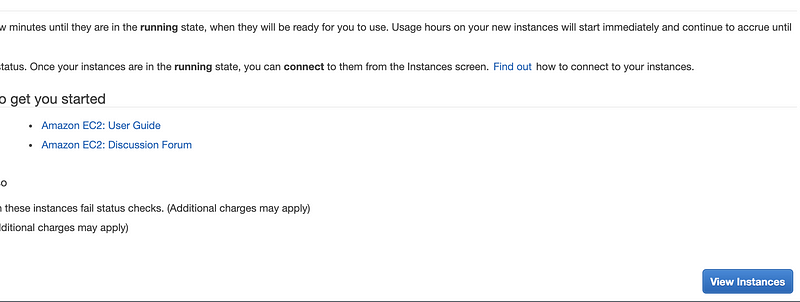
Then we click on the View Instance button to see the configuration of the EC2 Server and then click on the instance id,
In the instance information view, click on the connect button and then choose SSH client,
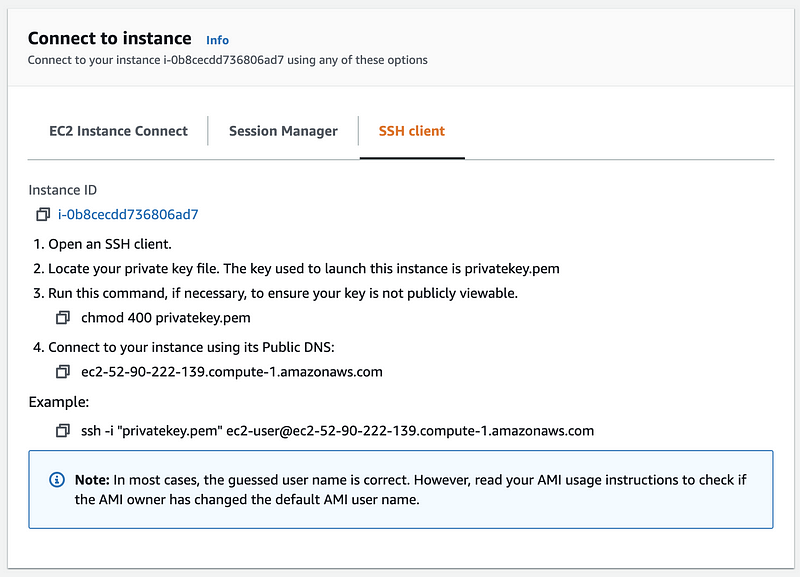
Then let’s go to the path that we saved our privatekey and change the mode of the .pem file to 400,
$ chmod 400 privatekey.pem
then we use the ssh command to connect to our remote host,
$ ssh -i "privatekey.pem" ec2-user@ec2-52-90-222-139.compute-1.amazonaws.com
Note that this can be different on your computer and you have to change this command based on the Connection to Instance page you got.
Then it is going to ask you whether or not to connect, please type in
yes
and then we are successfully connected to our remote host device if you can see something like,
[ec2-user@ip-172-31-30-231 ~]$
(2) Firewall and Remote Communication
Remember what we have to do to set up communication on the localhost. We used the nc command and we listen a specific port on our localhost. Then we used another terminal as a client and then connected to the server with nc command and the IP address.
But actually, we are actually communicating on the same device in the previous experiment of communication. Now, we would like to do the same thing on two different devices thanks to the help of AWS.
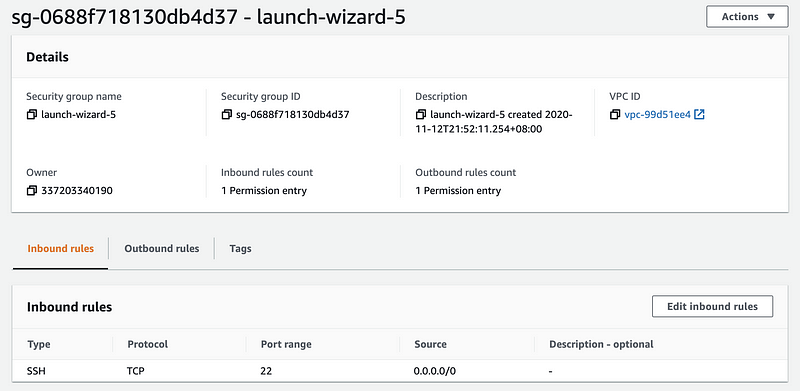
After we launched the instance and use an SSH to connect, we are then going to quit the SSH connection and start to configure a little bit on the firewall in order to make other PCs connect. Let’s go to the instance page of the AWS console, and click on the Security tag.

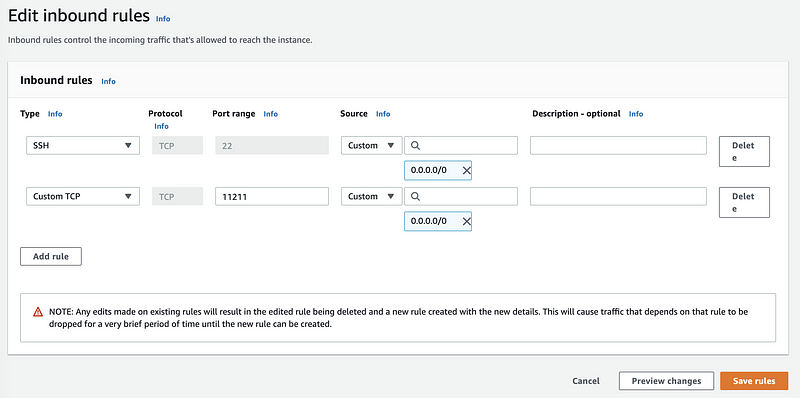
Here we can find that only port 22 is open for connection. Because we want to send messages by TCP on port 11211, so we have to open this port. We click on the Security groups and then choose edit inbound rules,
Click on Add rule and add a new inbound rule like the following image. After that, we click on the Save rules button to save all the stuff.
Then we redo the ssh connection part and connect to our remote host. In this host, we should install netcat by yum,
[ec2-user@ip-172-31-30-231 ~]$ sudo yum install -y nc
then we make this host listen to the port 11211,
[ec2-user@ip-172-31-30-231 ~]$ nc -l 11211
In our localhost, we can connect our AWS server by its public IP address, which can be found on the page of instance or the page of connection. Then we write in the local terminal,
$ nc <public ip> 11211
Congratulations! Now we can communicate with the remote host. Always keep it in mind that you must terminate the AWS serves after you use it or it will cost you a lot.