Data Acquisition 7 | An Introduction to the Amazon Web Services
Data Acquisition 7 | An Introduction to the Amazon Web Services
- Launch a New Server
In this case, we are going to launch a deep learning server with Ubuntu 18.04.

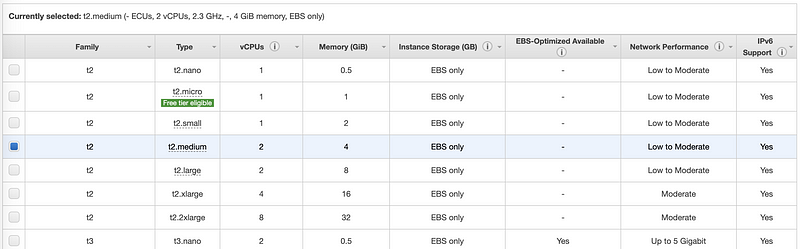
Recall what we have done in the last section and select the t2.medium type (with 2 CPU cores and 4 GB memory),
Then we launch the server and then choose the connection tag to connect. Make sure you understand this, or you may refer to the last session where we have talked a little about AWS,
Now, let’s install all the dependences,
pip install --upgrade pip
pip install numpy Flask
conda update -n base conda
conda install gunicorn
2. File Transfer
(1) Transformation Based on Copy and Paste
Suppose we have a file named awstest.md and the content of it is,
$ cat awstest.md
Hello Word
Hi
Good to know you
Then the most easy way (not cool at all) to do the the file transformation is by copy and paste. First, we copy the content of the awstest.md file, then in our ssh connection, we type in,
ubuntu@ip-172-31-32-243:~$ cat > awstest.md
then paste the content and then press control-c to quit
Hello Word
Hi
Good to know you
^C
to check the file, we can use,
ubuntu@ip-172-31-32-243:~$ cat awstest.md
then, the output should be
Hello Word
Hi
Good to know you
(2) Transformation Based on scp
The scp command is the secure copy command which can be used to transfer files through ssh.
By the following command, we will transfer our file to the server through ssh and name the file awstest.md as hi.md in the home directory.
$ scp -i privatekey.pem awstest.md ubuntu@ec2-18-221-186-233.us-east-2.compute.amazonaws.com:~/hi.md
Remember to change the connection information ubuntu@ec2-18-221-186-233.us-est-2.compute.amazonaws.com part to your own. Based on the network traffic speed, it may take time for the files to be transferred. You have to wait until you see something like,
awstest.md 100% 31 0.1KB/s 00:00
From the server, then we can check whether the file is successfully transferred.
ubuntu@ip-172-31-32-243:~$ cat hi.md
Hello Word
Hi
Good to know you
(3) Set up a Flask Server
Again, we have our python script as,
Then we use scp to transfer this script to the server,
$ scp -i privatekey.pem flaskpage_argu.py ubuntu@ec2-18-221-186-233.us-east-2.compute.amazonaws.com:~/server.py
After this, we then run our python script on the server,
ubuntu@ip-172-31-32-243:~$ python server.py
* Serving Flask app "server" (lazy loading)
* Environment: production
WARNING: This is a development server. Do not use it in a production deployment.
Use a production WSGI server instead.
* Debug mode: off
* Running on http://127.0.0.1:5000/ (Press CTRL+C to quit)
We may think that we can now get an access to the server by its public IP address (find in the instance information page of the AWS console) and the port 5000, however, when we try to access the URL:
http://<public ip>:5000/ # mine is http://18.221.186.233:5000/
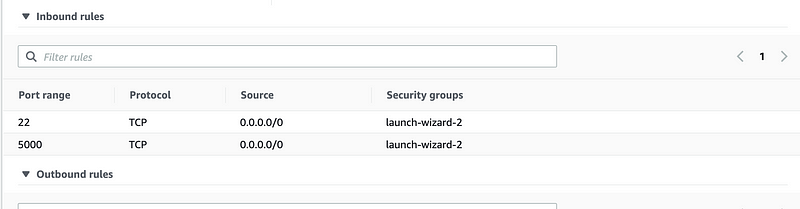
in our browser, then we can not get anything. Again, this is because of the firewall rules. We then open the port 5000 with TCP for all IP address (0.0.0.0/0).
Also, to make your server openly accessed by the other computers, also, we have to make the flask run on 0.0.0.0.
ubuntu@ip-172-31-32-243:~$ vi server.py
edit,
app.run('0.0.0.0')then save and quit the vim.
Launch the server by,
ubuntu@ip-172-31-32-243:~$ python server.py
Great, now we can have access to our public IP address port 5000, open a browser and type in,
http://<public ip>:5000/
You can find the page there! That’s all you need to know about AWS.