Data Pipeline 3 | Operators and Sensors
Data Pipeline 3 | Operators and Sensors

- Operators
(1) DummyOperator
Before we create our own operators, let’s first introduce some basic operators, and the first we are going to introduce here is the DummyOperator. As we have discussed, dummy typically has two functions.
- It can be used to group tasks
- It can be used to combine tasks
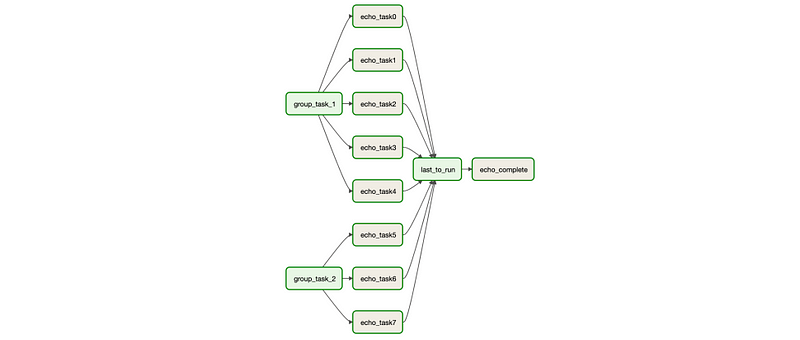
Now, let’s see an example script example_dummy.py,
In this example, the dummy operator group_task_1 is used to group echo_task0 to echo_task4 , and group_task_2 is used to group echo_task5 to echo_task7. The dummy operator last_to_run is used to group all the echo_task after running, and then they will be directed to the task echo_complete.
(2) BashOperator
Then, we can continue to see how we can use the BashOperator. Again, you can add the following DAG to your DAG folder.
bash_1 is a basic BashOpeartion task that is used to show that we can assign bash commands to parameter bash_command.
bash_2 is showing that we can use Jinja templates for bash commands. You can refer this link to know how it works. Some common templates we can use are,
{{ ds }}: The DAG run’s logical date asYYYY-MM-DD.{{ ts }}: The DAG run’s logical time like2018-01-01T00:00:00+00:00.{{ execution_date }}: The execution date, same as logical date.{{ run_id }}: Therun_idof the current DAG run.{{ dag_run }}: A reference to the DagRun object.{{ task_instance_key_str }}: A unique, human-readable key to the task instance formatted{dag_id}__{task_id}__{ds_nodash}.{{ macros.datetime }}: The standard lib’sdatetime.datetime
We can also define some personally cumstomed parameters by assigning the params variable. So the output of this bash_2 is supposed to be something like, (you can find this in the log)
Logical Date: 2021-12-01
Logical Time: 2021-12-01T20:54:09.152458+00:00
Execution Date: 2021-12-01T20:54:09.152458+00:00
Run ID: manual__2021-12-01T20:54:09.152458+00:00
DAG Run Reference: <DagRun example_bash @ 2021-12-01 20:54:09.152458+00:00: manual__2021-12-01T20:54:09.152458+00:00, externally triggered: True>
Readable Task Key: example_bash__bash_2__20211201
Customed Paramerter: This is a customed param
Standlib Datatime: <class 'datetime.datetime'>
Command exited with return code 0
In general, a non-zero exit code produces an AirflowException and thus a task failure. In cases where it is desirable to instead have the task end in a skipped state, you can exit with code 99 (or with another exit code if you pass skip_exit_code). So bash_3 is using exit 99; in its command and we are expected to see that this task instance is in the skipped state after running.

(3) PythonOperator
The PythonOperator can be used to execute Python callables.
op_args: used as list for passing the function argumentsop_kwargs: used as a dictionary used for passing the function argumentstemplates_dict: used as a dictionary for passing Jinja templates
Now, let’s see the following script,
run_start task will execute the running_func function and returns Start running .... In Airflow, whatever you return gets printed in the logs.
run_sleep task execute the sleep_func , which takes an argument sleep_time from op_kwargs.
run_complete task execute the complete_func , which takes a Jinja template value task_instance_key_str from templates_dict. Note that the templates_dict argument is templated, so each value in the dictionary is evaluated as a Jinja template. Therefore, the output of this task is something like,
Done. Returned value was: Complete running example_python__run_complete__20211201(4) Custom Operator
Airflow allows creating new operators to suit the requirements by extending the BaseOperator. Let’s see an example on the official document.
First, let’s put the following script in a new directory custom_operator in our DAG folder. This script defines the class HelloOperator inherited from BaseOperator. Then it modifies the operations in the __init__ method with a self.name attribute. It also modifies the execute method and make it print a formatted string Hello {self.name} to the standard output.
After that, we can use the following script for using this customized HelloOperator.
The log should show our result,
Hello foo_bar2. Sensors
(1) TimeDeltaSensorAsync
This is a drop-in replacement for TimeDeltaSensor that defers itself to avoid taking up a worker slot while it is waiting. We can use this to wait for a certain time period. We already have example_time_delta_sensor_async script in our example DAG folder and we can test it out. The script should be as follows,
with DAG(
    dag_id="example_time_delta_sensor_async",
    schedule_interval=None,
    start_date=datetime(2021, 1, 1),
    catchup=False,
    tags=["example"],
) as dag:
    wait = TimeDeltaSensorAsync(task_id="wait", delta=timedelta(seconds=10))
    finish = DummyOperator(task_id="finish")
    wait >> finish
The wait task is a sensor used to wait a time period of 10 seconds. Then the finish task of DummyOperator is called for finishing.
(2) BashSensor
Next up, let’s see an example of the BashSensor. Suppose we have the following bash script that will randomly exit with 0 or 1,
if (($RANDOM % 2))
then
    echo "Success, exit with 0."
    exit 0;
else
    echo "Hang and retry after 60 seconds, exit with 1."
    exit 1;
fi
Then the script should be as follows,
After triggering this DAG, we have a 50% chance to exit with 0 and another 50% chance to exit with 1. Let’s suppose we get an even $RANDOM value in the first trial, then we will output Hang and retry after 60 seconds, exit with 1. and then retry this command after 60 seconds. This interval is defined by the argument poke_interval and by default it should be 60 seconds. We can also change it to some other values for longer or shorter intervals. We can check this by viewing the logs,
[2021-12-01, 20:30:32 UTC] {bash.py:66} INFO - Running command:Hang and retry after 60 seconds, exit with 1.
...
[2021-12-01, 20:30:32 UTC] {bash.py:77} INFO - Output:
[2021-12-01, 20:30:32 UTC] {bash.py:80} INFO -[2021-12-01, 20:30:32 UTC] {bash.py:82} INFO - Command exited with return code 1
...
[2021-12-01, 20:31:32 UTC] {bash.py:66} INFO - Running command:
...
[2021-12-01, 20:31:32 UTC] {bash.py:77} INFO - Output:
[2021-12-01, 20:31:32 UTC] {bash.py:80} INFO - Success, exit with 0.
[2021-12-01, 20:31:32 UTC] {bash.py:82} INFO - Command exited with return code 0
[2021-12-01, 20:31:32 UTC] {base.py:249} INFO - Success criteria met. Exiting.
...
(3) Poke Method
Similar to operators, all the sensors are derived from a class named BaseSensorOperator (which also inherit from BaseOperator, so we say the sensor is a specific type of operator). For BaseSensorOperator , it has a parameter named mode , which defines how the sensor operates. Basically, a sensor can choose from the following two modes,
poke: the default one. It means to occupy the current worker when working and the current worker will sleep between pokes. This should be used when the cost of context switch on the scheduler is larger than the expected waiting time.reschedule: When set toreschedulethe sensor task frees the worker slot when the criteria is not yet met and it’s rescheduled at a later time. Use this mode if the time before the criteria is met is expected to be quite long.
The poke method in BaseSensorOperator is repeatedly invoked every poke_interval seconds until one of the following occurs,
- The
pokemethod returns true. - The
pokemethod raises anAirflowSkipException, in which case, the sensor task instance’s status will be set toSkipped. - The
pokeraises another exception, in which case it will be retried until the maximum number ofretrieshave been attempted.
(4) Custom Sensor
Now, let’s make our own customed sensor. We should pass the path to an attribute path_to_check and then check if it exists in every poke by modifying the poke function. Remember to put the customed sensor in a newly created directory named custom_sensor in the DAG folder.
Then we can create a DAG to use it,
If we trigger this DAG, it will poke every 5 seconds for checking if we have that path. For example,
[2021-12-01, 21:32:58 UTC] {logging_mixin.py:109} INFO - Sensor didn't find path, will try again in a while
[2021-12-01, 21:33:03 UTC] {logging_mixin.py:109} INFO - Sensor didn't find path, will try again in a while
[2021-12-01, 21:33:08 UTC] {logging_mixin.py:109} INFO - Sensor didn't find path, will try again in a while
...
Then we go to the terminal and use the command line to create a folder on that path,
$ mkdir /tmp/testsensor
Then finally, we can find out that the task suddenly detect the path,
[2021-12-01, 21:33:23 UTC] {logging_mixin.py:109} INFO - Sensor detected path exists
[2021-12-01, 21:33:23 UTC] {base.py:249} INFO - Success criteria met. Exiting.
And then the BashOperator delete_folder will be able to delete this path.