Relational Database 1 | Installation of Postgres and PgAdmin, An Intro to DBMS, ER Diagrams,
Relational Database 1 | Installation of Postgres and PgAdmin, An Intro to DBMS, ER Diagrams, and Structure Query Language (SQL)

- Installation of Postgres and PgAdmin
(1) Installation and Configuration of PostgreSQL
In macOS, we can run the following code to install the PostgreSQL,
$ brew install postgresql
Then we have to initial the database in a given path, for example, we will use the path of /usr/local/var/postgres here,
$ initdb /usr/local/var/postgres
Ignore the Bala Bala … disabled … Bala Bala … other than … Bala Bala … output, this won’t affect our database performance.
We should also create a user named postgres after this procedure, by,
$ /usr/local/opt/postgres/bin/createuser -s postgres
Okay, now we’ve done on the installation and initialization.
(2) Setup the PostgreSQL Server
To use our PC as the server, we can set up the database on localhost port 5432 by,
$ postgres -D /usr/local/var/postgres
Don’t close this window because we have to keep the server open.
(3) Create a PostgreSQL Client
Then we open another window of terminal and we then type in,
$ psql -d admin
because we haven’t created any database named admin, the terminal will then send back an error message,
psql: error: could not connect to server: FATAL: database "admin" does not exist
And also, we are going to get an error message in the server terminal,
CST [...] FATAL: database "admin" does not exist
We can then close the terminal windows.
(4) pgAdmin: An User-Friendly UI of PostgreSQL
Bored about the command line? So do I! Now let’s try something new now. We have known that localhost:5432 is used for our PostgreSQL services. So how about we use an html-based user interfacer to show us the result of our SQL commands? Sounds like a good idea, right? The answer to this is we can have pgAdmin software.
Firstly, we go to the website of pgAdmin and download the latest version. In this case, we choose to download the macOS version pgAdmin 4 v4.26 (released Sept. 17, 2020). After downloading it, we then open this file with a double click, and then probably, we have to wait a second for it to initialize. After that, we can add (copy or move) it to the application folder so that it will then be software on our computer.
To open the pgAdmin, we don’t have to use the terminal anymore. Just one click on the pgAdmin, it will automatically create a server for us on a leisure port.
Then you are going to type in the password and make sure that you can remember this password (you will be in big trouble if you forget this) and press ok to continue.
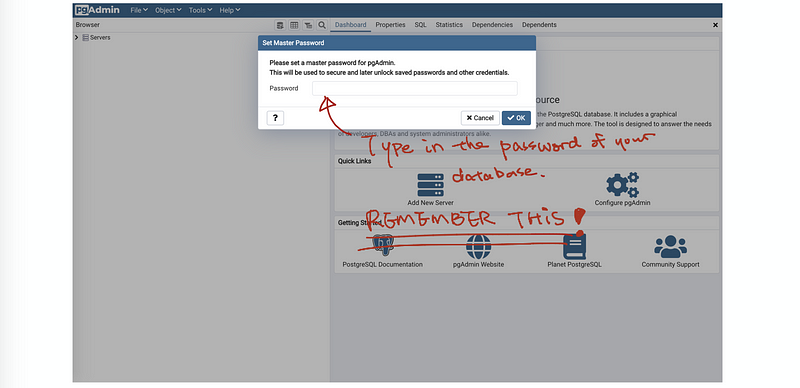
Then we press the Add New Server button (like a sandwich) and we can get this window:
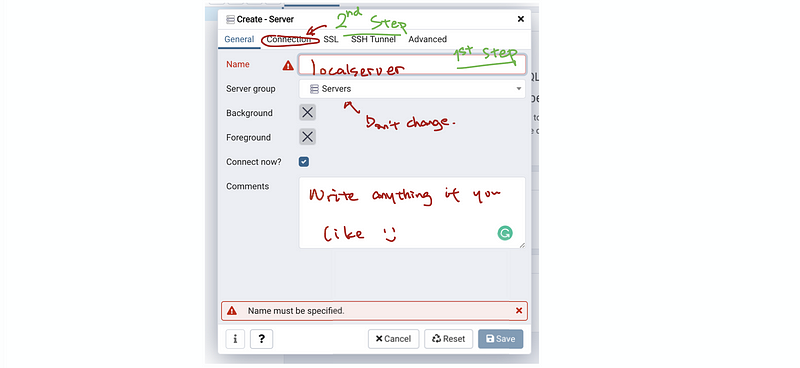
So the first step is that we are going to assign the name of this server as localserver,
Name: localserver
then we press the connection button and type in 127.0.0.1 and the port 5432,
Host: 127.0.0.1
Port: 5432
Then we should also write the username and the password,
Username: postgres
Password: <your password>
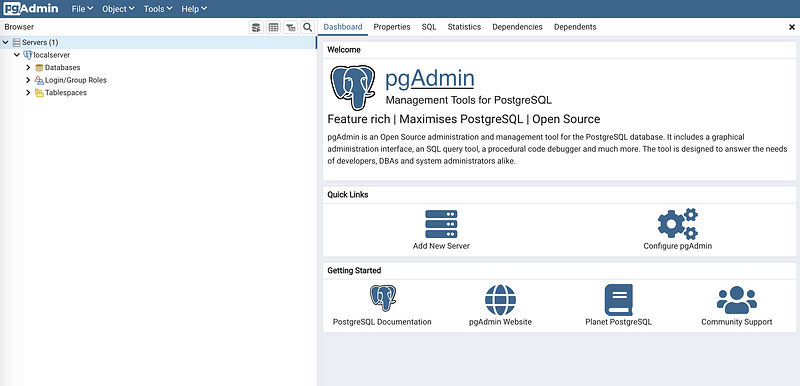
Select “save password?” to make life easier for us. If things are not messed up, you are expected to get the following page. Congratulations if you did it all right!
2. An Introductions of the Database Management System (DBMS)
(1) Features of the Database Management System
- Data Independence: the data in the DBMS is multi-layered (physical/logical/data) and data is independent between the different layers
- Data Abstraction: the DBMS allows us to see the hidden features of the data
- Efficient Access: DBMS is efficient to store and retrieve data
- Follow Integrity: DBMS can set rules for valid data
- Security: allow different permissions for different users
- Data Administration: centralize the admin of the data
- Allow Concurrent Access: with multi-users logging in simultaneously
- Backup: DBMS always allow crash recovery
- Reduced Development Time
- etc…
(2) The Definition of the Relation (aka. Record)
In the field of the relational database, a data table is called a relation. It is also called a record.
(3) The Definition of the Schema
The description we used to describe the data in a relation is called a schema of this relation. For example, a relation of student ID and the student name should include the sid (string, Not NULL, UNIQUE) and the name (string, Not NULL).
(4) The Definition of Tuples
Each line in a relation is called a tuple. Thus, each relation has a collection of tuples.
(5) The Relation between Relations
Because different relations can also have relations, we call this the relation between relations. (i.e. the department relation and the faculty relation can have a relation)

(6) Relational Database Design Steps
- Step #1: Requirement Analysis — what to put in the database?
- Step #2: Conceptual Database Design — develop an ER diagram
- Step #3: Logical Database Design — convert the ER diagram to the database schema
- Step #4: Schema Refinement — identify potential problems and refine
- Step #5: Physical DB Design — make sure the database fits the performance
- Step #6: Security Design — define the role and the accessibility of the role
3. Entity-Relationship (ER) Model
(1) The Definition of the Entity
An entity is an object that is distinguishable from the other objects and it can be described using a set of attributes.
(2) The Definition of the Primary Key
Super Key − A set of attributes (one or more) that collectively identifies an entity in an entity set.
Candidate Key − A minimal super key is called a candidate key. An entity set may have more than one candidate key.
Primary Key − A primary key is one of the candidate keys chosen by the database designer to uniquely identify the entity set. That is to say, the primary key is one of the minimal sets of attributes whose values uniquely identify an entity in the set.
Unique Key − The primary key is one of the minimal sets of attributes whose values uniquely identify an entity in the set. The difference between the primary key and the unique key is that: (a) we can have several unique keys if a relation but we can have only one primary key; (b) the unique key can contain NULL values whereas the primary key can only have NOT NULL values.
Foreign Key − The foreign key is the information stored in a relation linked to the information stored in another relation.
(3) The Definition of the Attributes
The attributes of an entity is the properties of this entity. Each attribute of an entity is assigned by a value.
(4) Entity: Examples
For example, an entity of the employee should be,
Employee:
-   eid: string, NOT NULL, UNIQUE (Primary Key)
-  name: string, NOT NULL
- title: string
-   SSN: string, UNIQUE
Another example should be the department entity,
Department:
-  did: string, NOT NULL, UNIQUE (Primary Key)
- name: string, NOT NULL, UNIQUE
Note that department name can also be a primary key and, actually, we can arbitrarily choose a primary key between did and name.
(5) The Definition of the Relationships
The relationship is an association between two or more entities. A relationship can have descriptive attributes.
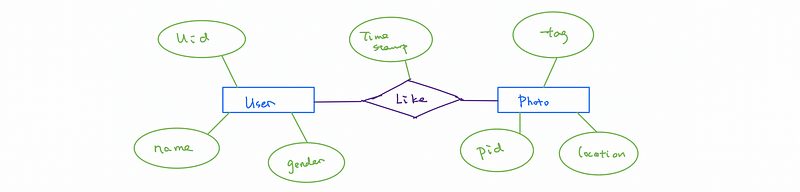
  ┌─ User:(entity)
  │  - uid: string, NOT NULL, UNIQUE (Primary Key)
  │  - name: string, NOT NULL
  │
Like:(relationship)
- timestamp: string
  │
  └─ Photo:(entity)
     - pid: string, NOT NULL, UNIQUE (Primary Key)
     - tag: string
     - location: string
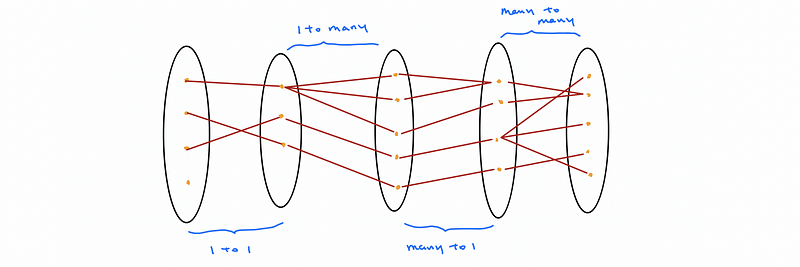
(6) The Definition of the Constraints
The key constraints are used to restrict an one-to-one, an one-to-many, a many-to-one, or a many-to-many relationship (going to explain later). It is always being represented by arrows.
(7) The Definition of Total Participation
Each entity is involved in the relationship.
(8) The Definition of Partial Participation
Not all entities are involved in the relationship.
3. ER Diagrams
(1) Entities
Entities are represented by rectangles.

(2) Attributes
Entities are represented by ellipses.
(3) Relationships
Relationships are represented by diamonds.
(4) Constraints
Constraints are represented by arrows with 1 and N.

(5) Total Participation and Partial Participation
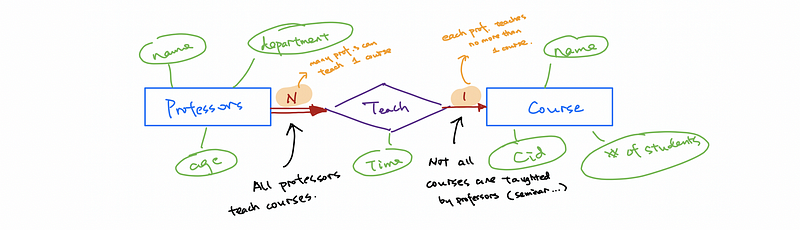
Total participation is represented by double lines, while partial participation is represented by a single line. For example, suppose we have all the professors participate in the program and teach courses. Some courses have more than one teacher, but each professor can only teach one course.
4. Structure Query Language (SQL)
(1) Create a Database
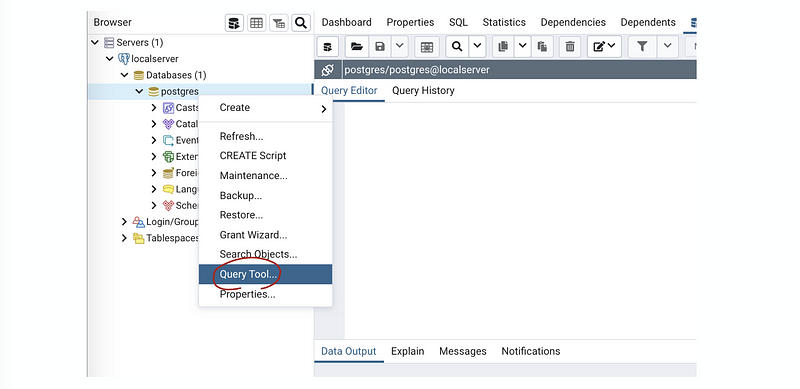
In order to create a new database, first of all, we right-click on the postgres in the databases tag and choose Query Tool,
Then in the Query Editor, we write (replace the <dbname> with your database name),
CREATE DATABASE <dbname>;
Then on the top of the editor, we press the triangular sign to run the code,

then we are going to have the output:
CREATE DATABASE
Query returned successfully in 262 msec.
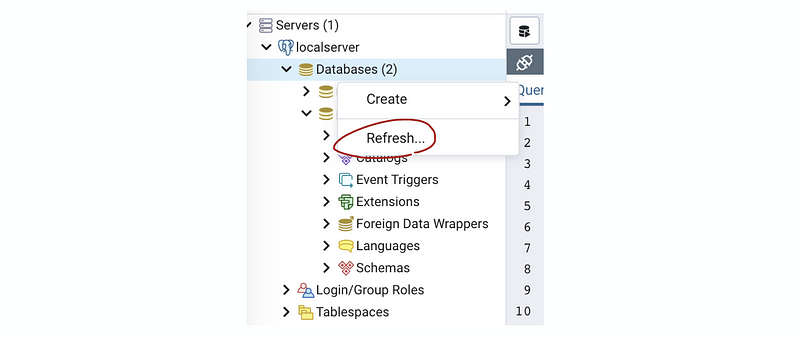
So where is this new database? To see this new database, we have to refresh the databases tag, by right click on it and choose Refresh,
Now let’s do something to our newly created database.
(2) CRUD Operation
CRUD operations! Sounds scary for the first time right? However, they are silly if you know the whole name of them. Basically, the CRUD operations are:
- Create / Insert operation
- Read operation
- Update operation
- Delete operation
(3) Create a Table
First of all, let’s create a table, we go to the Query Tool of our new database and then write,
CREATE TABLE <tablename> ( <att1name> <att1type> <att1constraint>,
                           <att2name> <att2type> <att2constraint>,
                                              ...
                           <attNname> <attNtype> <attNconstraint>,
                           <tableconstraint>);
- <tablename>: the name of the table
- <att?name>: the attribute name
- <att?type>: the type of attribute
In SQL, we can use types as,
(1) Boolean type: boolean
(2) Character Types: char(n), varchar(n), text
(3) Numeric Types: integer, serial, real
(4) Date/Time Types: timestamp , date, time, interval
(5) etc…
- <att?constraint>: the constraint of the attribute (option)
In SQL, we can use constraints as,
(1) CHECK <coonditions>: specify an expression which newly updated rows must follow
(2) NULL/NOT NULL: null values is allowed or not allowed
(3) DEFAULT <expression>: set the default value for column
Now let’s create a table called employees,
Also, we can create a department table by,
Finally, we can create a Works_In table by,
(4) Insert an Instance
We can use the following code to insert a line,
INSERT INTO <tablename>
VALUES <value1, value2, value3, ...>;
We have to make sure that the values follow the rules we have set. For example, we run the following code to give instances to the tables,
INSERT INTO employees
VALUES (1, 'Diane', 'manager');
INSERT INTO employees
VALUES (2, 'Abigail', 'engineer');
We can also add two values at the same time, for example,
INSERT INTO departments
VALUES (1, 'Data Science'), (2, 'Human Resources');
Suppose we know that Diane works at the Data Science department and Abigail works at HR, so what we can do is to run,
INSERT INTO works_in
VALUES (1, 1), (2, 2);
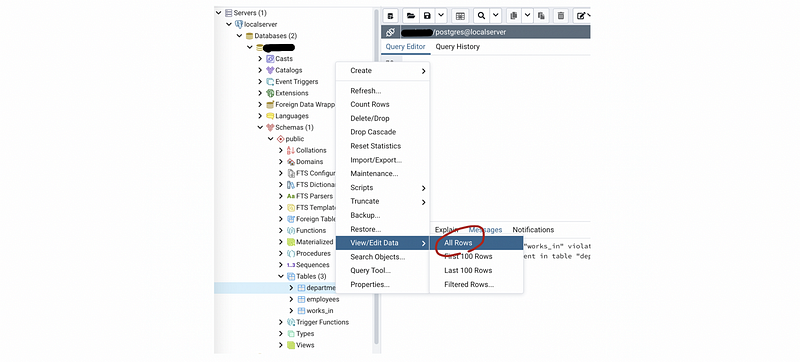
To see the change, we can right-click on the table we would like to show and choose All Rows.
(5) Load Data from a Given File
Suppose we have a .csv file that is located in the path <path> that we would like to load to a given table in the database, what we can do is,
COPY <tablename>
FROM '<path/filename.csv>'
DELIMITER ','
CSV HEADER;
we actually have this data file and you can have a try of the following code,
(6) Change an Existing Data
UPDATE <tablename>
SET <att1name> = <val_1>
    <att2name> = <val_2>
    ...
WHERE <constrains>;
(7) Change the Structure of the Table
ALTER TABLE <tablename>
<action>;
the action can be,
ADD COLUMN <attname> <datatype> <constraint>;
DROP COLUMN <attname>;
RENAME COLUMN <attname>
TO <new_attname>;
ALTER COLUMN <attname>
SET NOT NULL;
ALTER COLUMN <attname>
DROP NOT NULL;
RENAME TO <new_attname>;
(8) Remove Tuples from a Table By Given Constraints
DELETE FROM <tablename>
WHERE <constraints>;
(9) Delete a Table From a Database (if we know it exists)
DROP TABLE <tablename>;
(10) Delete a Table From a Database (if we are not sure whether it exists)
DROP TABLE IF EXISTS <tablename>;
(11) Remove the table and its dependent foreign key constraints in a referencing table
DROP TABLE IF EXISTS <tablename> CASCADE;
(12) Reject the removal if there is any object depends on the table
DROP TABLE IF EXISTS <tablename> RESTRICT;
Note that we don’t actually have to add this RESTRICT query because it is the default option.
(13) Retrieve or Show Data from a Table
SELECT <att1name>, <att2name>, ...
FROM <tablename>
WHERE <constraints>;
(14) Retain All the Data From a Table
SELECT *
FROM <tablename>
WHERE <constraints>;