Software Development Process 3 | Integrated Development Environment and Version Control System
Software Development Process 3 | Integrated Development Environment and Version Control System

- Integrated Development Environment (IDE)
(1) The Definition of Integrated Development Environment (IDE)
An IDE is a software application that supports software developers in many of their everyday tasks.
(2) IDE Features
IDEs have many useful features,
- Views: can be used to navigate project resources from different perspectives
- Source Code Editor: an editor that will allow you to browse documentation when you are writing code that uses a specific method. Also, they will give you the auto-completion when you start writing the name of an objection
- Version Control System: modern IDE will normally give you support for version control system
- Builders: IDEs also provide build and automation tools
- Runtime: IDEs give us runtime support so that we can run our projects from within the IDE or some aspects of the execution
- Testing: many IDEs also run tests within the IDE
- Debugger: many IDEs provide a graphical debugger
- Plug-Ins: IDEs can provide even more features with the plugins
(3) The Definition of Plug-Ins
If we imagine our IDE as a box, a plug-in is an additional functionality that you can actually plug into this box so that this box starts offering more features to the user. Plug-ins might be called differently on different platforms. For example, in Microsoft Virtual Studio, plug-ins are normally called add-ins, but the concept is more or less the same.
2. IDE Usage Example
(1) Introduction to Eclipse
Eclipse is an open, extensible development environment that was initially created by IBM and is now managed by the Eclipse Foundation. We choose this IDE because we can use Eclipse no matter what OS we are currently using, it can support the most common operating systems like MacOS, Windows, and Linux, and it also supports many other operating systems.
(2) Download and Install Eclipse
We can go to the official website of Eclipse and then we can download it to our computer. We have chosen Eclipse IDE for Java developers.
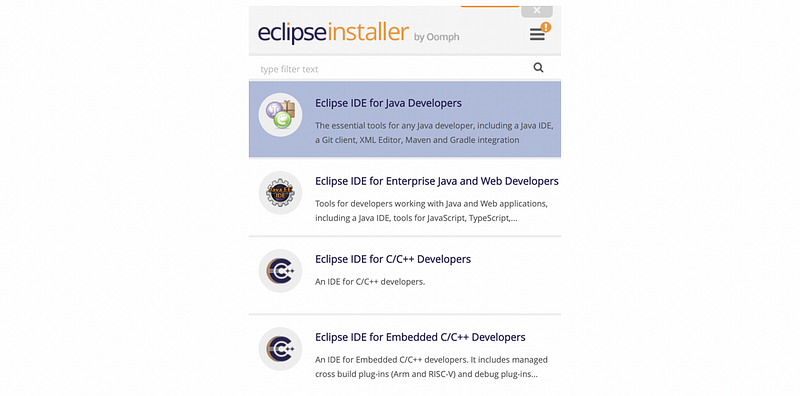
However, this Eclipse IDE is strongly NOT recommended for this series because IntelliJ is also a free and open-source software that has more features. We talked about Eclipse only for historical reasons and we will finally replace it later on.
(3) Installation of IntelliJ
We have discussed how to install IntelliJ, and you can refer to the following article to find out.
Series: Java Programmingmedium.com
(4) Envoironment Configuration for IntelliJ
For this series, we have to create a new project for IntelliJ. Select “Create New Project”, then choose Java version 11. Click on Next, then fill in the Project Name and choose a Project Location.
Project Name: Java
Project Location: .../Java
Then finally, we successfully create a project for this series of articles.
(5) Create a Package
Then, let’s create a package named edu.gatech under the src folder in the current project. We can right-click on the src folder and then select New > Package. The page name should be,
edu.gatech
Press enter to create this package.
(6) Create a Class
Let’s continue to add a class. We should right-click on the edu.gatech package we have created, then choose New > Java Class. Then we type in the class name,
HelloWorld
and press enter to create this class. We can find that now we have some template codes.
(7) Write a Hello World Program
In this class, we will implement, compile, and test a HelloWorld program. The program should be,
package edu.gatech;
public class HelloWorld {
    public static void main(String[] args) {
        System.out.println("Hello World");
    }
}
Then let’s see how we can run this code. Let’s first right-click in the view of this program and select Open in Terminal. Now we are in the directory of gatech. Run the following command line to compile this program,
$ javac HelloWorld.java
After that, let’s direct to the root directory src of this package,
$ cd ..
$ cd ..
In this directory, we can run this program by,
$ java edu.gatech.HelloWorld
Hello World
3. Version Control System (VCS)
(1) The Definition of Version Control System
The VCS is a system that allows you to manage multiple revisions of the same unit of information such as documents, source files, or etc. A VCS allows multiple actors to cooperate and share files.
(2) Benefits for Using Version Control System
The VCS is quite useful because it has many different benefits,
- Enforce Discipline: manage the process by passing the control from one person to another
- Archive Versions: we are able to store subsequent versions of source controlled items into a VCS
- Maintain historical information: we can also store information like the author, on what day, on what time, etc.
- Enable Collaboration: people can more easily share data
- Recover from Accidental Deletions or Edits: fix a wrong modification or deletion by recover from the accidental deletions or edits
- Conserve Disk Space: we can save the disk space because we don’t have many copies around
(3) Essential Actions for VCS
Now let’s discuss how the version control system actually works. Here are some essential actions that a VCS can actually perform,
- Add a file: we can add a file to the repository and at that point, the other people will be able to access that file with permissions
- Commit a file: when we configure a file locally, we would like to commit it to the repository so that all the other developers can see where has been changed
- Update a file: if we have a repository and someone else modified some files in it, we are able to get the changes that the other people made to the files in the repository
(4) Basic Workflow
Now let’s see the basic workflow for using a version control system.
- Person A: Add & commit
foo.txtto the repository - Person B: Update
foo.txtto the local environment - Person B: Modify and commit
foo.txtto the repository - Person A: Update
foo.txtto the local environment for getting a new version
All of these actions can be done in only a few minutes.
(5) Main “Don’t”s in VCS
There are two kinds of resources we don’t want to add to a VCS. These include,
- Derived files: we don’t need to add derived files (e.g. executable files like
.exe) derived by compiling because the source files are already in the repository - Bulky binary files: not a good idea to store them in a repository
Another common mistake is that some people don’t trust the VCS and they believe that it is necessary to make another local copy of the VCS files. However, we should never do this because it always leads to disasters. People always find this useless and risky, and it is quite common to be confused about which is the version that we are really using.
(6) Two Types of the VCS
There are two main types of VCS, the centralized VCS, and the decentralized VCS.
- Centralized VCS: means that there is a single centralized repository on which we commit files
- Decentralized/Distributed VCS: This means that all the developers have sort of a local repository in which they can commit files. This means that they can commit changes without the other users of the VCS being able to see these changes. When they are happy with the version and ready to release the version, they can push it to a central repository so that now the changes will become available to the other users.
There are several advantages for a distributed VCS,
- Having a local version: we can have a snapshot of your current working progress without informing the other users. There’s no way you can do that if you have a centralized VCS.
- Use multiple remote repositories: we can simply have more than one remote repository
4. VCS Example: Git
(1) An Introduction to Git
One good representative of the distributed version control system is called GIT, which is initially designed and developed by Linus Torvalds because he is unhappy with the existing version control systems, and wanted a different one.
(2) Installing Git
If we don’t have git on our computer now, we can go to the website of git and download it. For different operating systems, it may require different resources,
- Linux: Package
- MacOS: Xcode and Package
- Windows: Package with installer
(3) Fundamental Elements in Git Workflow
There are four fundamental elements in Git’s workflow,
- Workspace: the local directory
- Index: also called the stage
- Local repository: we also refer to this as
HEAD - Remote repository: like the Github
(4) File Status in a Workplace
Basically, if we consider a file in our workspace, it can be in one of the three possible states,
- Committed: the latest changes to the file are safely stored here
- Modified: the file has been changed and none of these changes have been saved to the local repository
- Staged: the file is basically a part of the index and it has been tagged to be considered in the next commit
(5) Git Commands
- create a local copy of the remote repository in the workspace
git clone <url>
- add a file that is in the workspace to the index
git add <filename>
- add a file that is in the workspace to the index, also consider the deleted files
git add -u <filename>
- commit the file that is staged to the local repository
git commit
- we can also conduct
addandcommitin one command by
git commit -a <filename>
- explicitly push your changes to a remote repository
git push
- get files from the remote repository to your local repository (
HEAD)
git fetch
- get the updated files from the local repository to the workspace
git merge
- the shortcut of getting files from the remote repository to the workspace
git pull
- compare the difference between the workplace and the local repository
git diff HEAD
- compare the difference between the workspace and the index/stage
git diff
(6) Git Demo
Now, let’s see how can we use Git. Before we start, let’s first set our configurations of the username and the email,
$ git config --global user.name "<username>"
$ git config --global user.email "<useremail>"
Then let’s start. First, let’s make a new dir myproject and move in,
$ mkdir myproject
$ cd myproject
Check if the current dir is a git repo. This tells that the current dir is not a git repo.
$ git status
fatal: not a git repository (or any of the parent directories): .git
We can make it a git repo by,
$ git init
Initialized empty Git repository in /Users/apple/myproject/.git/
$ git status
On branch master
No commits yet
nothing to commit (create/copy files and use "git add" to track)
Create a file called README ,
$ touch README
$ git status
On branch master
No commits yet
Untracked files:
(use "git add <file>..." to include in what will be committed)
README
nothing added to commit but untracked files present (use "git add" to track)
Then we have to tell the git that this README file should be considered in the index,
$ git add README
$ git status
On branch master
No commits yet
Changes to be committed:
    (use "git rm --cached <file>..." to unstage)
new file: README
Now we can see that git knows there’s a new file called README because it is staged. To commit this file, we can use,
$ git commit
Then we will be jumped to a text editor saying that we have to add a commit message.
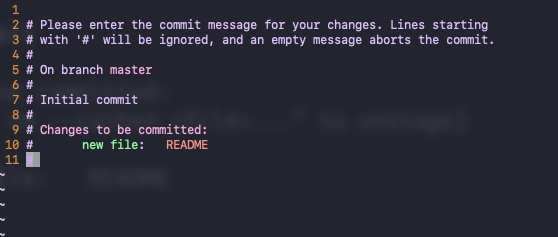
Press the hotkey I to enter Added README file in the first line and then press ESC > :wq to quit. Now the file is added to the git repository.
$ git commit
[master (root-commit) d3ea271] Added README file
1 file changed, 0 insertions(+), 0 deletions(-)
create mode 100644 README
If we want to make it simple by not opening a text editor, we can also type,
$ git commit -m "Added README file"
in the previous step.
If we check git status again, we can see that git tells us that there’s nothing to commit.
$ git status
On branch master
nothing to commit, working tree clean
Now let’s make some changes to the README file,
$ vim README
Then in the editor, we just write,
README file content
Once more, we can check the status,
$ git status
On branch master
Changes not staged for commit:
  (use "git add <file>..." to update what will be committed)
  (use "git checkout -- <file>..." to discard changes in working directory)
modified: README
no changes added to commit (use "git add" and/or "git commit -a")
It will know that the README file has been modified. This means that git finds out there’s a different version in the workplace. We can check the difference between the current README file in the workplace to the one we have committed,
$ git diff
diff --git a/README b/README
index e69de29..8b2b417 100644
--- a/README
+++ b/README
@@ -0,0 +1 @@
+README file content
You can see that README file content is added because it has an addition sign + in front of it. For deletion, you are able to see a minus sign. Before we want to commit the file, remember the file should always be staged. Otherwise, it will be ignored by the commit. At this time, we will use a shortcut,
$ git commit -a -m "Added README content"
[master f9321ef] Added README content
1 file changed, 1 insertion(+)
Let’s say if we want to see the history version of the repository, we can run git log . Then it will show you all the different commits for your repository, and each commit is going to have a commit ID (aka. a long hash value).
$ git log
commit f9321ef2b1c098860ef56d39d26bf55886e91683 (HEAD -> master)
Author: xxxxx <xxxxxx@xxxxxx.com>
Date:   Fri Sep 3 22:34:00 2021 +0800
Added README content
commit d3ea2717627148b76cb8b8772f0acf6d453b005b
Author: xxxxx <xxxxxx@xxxxxx.com>
Date:   Fri Sep 3 22:21:27 2021 +0800
Added README file
If we want to see the changes introduced by a commit, we can use the git show command. Actually, we don’t need to show the full ID of a commit, we can use only the first four values (e.g. d3ea).
$ git show d3ea
Author: xxxxx <xxxxxx@xxxxxx.com>
Date:   Fri Sep 3 22:21:27 2021 +0800
Added README file
diff --git a/README b/README
new file mode 100644
index 0000000..e69de29
(7) Github Authorization
Beginning August 13, 2021, Github no longer accepts account passwords when authenticating Git operations on GitHub.com. So we have to use another tool for Github Authorization. This useful tool is called the Github CLI. For Mac OS, we can download it by,
$ brew install gh
After installation, we can authorize Github by configuring,
$ gh auth login
We should choose GitHub.com or GitHub Enterprise Server , and then we can log in with the browser.
(8) Interact With Github
Now let’s try to clone a repo from the internet. Here, we are using the HTTPS protocol, but there are many others ways to use this. Note that you have to clone from your own repository.
$ git clone https://github.com/Sadamingh/myproject.git
Cloning into 'myproject'...
remote: Enumerating objects: 6, done.
remote: Counting objects: 100% (6/6), done.
remote: Compressing objects: 100% (3/3), done.
remote: Total 6 (delta 0), reused 6 (delta 0), pack-reused 0
Unpacking objects: 100% (6/6), done.
$ ls
myproject
Or, if we want to have a different project name, we can specify the name as follows,
$ git clone https://github.com/Sadamingh/myproject.git myproject2
Cloning into 'myproject2'...
remote: Enumerating objects: 6, done.
remote: Counting objects: 100% (6/6), done.
remote: Compressing objects: 100% (3/3), done.
remote: Total 6 (delta 0), reused 6 (delta 0), pack-reused 0
Unpacking objects: 100% (6/6), done.
$ ls
myproject myproject2
Then let’s go into one of these projects,
$ cd myproject
We can check the remote repository by,
$ git remote -v
origin https://github.com/Sadamingh/myproject.git (fetch)
origin https://github.com/Sadamingh/myproject.git (push)
Now let’s add a file newfile and commit it to our repository,
$ touch newfile
$ git add newfile
$ git commit -m "Add newfile"
[main 4bcc809] Add newfile
1 file changed, 0 insertions(+), 0 deletions(-)
create mode 100644 newfile
$ git push
Enumerating objects: 3, done.
Counting objects: 100% (3/3), done.
Delta compression using up to 8 threads
Compressing objects: 100% (2/2), done.
Writing objects: 100% (2/2), 930 bytes | 930.00 KiB/s, done.
Total 2 (delta 0), reused 0 (delta 0)
To https://github.com/Sadamingh/myproject.git
   b2d74f1..4bcc809  main -> main
Now let’s go to the other local copy myproject2 , and we have to pull the latest changes to this repo,
$ cd ..
$ cd myproject2
$ git pull
remote: Enumerating objects: 3, done.
remote: Counting objects: 100% (3/3), done.
remote: Compressing objects: 100% (2/2), done.
remote: Total 2 (delta 0), reused 2 (delta 0), pack-reused 0
Unpacking objects: 100% (2/2), done.
From https://github.com/Sadamingh/myproject
   b2d74f1..4bcc809  main       -> origin/main
Updating b2d74f1..4bcc809
Fast-forward
 newfile | 0
 1 file changed, 0 insertions(+), 0 deletions(-)
 create mode 100644 newfile
If we want to see which branch we are currently at, we can use,
$ git branch
* main
And we can find out that we only have one branch and main is our current branch. We can create a new branch by,
$ git branch newBranch
$ git branch
* main
  newBranch
To switch a branch, we have to use the git checkout command,
$ git checkout newBranch
Switched to branch 'newBranch'
$ git branch
  main
* newBranch
There is a shortcut for the commands above by -b option,
$ git checkout -b testing
$ git branch
  main
  newBranch
* testing
Now let’s create a new file testFile , then commit it to the current branch,
$ git add .
$ git commit -m "Add test file"
[testing b461149] Add test file
 1 file changed, 0 insertions(+), 0 deletions(-)
 create mode 100644 testFile
Now let’s switch to a different branch,
$ git checkout main
Switched to branch 'main'
Your branch is up to date with 'origin/main'.
$ ls
README.md file  newfile
We can find out that testFile is not in this branch. Let’s assume that we are happy with the modification of this file and we want to apply it to the main branch, what we have to do is to merge that branch to the main branch. To do that, we have to call,
$ git merge testing
Updating 4bcc809..b461149
Fast-forward
 testFile | 0
 1 file changed, 0 insertions(+), 0 deletions(-)
 create mode 100644 testFile
Now the testFile is in our current branch.
$ ls
README.md file  newfile  testFile
Let’s suppose we want to delete the testing branch because we don’t need it anymore, we can call
$ git branch -d testing
Deleted branch testing (was b461149).
$ git branch
* main
  newBranch
Now the testing branch no longer shows up. However, we can have some conflicts when we merge if we change the same file into different branches. Now let’s edit the file newfile and commit it,
$ vim newfile
new file in main
~
~
~
...
:wq
$ git commit -a -m "new file in main"
[main 9215838] new file in main
 1 file changed, 1 insertion(+)
Then let’s move to another branch, edit the file newfile and also commit it,
$ git checkout newBranch
Switched to branch 'newBranch'
$ vim newfile
new file in new branch
~
~
~
...
:wq
$ git commit -a -m "new file in new branch"
[newBranch cd93c87] new file in new branch
 1 file changed, 1 insertion(+)
Let’s now go back to the main branch and merge it with the new branch,
$ git checkout main
Switched to branch 'main'
Your branch is ahead of 'origin/main' by 2 commits.
  (use "git push" to publish your local commits)
$ git merge newBranch
Auto-merging newfile
CONFLICT (content): Merge conflict in newfile
Automatic merge failed; fix conflicts and then commit the result.
Now, we have a merge conflict problem and we have to fix it. Let’s now edit the file newfile ,
$ vim newfile
<<<<<<<< HEAD
new file in main
=======
new file in new branch
>>>>>>>> newBranch
~
~
~
...
We can choose a version to keep. Suppose we want to keep the content in main, we have to eliminate the other contents (by pressing dd in the line we don’t need),
new file in main
~
~
~
...
:wq
Then we can do normal add and commit for fixing this conflict,
$ git add newfile
$ git commit -m "fix conflict"
[main 3795086] fix conflict
5. Git Usage Assignment
(1) Update Git Configuration
Before you start, please check if you fill in the correct username and email address. We can check it by,
$ git config --list
We can change this information by,
$ git config --global user.name ...
$ git config --global user.email ...
(2) Git Authorization by GitHub CLI
Use GitHub CLI to authorize git,
$ gh auth login
Choose,
- What account do you want to log into? GitHub Enterprise Server
- GHE hostname: github.gatech.edu
- How would you like to authenticate? Login with a web browser
(3) Useful Git Commands
- to push all the branches,
$ git push --all
- release a lightweight version
v1.0of the current snapshot
$ git tag v1.0
- check the current tags
$ git tag
- push the current tags to the remote repository
$ git push origin --tags
(4) Restart from a Clean Slate
- Run
git logfrom within your local repository - Get the last commit ID in the list
- Run in each of the two terminals, and from the root of your repo:
$ git checkout master
$ git branch -D development temp
$ git push origin :development
$ git push origin :temp
$ git tag -d V1
$ git push origin :V1
$ git reset --hard <last commit ID>
$ git push --force
(5) Network View in Github
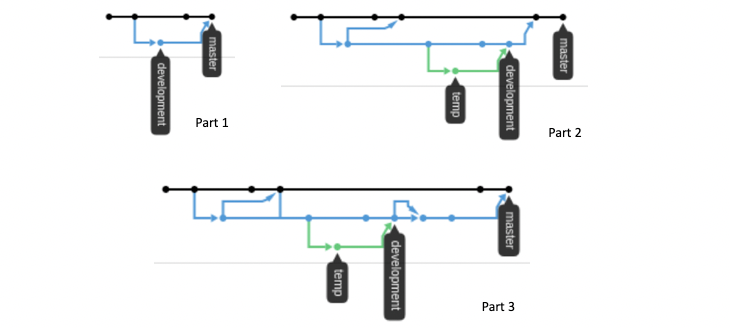
When we are done for each part, we can check the network view in github. If all the operations are correct, our network should look like the one in the figures below. You can find the network view in the main page of your repository, then select Insights > Network.
(6) Submission
To submit our solution, we should,
- Retrieve the commit ID by
$ git log -1
commit ...
and the commit ID is the long hexadecimal number after commit.
- Create a file named
submission.txt. The first line in this file should be your github username, and the second line should be the commit ID for your submission. - Submit this assignment to Gradescope.