Software Development Process 6 | Introduction to Android, Android Development, and a Case Study
Software Development Process 6 | Introduction to Android, Android Development, and a Case Study

- Introduction to Android
(1) What is Android?
Android is an operating system designed for mobile devices where mobile devices are devices that are characterized by the fact of having touch screens and sensors. An important characteristic of the Android operating system is that it is based on the Linux kernel. And in order to be able to run an application, it is powered by a Java-based virtual machine, which is called the Dalvik VM.
(2) Basic Architecture of Android
- APPs (top layer): Android apps are applications that are written in Java, and that get compiled into byte code, packaged, and installed on the Android system.
- Application Framework (layer 2): The application framework is that layer that provides the services that are needed by Android apps to run such as the Window manager, the telephony manager, the location manager, and the resource managers and there are many more.
- Android Native Libraries (layer 3–1): The Android native libraries provide APIs for various functionalities. For example, the DB APIs (e.g. SQLite), the WebKit APIs, the SSL APIs, OpenGL, and so on.
- Android Runtime (layer 3–2): In addition to the libraries, the same layer also contains the Android runtime which consists of the Dalvik virtual machine which we just discussed, and also the core Java libraries. Basically, the core Java libraries are the Android version of the standard Java libraries, also called JDKs.
- Linux Kernel (basic layer): this is the core of the Android operating system and it is a standard Linux kernel, as we said, with some customizations made by Google that can be used for interacting with the hardware.
(3) Android App Components
An Android application is slightly different from the traditional application, as it is a collection of several components of different types. We have,
- Activities
- Services
- Content Providers
- Broadcast receivers
And all these four components are connected by intents and tied together by what we call an Android Manifest which is an XML file that declares the components and some properties of your application.
(4) The Definition of Activities
An activity is a single screen with a user interface (UI). For example, a phone dialer is an activity. Here are some other things to know about activities,
- Independent Units: activities are independent units
- Coherence: activities can work together to form a cohesive wholes
- Invocable: activities can be invoked by other applications (i.e. invoke the camera)
- Extendable: we can create an activity by simply extending the activity class, which is part of the Android system
(5) The Definition of Service
A service is an application component that performs a usually long-running operation in the background while not interacting with the user. It is a way for the app to tell the system about something that it wants to continue doing in the background, even when the user leaves the application. For example,
- a service for playing music
- a download service
Because services run in the background and they don’t interact with the user, unlike an activity, services do not provide a UI. Similar to activities, the way to create a service is simply to extend the service class. Here are some main usages of the services,
- a way for APPs to run in the background
- a way for applications to expose some of this functionality. By doing so, applications can bind to the service and use the service.
(6) The Definition of Content Provider
The content provider provides a structured interface to a set of data such as a set of pictures or media files. For example, these include,
Insert()Update()Delete()Query()- etc.
As we saw earlier, Android contains an implementation of the SQLite Database manager. So, very often, apps rely on an SQLite database to store the data and a content provider to give it access to such data. In some cases, a provider can be used for accessing data within an application. In which case, the data will be application data, such as a list of items to be bought for a shopping list management application.
More generally, a provider can be used by an application to also share data with other applications. So in this case, all these applications will be able to access the same data through a common, well-structured interface, which is the one provided by the content provider.
(7) The Definition of Broadcast Receiver
The broadcast receiver is a receiver that can be registered to receive system or application events. What the broadcast receiver can do is register with the Android system a specific event of interest and the Android system will notify the broadcast receiver every time an event of that kind will occur.
For example, consider a music player. A music player could use a broadcast receiver to register for the event of incoming phone calls because it wants to suspend playing music every time there is an incoming phone call. Similarly, it could also register for the end of the phone call because it might want to resume playing music every time a phone call is ended.
(8) The Definition of Intents
The four components above that we just saw can be connected by using intents. An intent is an abstract description of an operation to be performed and it consists of two main parts,
- An action: the action is the action to be performed, which is indicated as a string. For example, a phone call.
- A set of data: the data is the data on which the action will operate. For example, a phone number.
They provide the developers with a way to perform late binding between different applications to connect applications that were not initially meant to be connected.
(9) An Example of Intents
Let’s imagine we are making a phone call. We first open the contact app, find the guy we want to connect with, and then click the calling button with a phone icon to make that call. This is an intent in which the action is call, and the data is the phone number for the person that you want to call. So what the final result is that we start an activity, and then another activity happens through the intent.
(10) Types of Bindings
When we use intents, it actually performs an action in one activity and another activity is started as a consequence. There are different ways in which this can happen,
- Direct Binding for Activities: the activity or the app generating the intent will directly start an activity from another application
- Direct Binding for Services: the app generating the intent could directly start the service
- Broadcast: the activity generating the intent and it could broadcast the event to all interested broadcaster receivers
(11) Android Manifest
The Manifest is what keeps an Android application together. It is actually an XML file that declares all of the steady components of your app, including,
- Activities
- Services
- Content providers
Broadcast receivers could be defined either statically in the Manifest or dynamically in run time, so they don’t necessarily have to be in the Manifest.
There are also some other features for the manifest,
- the manifest declares are all the permissions required for an app to work
- the manifest specifies the entry point for the application
- the manifest declares the version of the app
- the manifest declares the lowest Android SDK version for which is app is valid
(12) Android Activity Lifecycle
Because Android apps run in a multitasking environment, the runtime system routinely suspends, stops, and even kills applications and activities.
If you want an example, just think of the case of a phone call that arrives while you’re writing an email message. In such cases, what happens is that the phone application replaces your email client and gets in the forefront.
You can refer to the following diagram about the Android activity lifecycle.
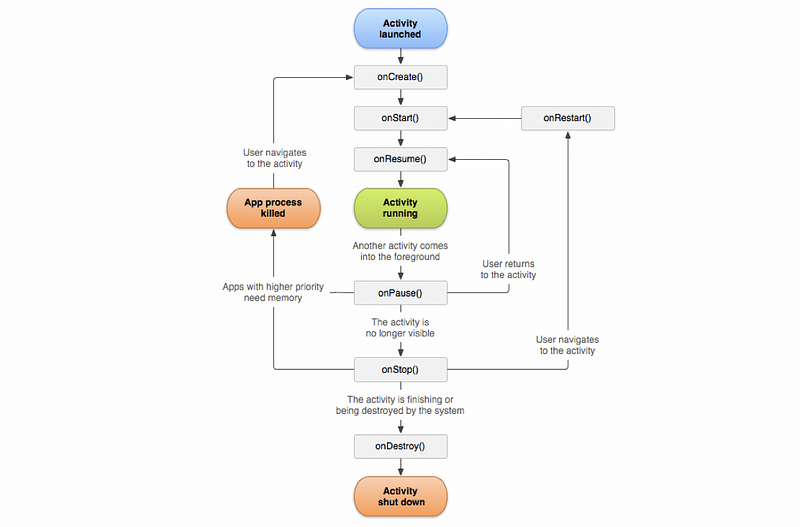
Let’s start from the top when activity A is launched, then the system will call different methods (e.g. onCreate(), onStart(), and onResume()) on the activity, and will put the activity in the foreground. What that means is that the activity will stay on the screen, visible, the user will be able to interact with the activity, and the activity will be in the running state.
At this point, two things might happen if another activity B is launched,
- Case 1: A may lose its focus but still be visible. B is a transparent activity, so it has focus but we can still see the original activity behind it. In this case, the system will call
onPauseon Activity A and the activity will be in the paused state. What can happen next is that activity A might be killed or destroyed. - Case 2: B is being launched is completely obscuring my original activity A, which is a kind of more standard case. In this case, the system will call
onStopon A and the activity will be in the stop state. Similar to the pause state, activity A still retains all of the state information but it is more likely that it will be killed or destroyed by the system.
So in the paused state or the stop state, barely three things can happen to our original activity,
- If the user happens to go back to the activity, the system will recreate it basically, so it will restart it from scratch.
- When your activity is paused or stopped, the activity is finishing or is being completely destroyed by the system with
onDestorymethod. - If the activity is not killed, is not destroyed, and the user then simply returns to the activity. In this case, the system will call
onRestart()on the activity and the activity will go back to the running state.
2. Android Development
(1) Download and Install Android Studio
Before we start, we have to download and install the Android Studio for Android development. What we have to do is to go to the download page of the official website and then download the latest version.
Note that the users in China can only successfully download SDK by assigning a proxy. To do so, you have to choose HTTP Proxy > Manual proxy configuration, and then select SOCKS. You also need to fill in the hostname and the port number.
(2) Starting a New Android Studio Project
Select New Project > Phone and Tablet > Empty Activity, then click on Next to continue.
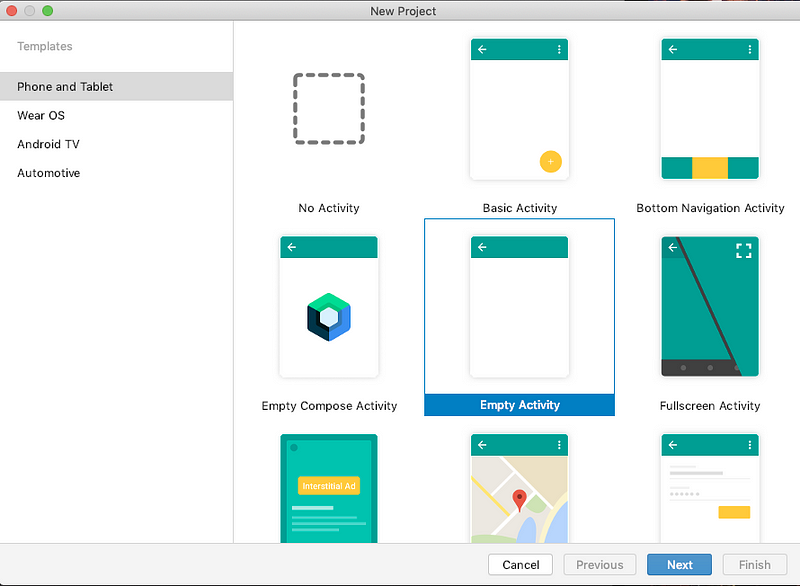
Set the file name as,
Converter
And then specify a specific location for this file. Select the language as Java instead of Kotlin. We will run our example project based on the API 26: Android 8.0 (Oreo). Finally, click on Finish to create this project.
Debuggers:
Cause: dl.google.com:443 failed to respond: This means that you can not access thegradleresource from Google. You have to open the file~/.gradle/gradle.properties,
$ vi ~/.gradle/gradle.properties
and then comment on two HTTPS proxy addresses.
License for package Android SDK Build-Tools xxxxx not accepted.: This is probably because the Android SDK was not successfully installed. You have to go to the SDK manager and find out what’s wrong.
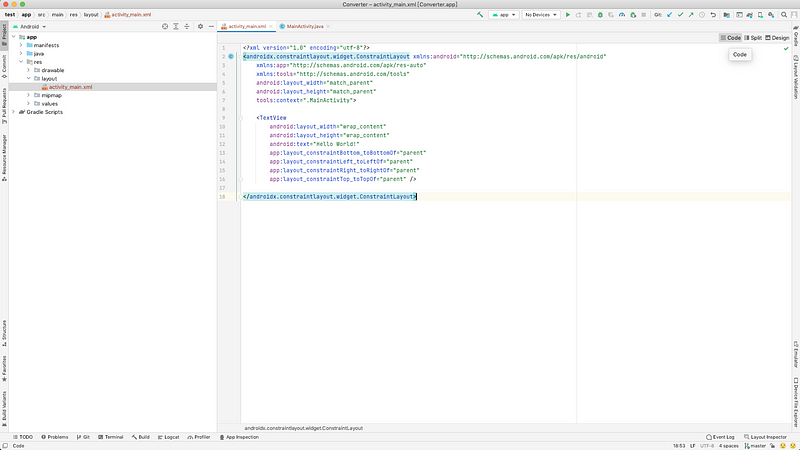
(3) Build a Hello World Demo
Then we can Select app/res/layout/activity_main.xml . This is the XML file for the activity user interface.
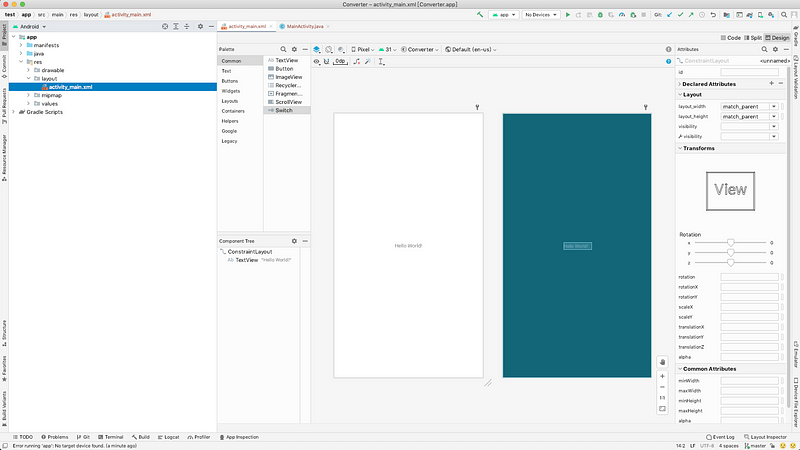
If you select Code, then you will find out the XML layout is actually some XML code that we can modify. However, working in the Design view will be easier for the developers so we don’t have to refine the raw code.
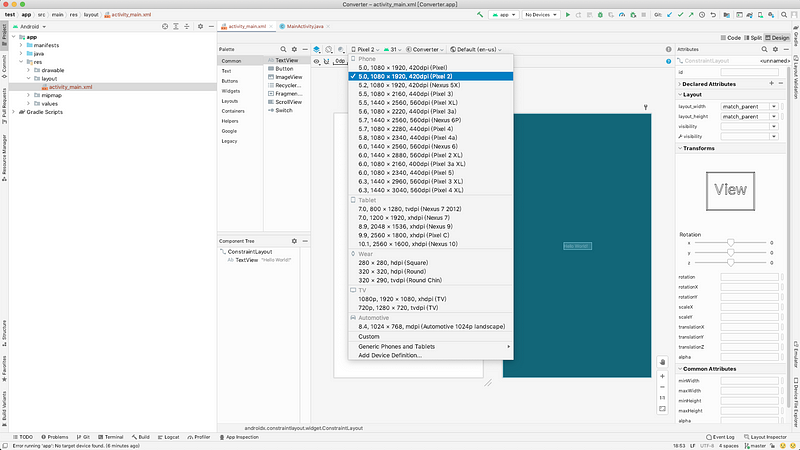
In order to run this Hello World demo, the first thing that we are going to do is to choose a target device. In this case, we are going to select Pixel 2 phone.
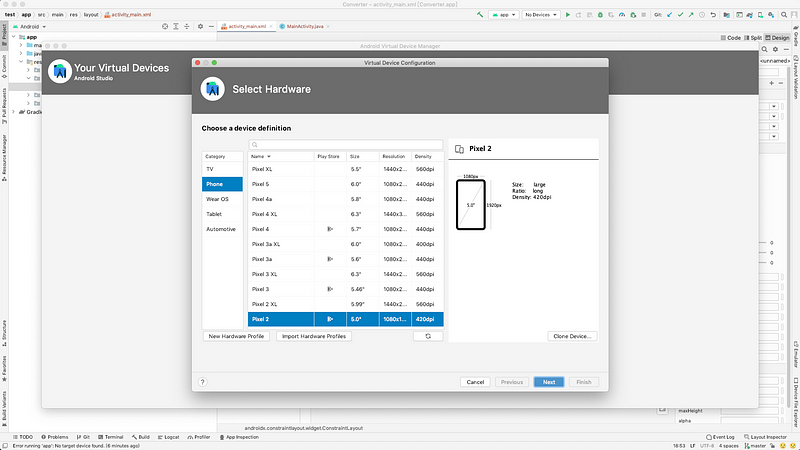
Then we have to choose a device by the ADV Manager,

Here we will select Pixel 2, click on Next.
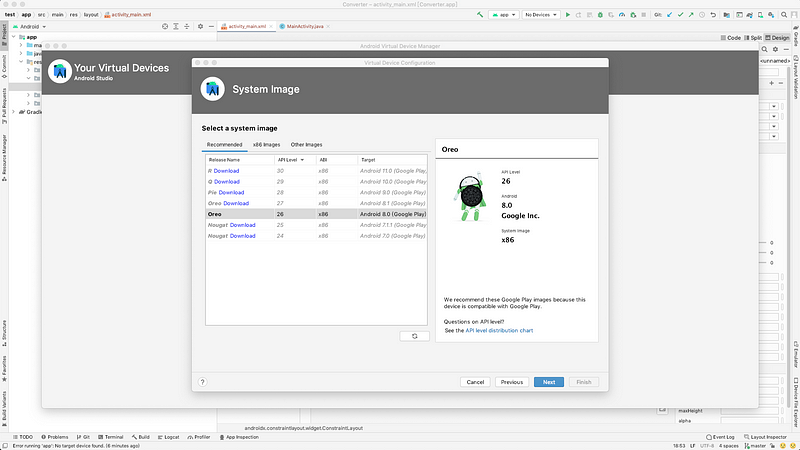
And then download the device of Oreo x86 Android 8.0 if you haven’t got it. After you finish, click on Next to continue. Finally, click on Finish to save this device.
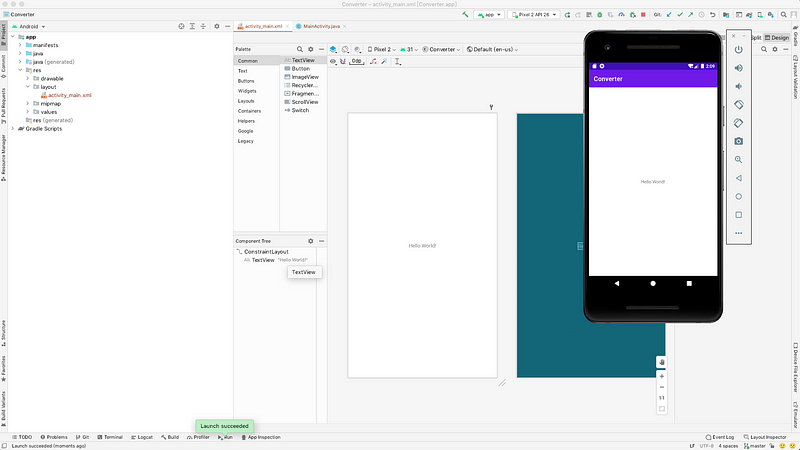
Then we can click on the Run ‘app’ button to run this empty script with Hello World.
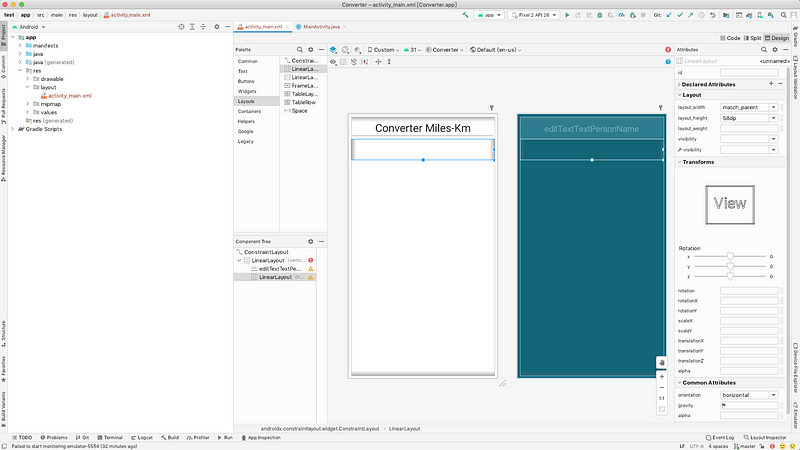
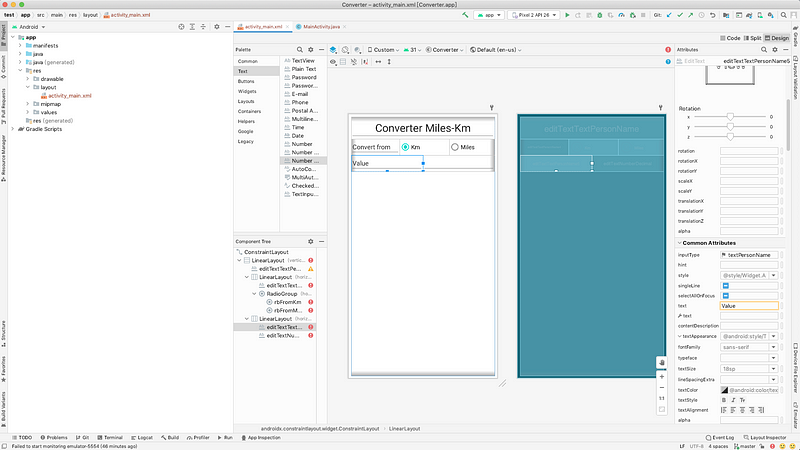
(4) Build a Converter Layout
Now that we have this Hello World activity, what we will do is to create the converter as we wish.
- Delete the HelloWorld String: click on it and delete
- Pick a vertical layout for the app by selecting Layouts > LinearLayout (vertical), then drag and release it on the view
- Add a title by Text > Plain Text, drag, and release it onto the view. Change the text to
Converter Miles-Kmand Align center with the bold font of 30sp size.

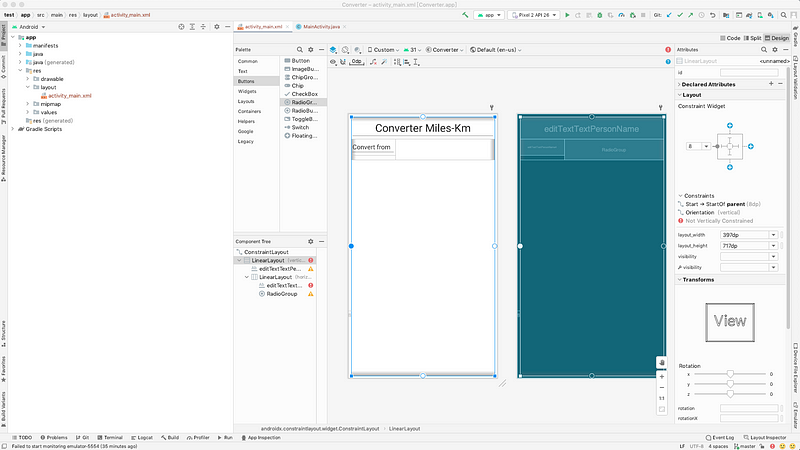
- Add another horizontal layout below the app title, and then reduce its height a little bit
- Create a new Plain Text in this layout as a label, rename it as
Covert from - Then add a new Buttons > RadioGroup at this place, reduce its size a little bit to show the full string of
Convert from
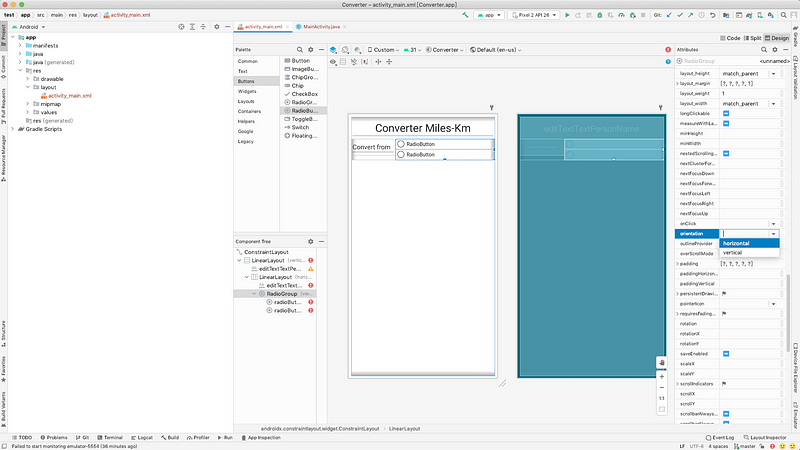
- Then add two Buttons > RadioButtons at this place. Then select the RadioGroup we have created, find All Attributes in the Attributes tab. Choose horizontal for the orientation.
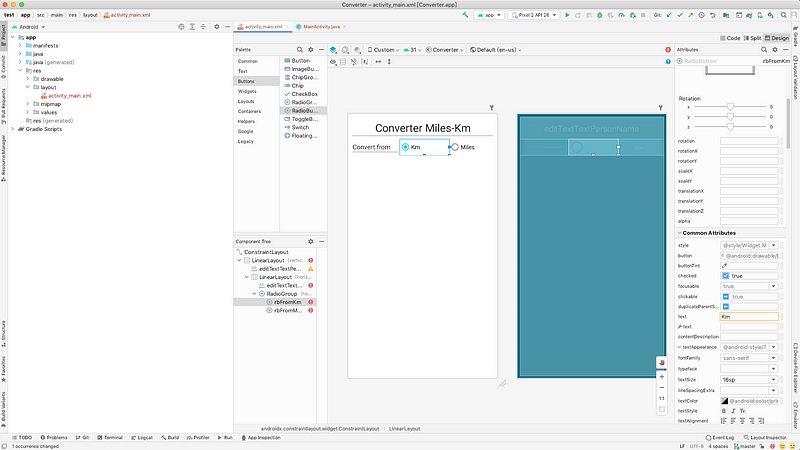
- Then we rename these two buttons to
KmandMiles, the font size of them should be 16sp. Change the id of these two buttons torbFromKmandrbFromMiles, respectively. Also, set the check value of therbFromKmbutton to checked, so it will be checked by default.
- Create another horizontal layout. Add a Plain Text in it with text
Value, and also put a Number (Decimal) right after it. Rewrite the id of the Number (Decimal) tovalue.
- Similarly, add another horizontal layout. Add a Plain Text in it with text
Result, and also put a Number (Decimal) right after it. Rewrite the id of the Number (Decimal) toresult.
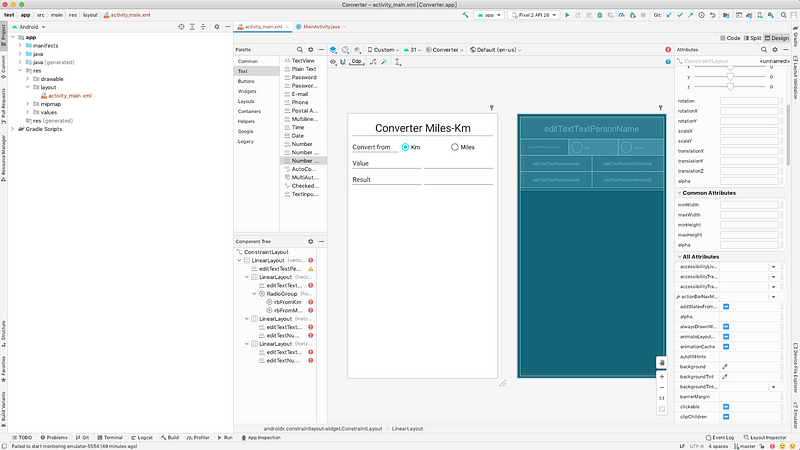
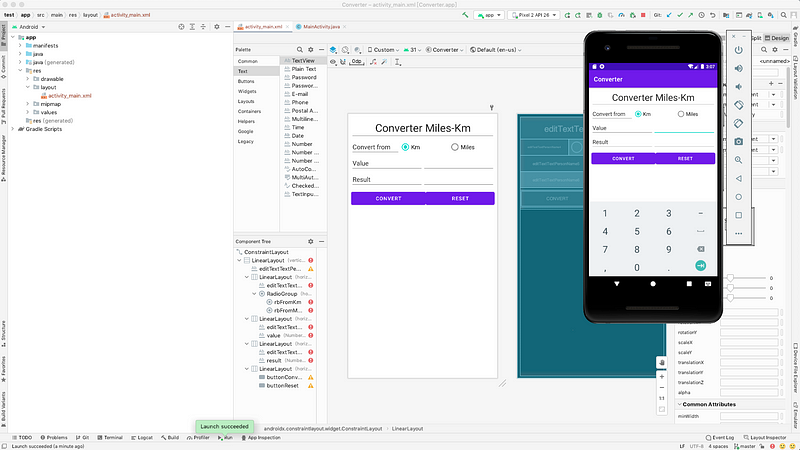
- Then create a horizontal layout after it. Add two buttons with text
CONVERTandRESET. Set the id of them asbuttonConvertandbuttonReset.

- Finally, we can run this again to check the layout of our configurations.
(5) Program for the Converter Logic
To make our activity work, we have to write some logic behind its layout, and we can add the logic by modifying the MainActivity.java file.
- First of all, we need to create four private attributes
rbFromKm,rbFromMiles,textValue, andtextResult
private RadioButton rbFromKm;
private RadioButton rbFromMiles;
private EditText textValue;
private EditText textResult;
- Then in the function
onCreate, we have to link these values to the IDs,
rbFromKm = (RadioButton) findViewById(R.id.rbFromKm);
rbFromMiles = (RadioButton) findViewById(R.id.rbFromMiles);
textValue = (EditText) findViewById(R.id.value);
textResult = (EditText) findViewById(R.id.result);
- Then we have to build the necessary logic of the converter. We have to build two functions
milesToKMandkmToMiles,
private String milesToKM(String Miles) {
    Double m_value = Double.parseDouble(Miles);
    Double km_value = m_value * 1.609;
    return String.valueOf(km_value);
}

private String kmToMiles(String km) {
    Double km_value = Double.parseDouble(km);
    Double m_value = km_value / 1.609;
    return String.valueOf(m_value);
}- Build another function called
handleClickand use this function for the convert logic and reset logic.
public void handleClick(View view) {
    switch(view.getId()) {
        case R.id.buttonConvert:
            String result;
            String value = textValue.getText().toString();
            if (rbFromMiles.isChecked()) {
                result = milesToKM(value);
            } else {
                result = kmToMiles(value);
            }
            textResult.setText(result);
            break;
        case R.id.buttonReset:
            rbFromKm.setChecked(true);
            rbFromMiles.setChecked(false);
            textValue.setText("");
            textResult.setText("");
    }
}- Go back to the
activity_main.xmllayout. Select the two buttons (buttonConvertandbuttonReset) and then choose Attributes > Common Attributes > onClick > handleClick so that the button will be linked to our operation functionhandleClickin theMainActivity.java.
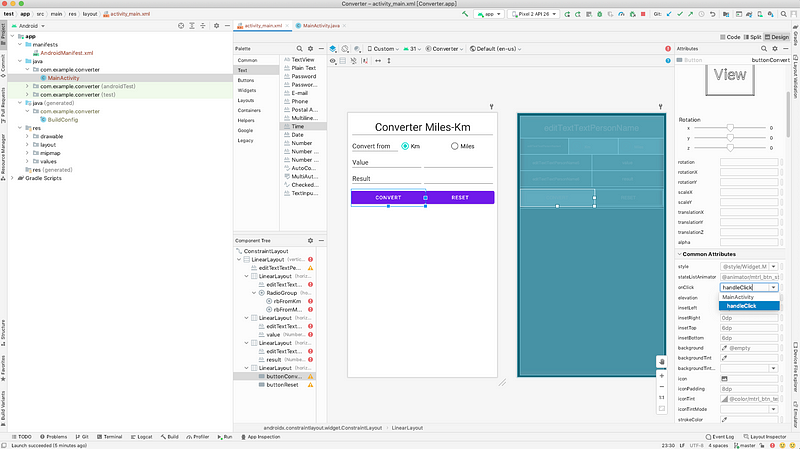
- Now let’s try out our activity, and you will see that this app works.
(6) Debuggers
However, even though our activity works just fine for the converter logic, there is one exception we would like to deal with. Now try if you enter nothing in the EditText value and then press convert, our activity will crash because it can not handle converting the NULL value.

So what we will do is to modify the MainActivity.java program and make it work. So basically, we have to write a condition statement and see if the length of the value equals 0,
if (value.length() == 0) {
    Context context = getApplicationContext();
    CharSequence text = "Error: empty value.";
    int duration = Toast.LENGTH_LONG;
    Toast toast = Toast.makeText(context, text, duration);
    toast.show();
} else {
    if (rbFromMiles.isChecked()) {
        result = milesToKM(value);
    } else {
        result = kmToMiles(value);
    }
    textResult.setText(result);
}
I would like to talk about this code a little bit more. To show an error text message, what we will commonly do is to call Toast.makeText function, and we have to decide the context, the string we want to show, and the duration of this message.
So finally, let’s check our code out, and we can see that it meets the our expectation.

3. Case Study: Simple Android App
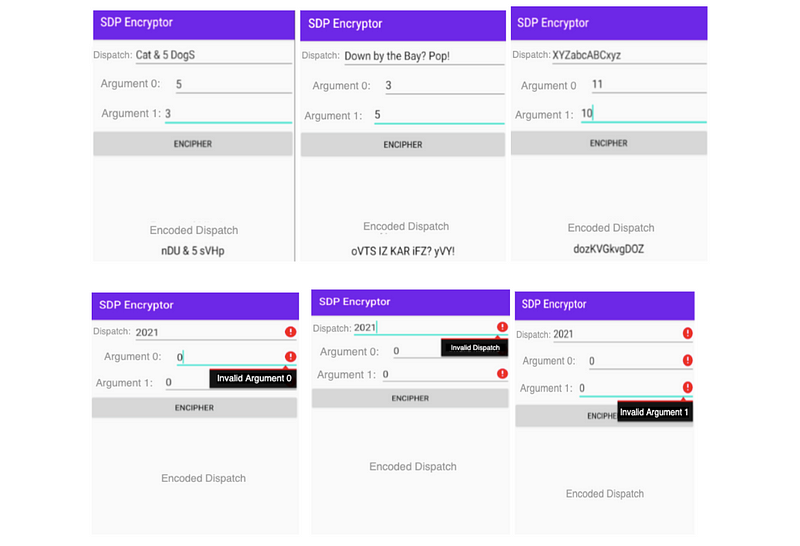
(1) Inputs and Outputs
- Project name:
SDPEncryptor - Message to be encoded:
Dispatch(id =dispatchID) initially blank - First parameter:
Argument 0(id =arg0ID) initially 1 - Second parameter:
Argument 1(id =arg1ID) initially 1 - Encipher button:
ENCIPHER(id =encipherButtonID) - Result:
Encoded Dispatch(id =encodedDispatchID)
(2) Build the Environment
- Go to the root directory for the last assignment
$ cd .../6300Fall21<GT username>
- Pull the latest version of your code
$ git pull
- Build a new folder called
Assignment4and direct to it
$ mkdir Assignment4
$ cd Assignment4- Create an empty Android app project in this folder named
SDPEncryptor, note the package name:edu.gatech.seclass.sdpencryptorand note the minimum SDK:API 29: Android 10.0 (Q) - In the
build.gradlefile, include the following dependencies, and then choose Sync Now.
testImplementation 'junit:junit:4.12'
androidTestImplementation 'androidx.test.ext:junit:1.1.1'
androidTestImplementation 'androidx.test.espresso:espresso-core:3.2.0'
androidTestImplementation 'androidx.test:rules:1.1.1'
If some dependencies are missing, make sure to add them. There may be newer versions of some of the dependencies available, but you should use the ones we recommend anyway.
(3) Suggested UI
We suggest that you try to generate a user interface (UI) similar to the one shown above, but you don’t have to.
(4) Phases for Implementation
- Create the UI
- Edit the identifiers
- Set the private attributes
- Link the private attributes
- Write the
onClickfunction - Write the encoding logic function
- Handle the constraints of the arguments with
setErrorwith reference, make sure to handle the coprime case carefully - Try and pass the manaual test case
- Download the testing script, put and unpack its contents in the directory
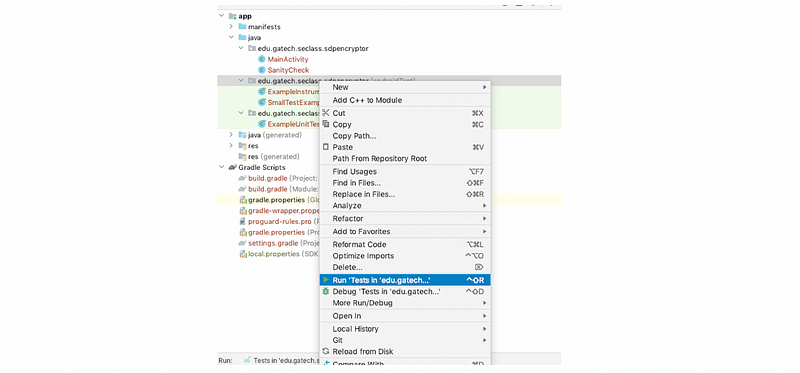
.../Assignment4move the fileSmallTestExamplesandSanityCheckinto the corresponding folders - Run the test by right-click on
edu.gatech.seclass.sdpencryptor, and then chooseRun 'Tests in 'edu.gatech...'. If you meet an error ofandroid:exported needs to be explicitly specified for <activity>, you need to modify thetargetSDKvalue from31to29in thebuild.gradle (Module ...)file.
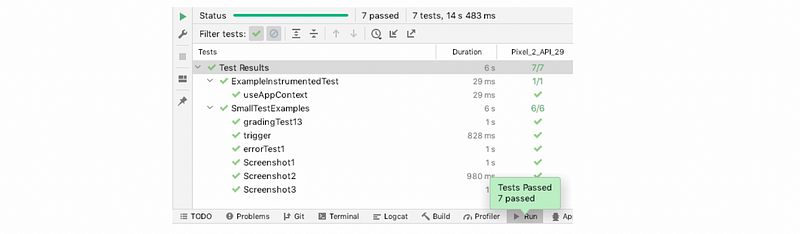
- Check the testing result and see if you can pass all of them.
- In the root directory, add the following content in
.gitignorefile
*.iml
.gradle
local.properties
.idea/workspace.xml
.idea/libraries
.idea
.DS_Store
build
captures
.externalNativeBuild
- Add a
manual.mdfile that shows how to use the app inAssignment4directory. - Push it to GitHub,
$ git add SDPEncryptor manual.md
$ git commit -a
$ git push
- Submit the
submission.txtfile to GS.
(5) Lint Exception Handler
If your build fails with an error Task :app:lint FAILED or similar, you should be able to fix the issue by “inferring constraints” for your layout. Android studio will do it for you automatically, just go to your activity_main.xml file, hover over the error reported, and the IDE should give you the option to fix it. Alternatively, you can also disable the lint task for your project by adding the following to build.gradle:
android {
    //...
    lintOptions {
        abortOnError false
    }
}