Video Game Design 4 | Unity Animation Case Study
Video Game Design 4 | Unity Animation Case Study
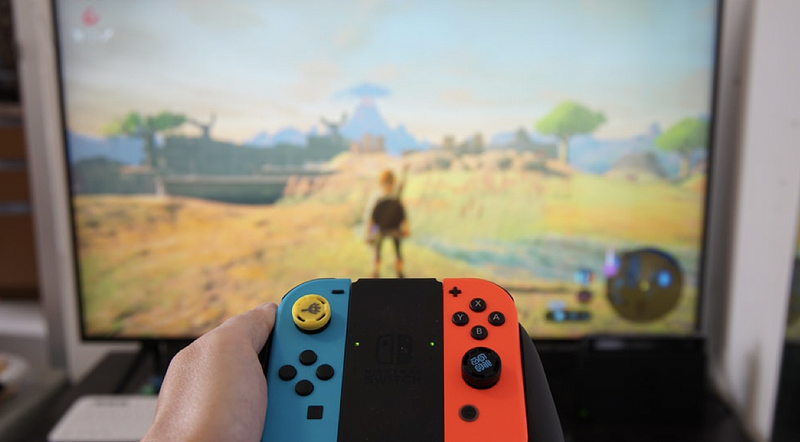
- Unity Interactive Animation
(1) Clone the Unity Template
Before we start, let’s first clone the template CS4455_M1_Support from GitHub. You can find it here. Note that we must have the GitHub enterprise account for Gatech before we clone this file.
After having cloned this template, we can open it as a project through Unity Hub.
(2) Default Scene
Before we talk about the animations, let’s first play through the template so that we can know what it goes by default. Let’s hit the play button of the game,
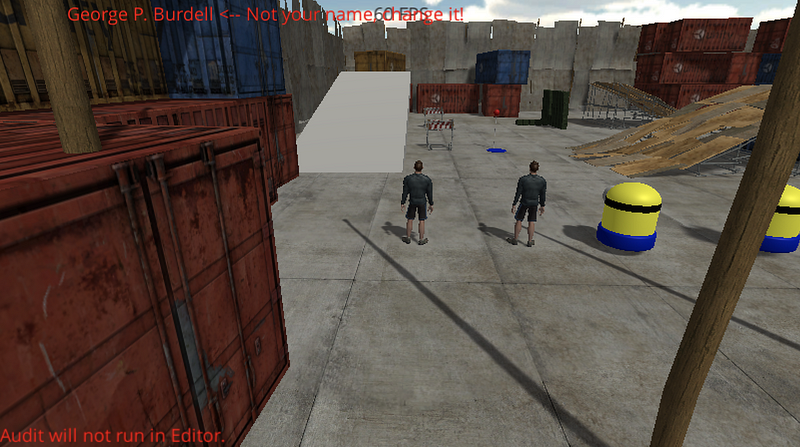
We can notice there are four characters, two humanoids (rigged skeletal animated mesh models), and two minions (Unity primitive objects). Actually, we have different movement approaches for these objects and we would like to move them around.
(3) Problems for the First Humanoid
We can press WASD to move the first humanoid around, and we can also press T to switch among different characters. In addition, we can change the speed of each character by the number keys 1 (minimum speed) to 9 (maximum speed). The key 0 means the full speed, which is the default speed we have for each character. We can find out that the movement of the first humanoid doesn’t seem that good, and we can see,
- Weird feet: the feet slide on the ground
- Skating on ice: if we have a slower speed (≤ 6), it seems like we are skating on ice
- Turn: not so good
- No root motion
If we press T and check another humanoid, things will be a lot better for us because we have embedded root motion for this character.
The downside of root motion is that sometimes character control can be less responsive because one needs to wait for animations to accomplish the desired movement rather than just immediately executing a translation or rotation. It’s quite common to use root motion for translation but use programmatic rotation for turning. In fact, a lot of Unity demos you find online use this hybrid approach as a compromise.
(4) Minion Movements
We have also have a look at the movements of two minions. It is quite easy to see that the first minion moves with a jumping motion and the second one is only sliding.
(5) Open Animation and Animator Window
Select Window > Animation > Animation and Window > Animation > Animator to open both the animation and the animator windows in the view. So that we can check out how different animation works for different characters.
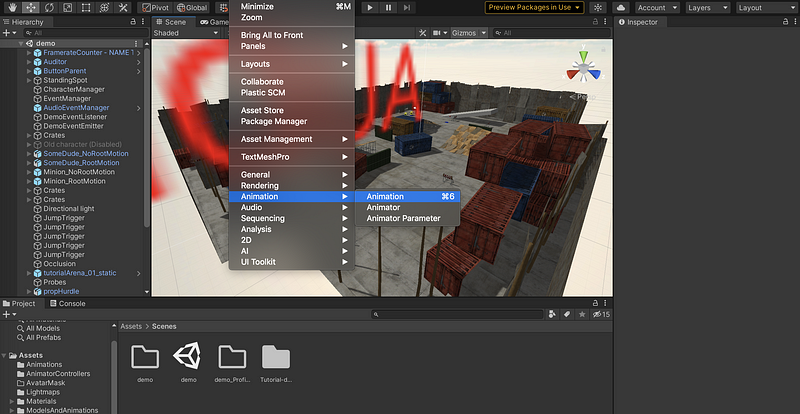
If would be better to use if we put them in a new window next to the current Scene view. You can make it by select and drag the Animation and Animator window tag to the position you want. We can put the Hierarchy window next to the Assets below.
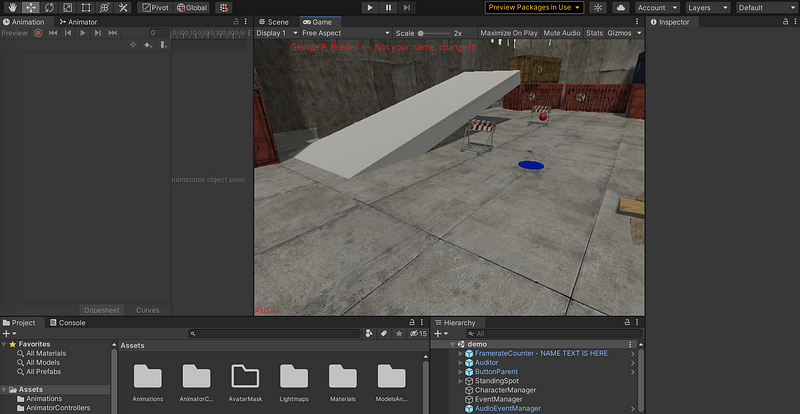
(6) Character Input Controller
We have played the game and we can use WASD or the arrows to move. In addition, we can hit numerical keys 1–9 and 0 to change max speeds. 0 is full speed (default). 1 is slowest (10% of full). The keys in-between change the max speed in increments of 10%. Also, Q and E can be used for 50% turn rates.
However, which file controls all of this? This special input code can be found in Project: Assets/Scripts/CharacterControl/CharacterInputController.
At the beginning, we should setup h variable as our horizontal (left and right key) input axis, and also setup v variables as our vertical (up and down keys) input axis. We can do filtering here instead of the InputManager by GetAxisRaw function.
float h = Input.GetAxisRaw("Horizontal");
float v = Input.GetAxisRaw("Vertical");
If we have to map a square coordinate to a circular, we have to do the following calculation and you can find a proof here,
h = h * Mathf.Sqrt(1f - 0.5f * v * v);
v = v * Mathf.Sqrt(1f - 0.5f * h * h);
Also, we have to define the letter keys. We can use Input.GetKey for getting the values from the keyboard. If we find Q, E, or other numbers, we have to assign the corresponding values. For example,
Input.GetKey(KeyCode.Q)
Input.GetKey(KeyCode.E)
Input.GetKeyUp(KeyCode.Alpha1)
...
Input.GetKeyUp(KeyCode.Alpha0)
Finally, we should do some filtering of our input as well as clamp to a speed limit. We have to call Math.Clamp and Mathf.Lerp for the final result,
filteredForwardInput = Mathf.Clamp(Mathf.Lerp(filteredForwardInput, v, Time.deltaTime * forwardInputFilter), -forwardSpeedLimit, forwardSpeedLimit);
filteredTurnInput = Mathf.Lerp(filteredTurnInput, h, Time.deltaTime * turnInputFilter);
In the end, let’s update the position by,
Forward = filteredForwardInput;
Turn = filteredTurnInput;
(7) Root Motion for the Humanoid
We have talked about the root motion previously, and now let’s analyze it in details. In project, we have two GameObject named SomeDude_NoRootMotion (1st humanoid) and SomeDude_RootMotion (2nd humanoid) respectively. We have seen that the humanoid with root motion looks better especially with different speeds. This is because the root motion animation allows translations and rotations to slightly speed up or slow down, coinciding with natural movement. This gives the feet of the model a much more planted and realistic look.
However, the downside of root motion is that sometimes character control can be less responsive because one needs to wait for animations to accomplish the desired movement rather than just immediately executing a translation or rotation. It’s quite common to use root motion for translation but use programmatic rotation for turning. In fact, a lot of Unity demos you find online use this hybrid approach as a compromise.
(8) Better Movement for the 1st Humanoid
In SomeDude_NoRootMotion’s control script, try disabling the code that sends the rotation input to the animator and test it out. The script for controlling SomeDude_NoRootMotion is the file BasicControlScript.cs. In this file, the corresponding lines for updating the inputs are lines 101 to 103,
101 anim.SetFloat("velx", inputTurn);
102 anim.SetFloat("vely", inputForward);
103 anim.SetBool("isFalling", !isGrounded);
And the line 101 is what we want to find because it controls the rotation input (i.e. inputTurn). We have to disable this code by,
// anim.SetFloat("velx", inputTurn);Then save and replay the game. Now, you will probably find that this looks better. Without the subtle root motion corrections, the leaning into the turn is very hard to get to where it looks good using programmatic control. In this case, simply not using turn animations is often better.
(9) Running Animations for the 2nd Humanoid
Now let’s look into making SomeDude_RootMotion more capable by adding some run animations. Since he can only move as fast as the animations allow, run animations will really help him out.
Let’s first select Hierarchy > SomeDude_RootMotion, then go to the Animator view. Drill down into the Blend Tree-Forward state.
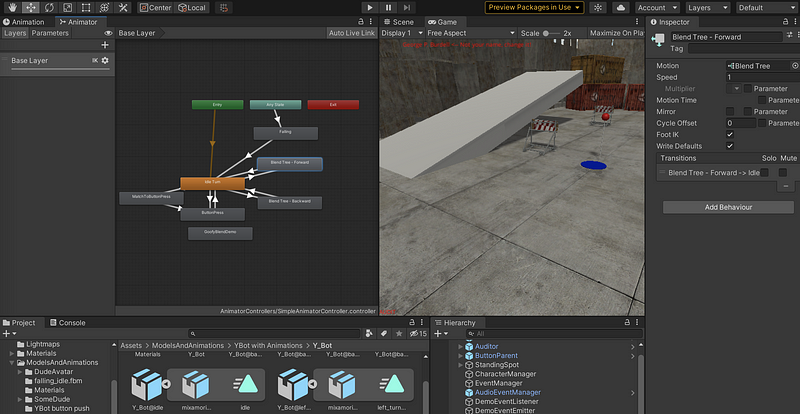
Select the Blend Tree and observe the 2D Freeform Directional blendtree in the Inspector. You can press the Play button to see the movement of the skeleton. Also, you can drag the red dot 🔴 (like the thumbsticks) in the parameters view to see different animations.

Then let’s go back to the Basic Layer and select Groofy Blend Demo. Here we can see a demo of the running behavior. You can also observe the 2D Freeform Directional blendtree in the Inspector.
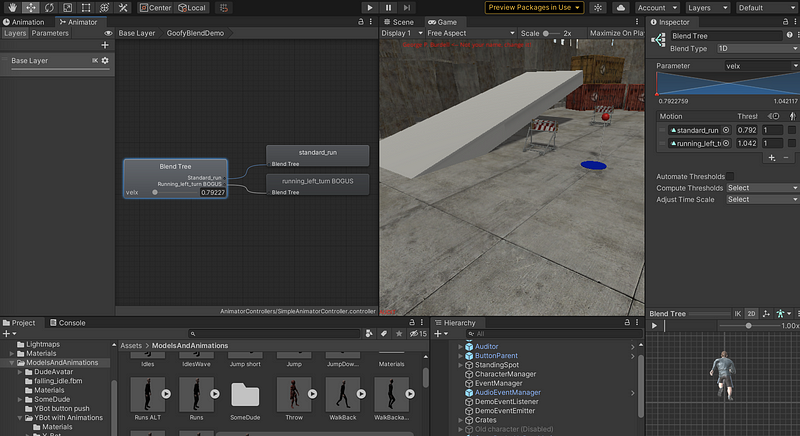
Now, let’s go back to the Blend Tree-Forward state and see if we can add some running animations. You can find Run, RunLeft, and RunRight animations under ModelsAndAnimations > Runs.
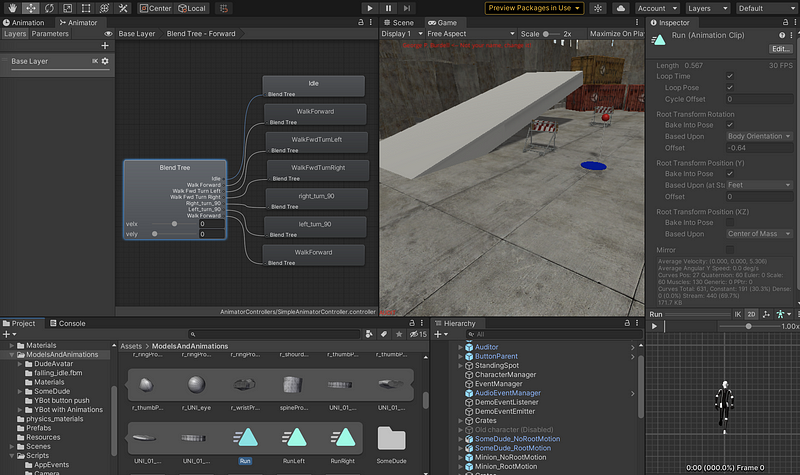
To add a running animation, we have to select the Blend Tree > Inspector > + > Add Motion Field to create a new motion,
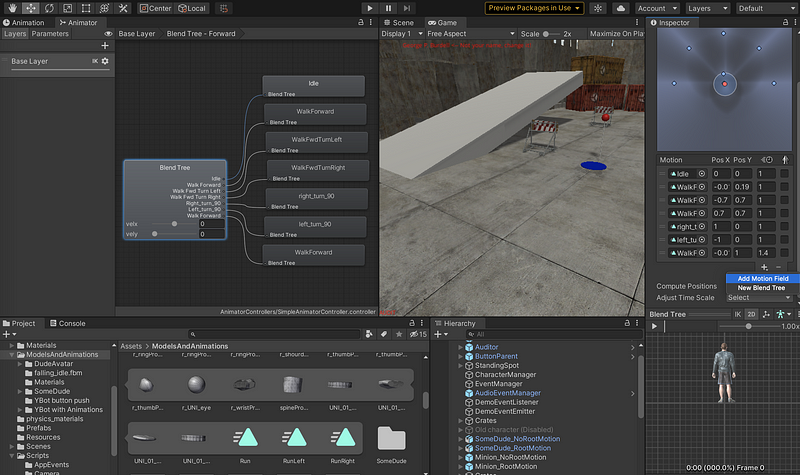
Then, we can drag the Run animation in ModelsAndAnimations to the Motion field we just created. We should also change the position of this newly created field. The Pos X of it should be 0 and the Pox Y of it should be 1. To make things even clear and to avoid conflicts, we also have to change the WalkForward movement with its Pos Y equals 1 to value 0.6. After this, we can drag and move the red dot again to see the running movements.
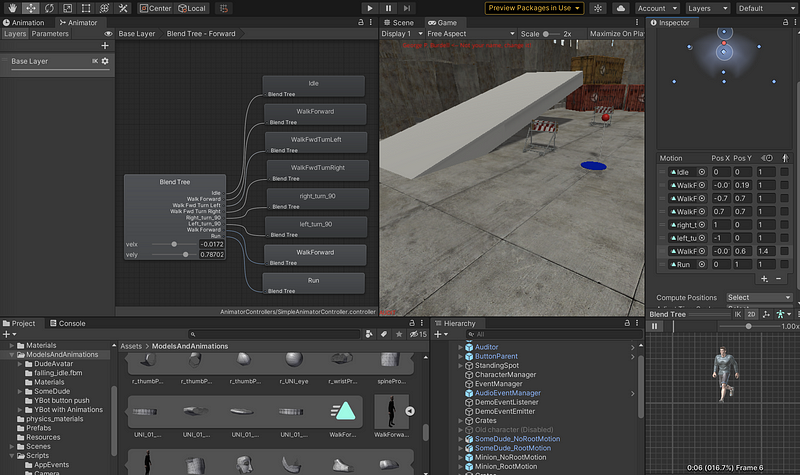
Once you get everything dialed in, run the game and test things out a bit. Now, you can see that the second humanoid can run by default, and if we change it to a lower speed, it will walk.
(10) Tricky Tweaks for Running Movements
Next up, let’s see if we can add an extra degree of control over SomeDude_RootMotion’s animations. Since you probably don’t have the 3D animation software or motion capture hardware to revise the animations, you’ll want to know about other methods of tweaking root motion. Basically, there are two ways for these settings,
- Adjust animation Mecanim state Transitions: this is the first way to tweak the movements. We can configure it by clicking on the lines in the Base Layer, and then choose to modify Inspector > Settings > ExitTime, TransitionDuration and other settings.
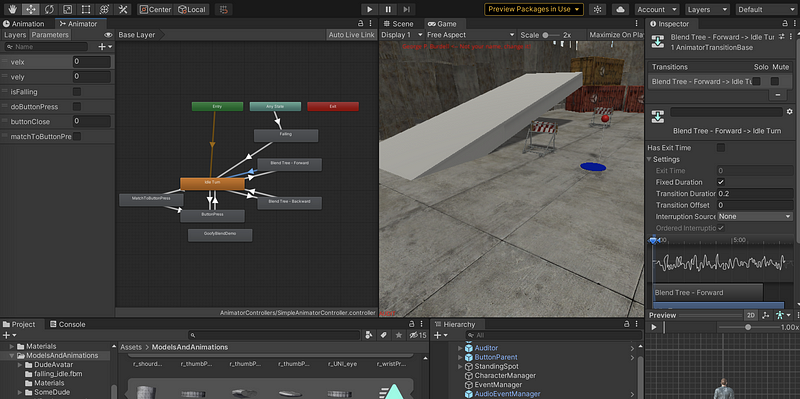
For instance, we can disable ExitTime for immediate animation transitions to speed up responsiveness. This can be done by uncheck the box of Has Exit Time. Also, the TransitionDuration (i.e. 0.2 in our example) can be shortened for the same purpose or increased to make cleaner and more realistic looking animations due to the blending.
- Add some tweaks to the playback of animations: For example, with
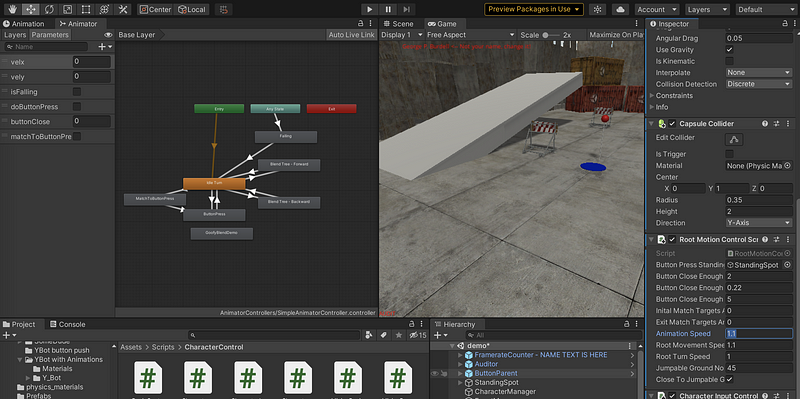
SomeDude_RootMotion, we can add three public member variable floats to theRootMotionControlScript: namelyanimationSpeed,rootMovementSpeed, androotTurnSpeed(default values of 1f).
In our template, we should go to open the script RootMotionControlScript and then modify its content. First of all, let’s add these three public float variables. I am going to add these after the line 27, which is,
27 public float exitMatchTargetsAnimTime = 0.75f;
After this line, we have to add,
30 public float animationSpeed = 1f;
31 public float rootMovementSpeed = 1f;
32 public float rootTurnSpeed = 1f;
Then in FixedUpdate() of the same script (NOT the Update() function), we can set the Animator Component’s speed to the animationSpeed scalar. Refer to Unity’s online documentation of the speed property of the Animator component. This will cause the entire Mecanim animation state machine and blendtrees to play faster or slower as animationSpeed is adjusted. A setting of 1f is regular speed, 0.5f is half speed and 2f is twice as fast. I am going to put the code in the line 114.
114 anim.speed = animationSpeed;
Now modify OnAnimatorMove() in the same script to scale the difference in position and rotation from the previous frame (i.e. this.transform) as compared to the new candidate root motion pose.
It is recommended you accomplish this with Vector3.LerpUnclamped() and Quaternion.LerpUnclamped() using your two new scalars, rootMovementSpeed and rootTurnSpeed. You can refer to Unity’s online API documentation if you aren’t familiar with Lerp (linear interpolation/extrapolation).
To modify this function, let’s locate to,
220 //TODO Here, you could scale the difference in position and rotation to make the character go faster or slower
And we have to add some codes after it. Here is an example of how to update the newRootPosition by Vector3.LerpUnclamped.
newRootPosition = Vector3.LerpUnclamped(this.transform.position, newRootPosition, rootMovementSpeed);
While you have to finish the function for updating the newRootRotation with the function Quaternion.LerpUnclamped() and public float variable rootTurnSpeed in a similar way. After you finished, you have to save the script for the project. Inside the project, we then select the GameObject SomeDude_RootMotion . In its Inspector, we can change the public values of. Animation Speed, Root Movement Speed, and Root Turn Speed. Note that the recommended values for Animation Speed and Root Movement Speed is 1.1 , and you have to try out a few times before you decide the value for Root Turn Speed.
(11) Minions Movements Overview
Next up are the minion characters. Both of the minions follow the same pattern as the humans with programmatic movement and root motion control. The trade-offs between the two types of movement aren’t nearly as noticeable since these particular minions don’t have feet (lost in a workplace accident).
One thing about the minions is that their model was made within Unity using primitive shapes. Mecanim is able to animate nearly any attribute of any GameObject. Creating new interactive characters like the minion example is really quite easy. The trick is to leverage the Hierarchy relationships between the GameObjects that make up a character and animate the relative poses. You can even use Mecanim to animate things that aren’t characters like elevators, drawbridges, etc.
(12) Minions No Root Motion Animations
Let’s select Minion_NoRootMotion to see its Blend Tree-Forward,
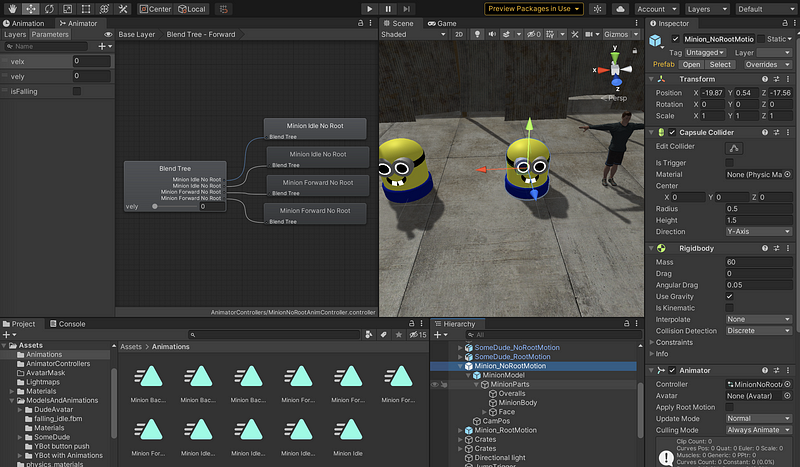
We can click on the Blend Tree, drag the red pointer in the Inspector > Parameter, and then click on the Play button to check the animation in Blend Tree.
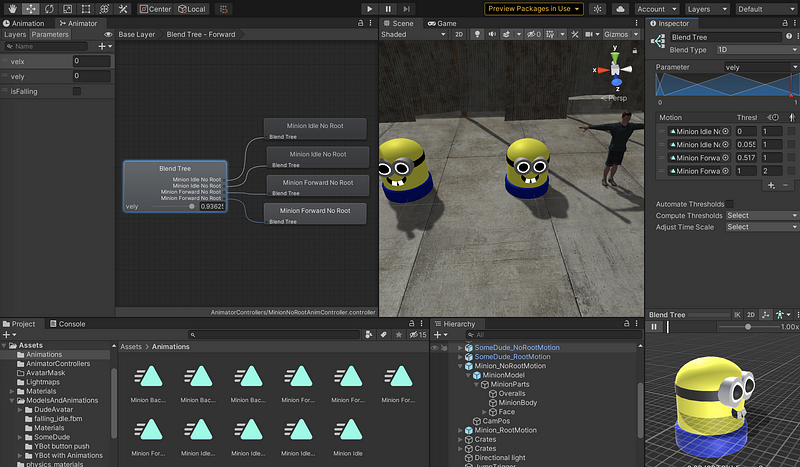
To check the animation of this GameObject Minion_NoRootMotion , let’s first left-click on the Hierarchy > Minion_NoRootMotion , then select the Animation window.
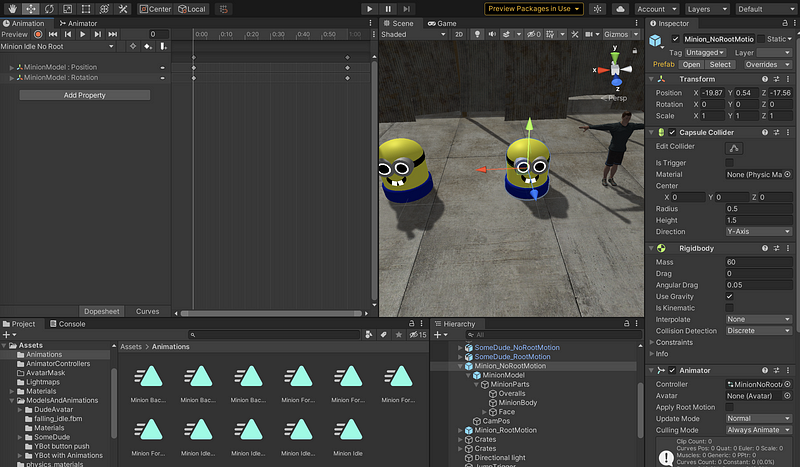
In particular, check out Minion_NoRootMotion’s Minion Forward No Root.
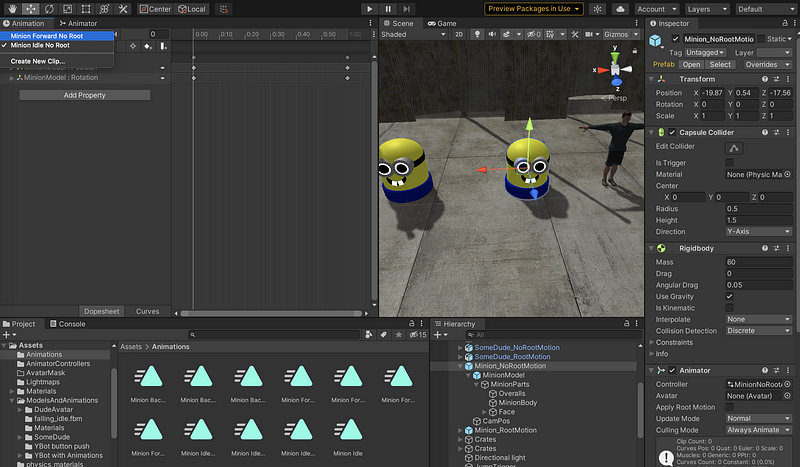
We can either scrub through the timeline to see the animation progress through the keyframes or simply click on the Play button of the Animation tab to see the animation. This animation simply moves the minion up and down and rotates slightly around the Z axis.
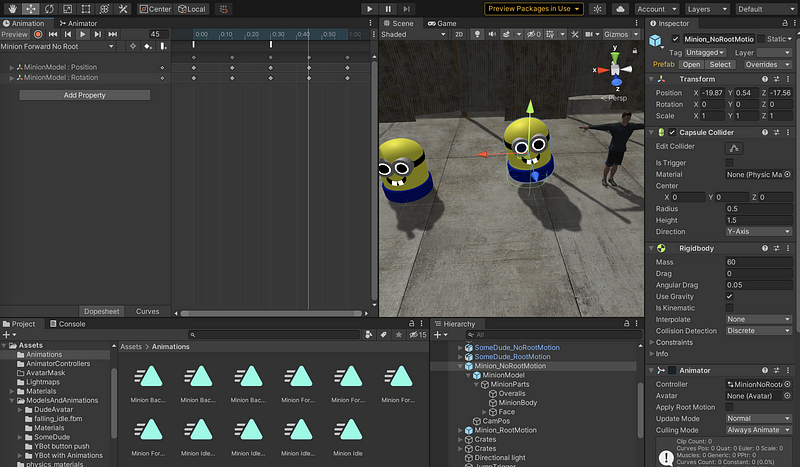
Now, let’s have a look at the key frames and see how we create the key frames. We can click on the MinionModel: Position and MinionModel: Rotation for the XYZ Position/Rotation of each key frame,
- Key Frame 0: Position.x/y/z = 0, Rotation.x/y/z = 0
- Key Frame 1: Position.y = 0.5, Rotation.z = 10
- Key Frame 2: Position.x/y/z = 0, Rotation.x/y/z = 0
- Key Frame 3: Position.y = 0.5, Rotation.z = -10
- Key Frame 4: Position.x/y/z = 0, Rotation.x/y/z = 0
If we look at the curves tab of the Animation, you can see that the interpolation between keyframes is not simply linear but follows a curve (defined by control tangents). The ability to control the tangents for keyframe interpolation is great for making nice animations.

(13) Minions Root Motion Animations
Next, let’s check out Minion_RootMotion’s (the other one) Minion Forward and Minion Forward Turn Left animations. Minion Forward only defines a simple Z direction translation in a straight line. Minion Forward Turn Left rotates while moving forward and to the left along a curve. Note if you can not see the animations, play the game, try the movement of this minion, and then go back to see the animations. Ignore the Missing! stuff because it seems like an irrelevant issue for us.

You should also check out the Curves view to see what’s really going on. Setting the tangents lets us get away with only two keyframes to pull off a turn animation. You could of course add more keyframes and rely less on the tangents though.
By the way, the view controls of the Curves tabs of Animation is a bit cumbersome to navigate. You can zoom with a mouse scroll wheel or two-finger touchpad zoom. However, this zooms both axis equally. Hold down either SHIFT or COMMAND (maybe ALT on Windows) to zoom the axis independently .
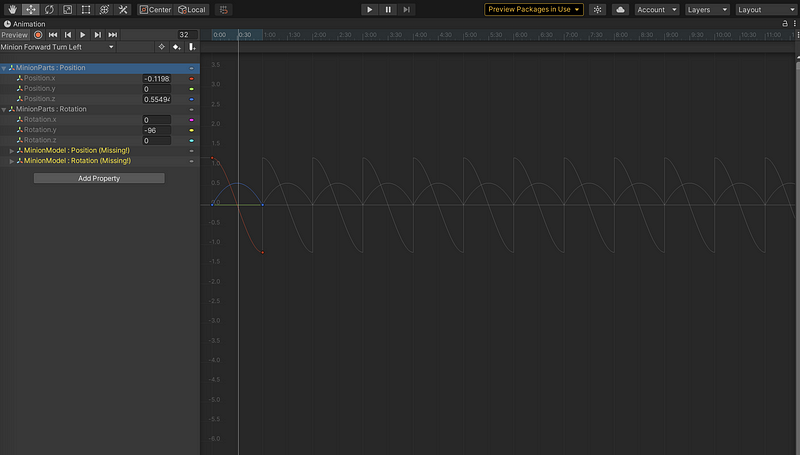
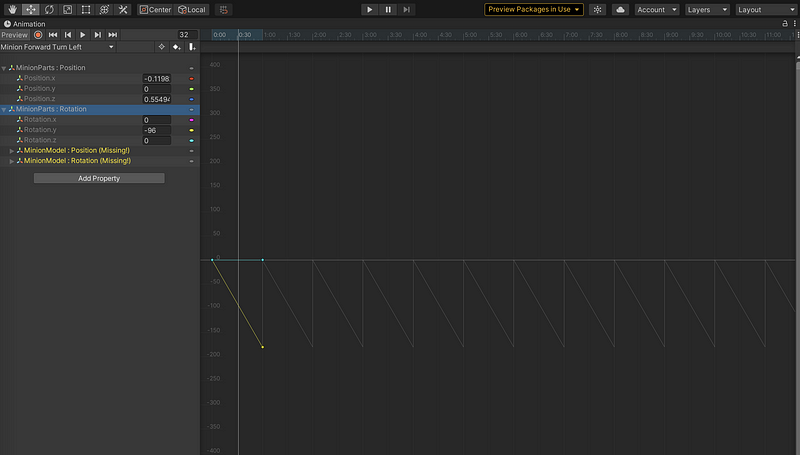
(14) Creating Hopping Motion Animations for Minions
Since Minion_RootMotion’s animation is pretty boring, add a hop and a twist to the movement of Minion Forward similar to Minion Forward No Root. You’ll probably want to preserve the original Minion Forward in case you mess up. To make a duplicate animation, select the animation in the Project View and execute Edit > Duplicate (or press Shift + D) to the Minion Forward animation and rename the new file to something appropriate like Minion Hop.
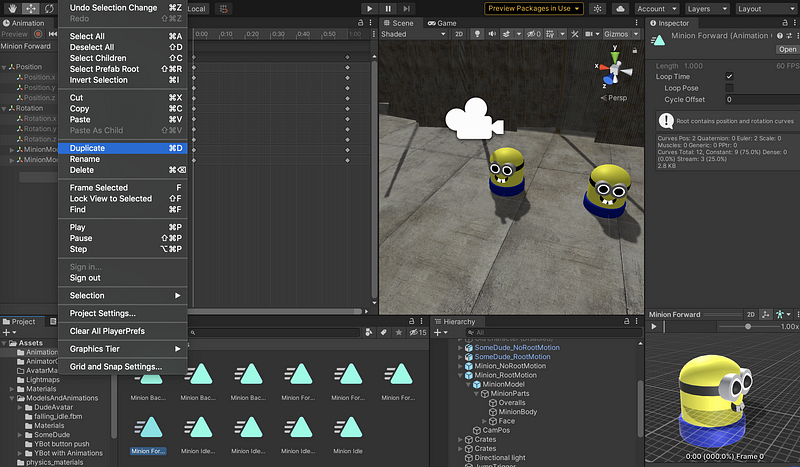
Note that if you can not view the current animation in the right-down corner, and the error is,
No model is available for preview.
Please drag a model into this Preview Area.
Then, you can directly drag the GameObject (e.g. Minion_RootMotion) from Hierarchy here if you want to view it in this position.
Before we edit the animation for hopping, make sure we have Minion Hop selected. Then in the Dopesheet view, we have to create some extra key frames. For example, we can right-click in the middle and select Add Key. We only have to add the key frames for MinionModel: Position and MinionModel: Rotation.
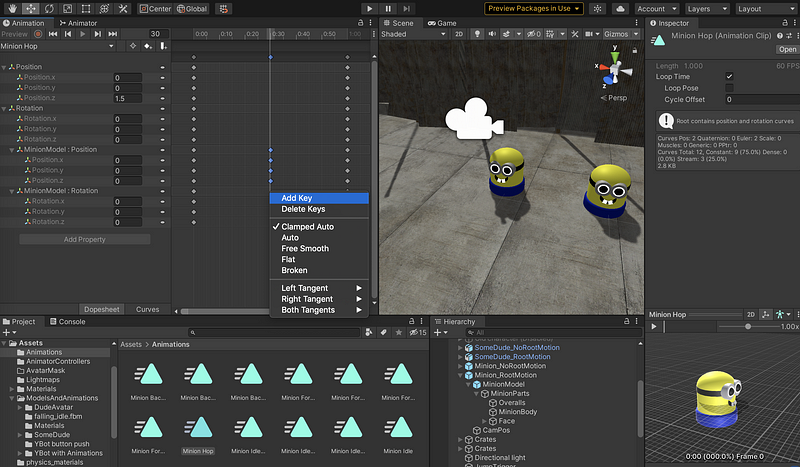
To add this hopping animation, we should change Position.y of the key frame in the current time to 1. Then we can click on the play button in the right-down corner to see this movement.

Do the same with the Minion Forward Turn Left and Minion Forward Turn Right animations. Name these files Minion Hop Turn Left and Minion Hop Turn Right. Just makes sure all of them follow the same pattern. For instance, if the first hop leans to the left and the next leans to the right, you should replicate that in all three animations.
When adding new keyframes for the hopping, be sure to modify the minion model transform and not the root game object position (otherwise you’ll mess up the capsule collider orientation). Also, you can add partial keyframes (only keyframing the parameters that are changing). If you add complete keyframes for all parameters you might end up messing up the curves for the root motion of the game object. After your configuration, the keyframes of all these three animation files should be looked like the ones below.

Now test it out in the Basic Layer of Mecanim Animator MinionAnimatorController.
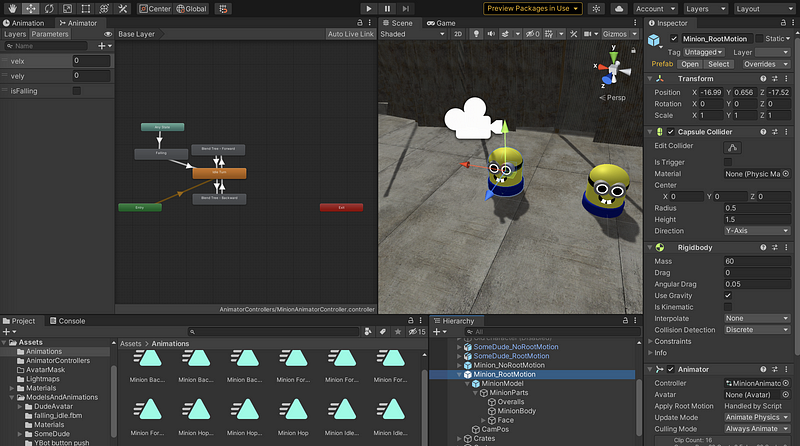
Change the forward blendtree’s referenced animations to your new ones with the hop.
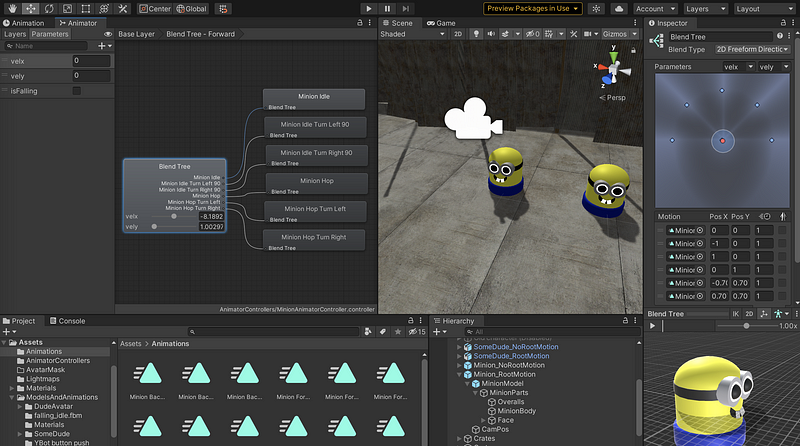
If the animations match well enough the hops should smoothly blend for any ratio of forward and turning. You should carefully check all the hops in case there are any mistakes.
(15) Creating Footstep Animation Events for Minions
The other thing the minion needs are some squeaky footsteps like his brother. To accomplish this, let’s first check out the installed components on the Minion_NoRootMotion in the Inspector.
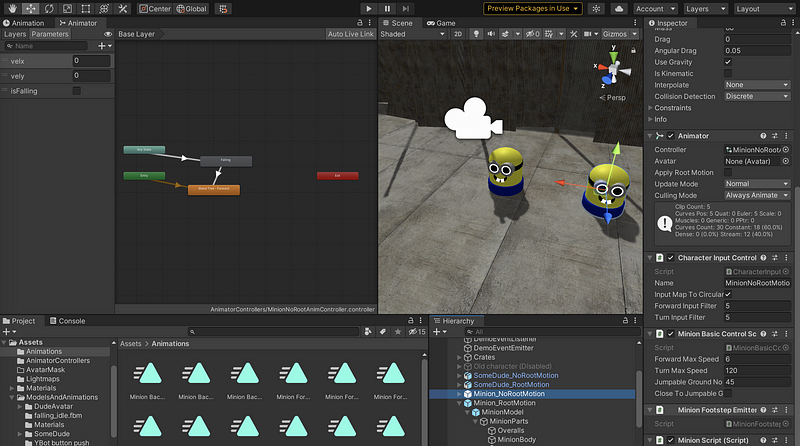
You should see that it has a MinionFootstepEmitter attached. Add that same script to Minion_RootMotion.
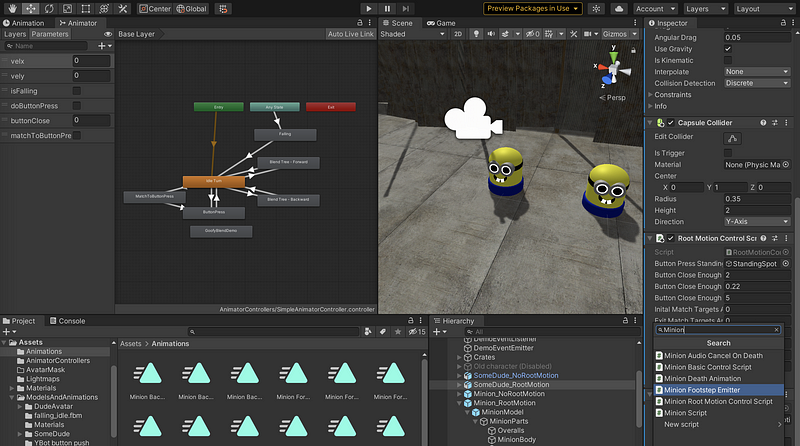
Also, look at the actual script code. The script should be located in Scripts > MinionSupport > MinionFootstepEmitter. You’ll notice that it implements a method ExecuteFootstep(). When called, this method generates an event that is consumed by the AudioEventManager, which plays the sound.
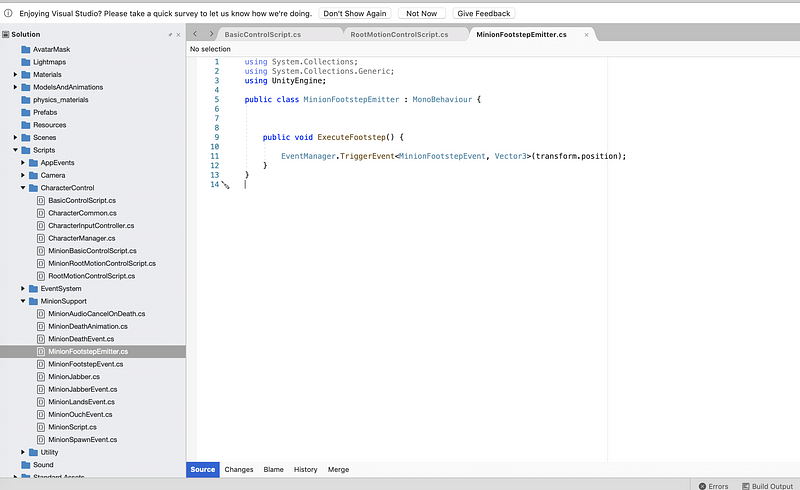
So where is the method ExecuteFootstep() actually called? Unity supports a feature called animation events. These are events that you can embed within an animation. When the event is triggered, Unity will call a callback method of your choice.
In the Animation view of Minion Forward (Now it should be changed to Minion Hop) and with the Dopesheet tab selected, click the “Add Event” button (looks like a white pencil with a plus next to it). The new event will show up just below the timeline as a little pencil shape. Drag it left/right to wherever on the timeline the footstep should occur.

With the animation event selected (little pencil turns blue), select the ExecuteFootstep() callback in the Inspector view Function setting and send it to the MinionFootstepEmitter as the receiving Object. Also, add any more animation events you need for other footsteps (probably at least two).
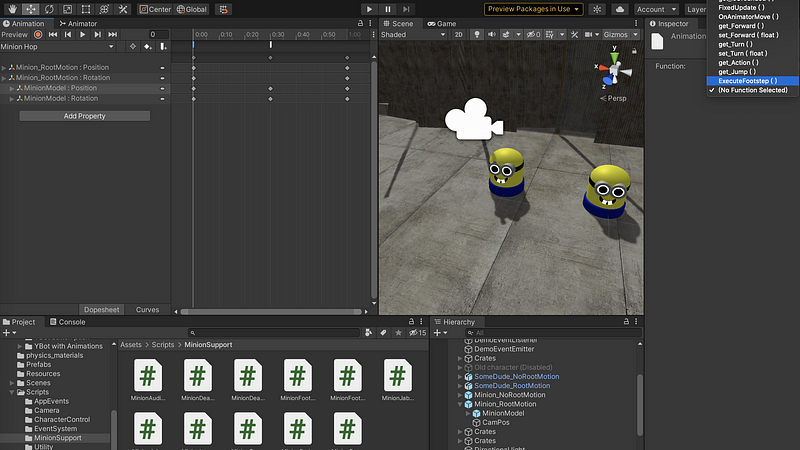
If your footstep occurs at the very beginning of the animation, you don’t need one at the very end. This is because of the looping nature of the animation (beginning and end are essentially the same moment). Implementing footstep animation events only in Minion Forward (Now it should be changed to Minion Hop) is fine for now. If all the things are correct, we are expected to hear squeaky footstep sound events to our forward animation.
(16) Inverse Kinematic for Pressing Button
Now we are going to go back to SomeDude_RootMotion. You may have noticed a stick with a red ball on it just ahead of the character. You are now going to leverage Unity’s Inverse Kinematic (IK) features so that the character can press the red ball as if it is a button.
If you run the game and select SomeDude_RootMotion, you can press the “Fire1” button to execute a button pressing animation. But it only works if you get SomeDude_RootMotion perfectly placed on the blue marker and facing the button. On a keyboard “Fire1” should be the Left-Control key. Otherwise, you can check Unity’s InputManager setting to see what mapping is configured. To view the InputManager, we should select Edit > Project Settings > Input Manager > Fire 1 > Positive Button.
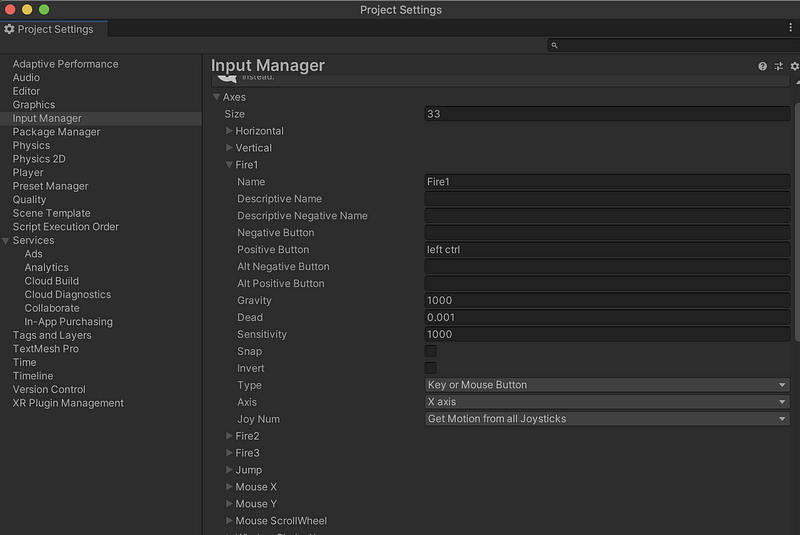
This distance/angle constraint is already implemented for you. Many games will only allow a character to interact with something if they are close enough. This constraint is implemented via a reference to a buttonPressStandingSpot object (the blue marker in the scene) and conditional evaluation of buttonDistance and buttonAngleDegrees in FixedUpdate() of RootMotionController.cs.
Take a look at SomeDude_RootMotion’s Animator Controller state machine. You will see that there are two transition paths through the state machine that lead to the ButtonPress state. Either a transition directly from the following two paths,
- “Idle Turn” > “ButtonPress”
- “Idle Turn” > “MatchToButtonPress” > “ButtonPress”
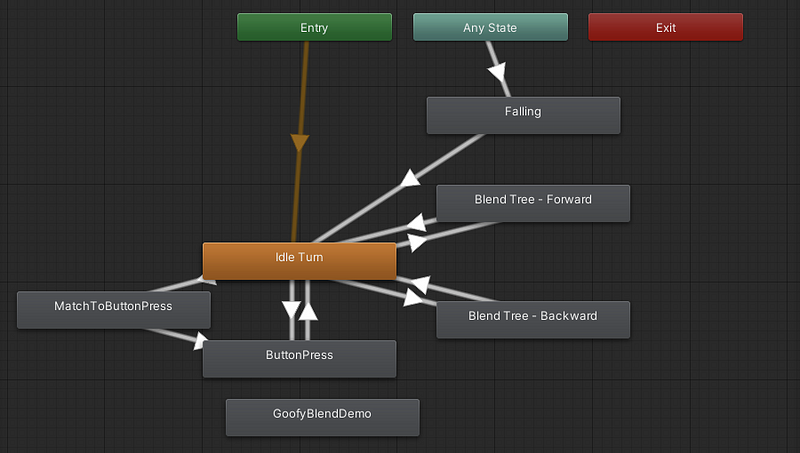
The reason for this is that we want SomeDude to immediately press the button if he is perfectly aligned but if not, then he will move into alignment first via MatchToButtonPress. The MatchToButtonPress animation state is simply the character taking a couple steps forward. It is unlikely that this animation will be sufficient to get SomeDude where he needs to be to press the button. However, through the use of Animator.MatchTarget() we can augment the animation to align with the standing spot.
The first thing we want is to make the button press action a little more forgiving regarding where SomeDude_RootMotion is relative to the button. To do this, we will use Unity’s Animator.MatchTarget() method. Let’s first open the RootMotionControlScript and locate // TODO UNCOMMENT THESE LINES FOR TARGET MATCHING . We should uncomment the two lines below it,
// TODO UNCOMMENT THESE LINES FOR TARGET MATCHING
Debug.Log("match to button initiated");
doMatchToButtonPress = true;
Next, replace the comment // TODO HANDLE BUTTON MATCH TARGET HERE with the following,
// TODO HANDLE BUTTON MATCH TARGET HERE
// get info about current animation
var animState = anim.GetCurrentAnimatorStateInfo(0);
// If the transition to button press has been initiated then we want // to correct the character position to the correct place
if (animState.IsName("MatchToButtonPress")
   && !anim.IsInTransition(0) && !anim.isMatchingTarget)
{
}
The code you just pasted queries for the current animation state. This allows us to know when a particular animation is playing. Additionally, we check to make sure we aren’t in a transition between animations and that we aren’t already performing Animator.MatchTarget(). Next, add the following inside the if-clause you just placed,
if (buttonPressStandingSpot != null)
{
    Debug.Log("Target matching correction started");
    initalMatchTargetsAnimTime = animState.normalizedTime;
    var t = buttonPressStandingSpot.transform;
    anim.MatchTarget(t.position, t.rotation, AvatarTarget.Root, new MatchTargetWeightMask(new Vector3(1f, 0f, 1f), 1f), initalMatchTargetsAnimTime, exitMatchTargetsAnimTime);
}
The call to MatchTarget() allows us to reference a current animation to serve as a time line. Over the progression of this timeline we will override root motion and interpolate towards a desired pose. The specifics of the pose are determined by which part of the character is used as a reference point and which dimensions are used via a MatchTargetWeightMask(). The time period of the interpolation is controlled by a normalized time reference for the start initalMatchTargetsAnimTime and stop exitMatchTargetsAnimTime. You can check out this link for more details.
Now, try it out. You should be able to walk SomeDude_RootMotion close to the marker and when you press “Fire1” you will see him turn and take a couple steps ending with alignment with the button followed by a press animation.
However, the MatchTarget() call doesn’t work perfectly. What you just implemented is a minimal solution. Ideally, you would include more animations and possibly some AI control to get the character closer to the button before using MatchTarget(). However, even this minimal solution is a big improvement in the quality of interaction.
(17) Actural Button Pressing
Now let’s focus on the actual button press. Note that the button press animation always moves the hand to exactly the same spot according to the keyframes of the animation. But we want the hand to go to where the red ball is. In order to do this, we will override the animation with IK to go to the ball.
IK works in the opposite direction of forward kinematics. In this case, we specify the desired pose of one of the extremities of the character (hands, feet, head) and IK will determine a valid pose configuration of all bone rotations up the chain. For instance, if a hand is set to be positioned at a particular point, a pose will be determined for the wrist, elbow, and shoulder.
In order to get IK working, the first thing you need to do is enable IK on the appropriate Animation Layer of the character’s Animator. In this case, there is only one layer, the Base Layer. Under the Layers tab of the Animator, click the gear and check IK pass (note that it may already be checked).
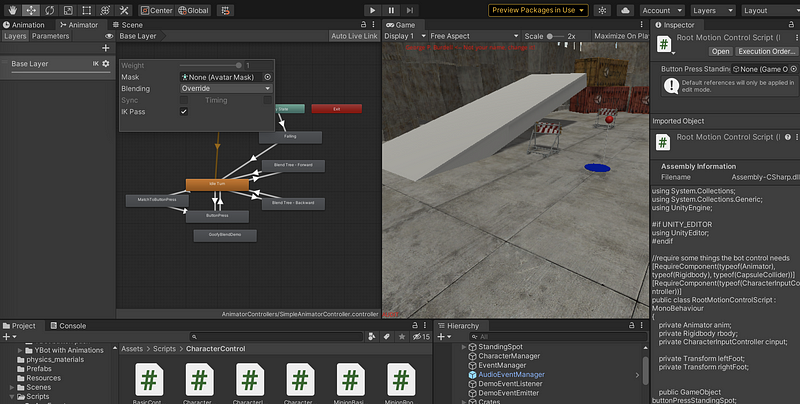
Next up, we will add a callback to the RootMotionControlScript called OnAnimatorIK(). It should have a void return type and int layerIndex as the parameter. Within this method, you will implement the logic necessary for the character to be able to look at the button and to reach out and touch the button. We will add this function right before the OnAnimatorMove() function. Within OnAnimatorIK(), we need to add some logic to recognize when the ButtonPress Animator state is playing.
private void OnAnimatorIK(int layerIndex)
    {
        if (anim)
        {
            AnimatorStateInfo astate = anim.GetCurrentAnimatorStateInfo(0);
            if (astate.IsName("ButtonPress"))
            {
            }
            else
            {
            }
        }
    }
Now add a public member variable before this function to RootMotionControlScript for a GameObject named buttonObject.
public GameObject buttonObject;
Next, we will add some calls to the Animator to solve IK. Add the following to the if-clause from above.
float buttonWeight = 1.0f;
// Set the look target position, if one has been assigned
if (buttonObject != null)
{
    anim.SetLookAtWeight(buttonWeight);
    anim.SetLookAtPosition(buttonObject.transform.position);
    anim.SetIKPositionWeight(AvatarIKGoal.RightHand, buttonWeight);
    anim.SetIKPosition(AvatarIKGoal.RightHand,
        buttonObject.transform.position);
}
In the else-clause, add the following,
anim.SetIKPositionWeight(AvatarIKGoal.RightHand,0); anim.SetLookAtWeight(0);
Then, save this script. Now in the Inspector view of SomeDude_RootMotion, connect the public parameter buttonObject to the Scene Hierarcy game object ButtonHandle (child of ButtonParent).
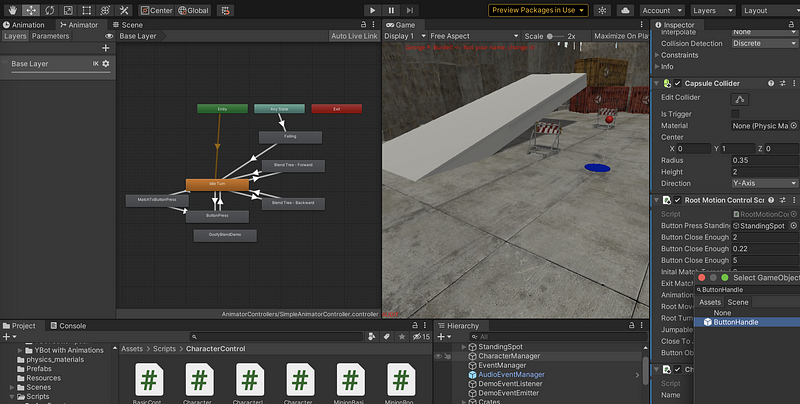
You should now be able to play the game and observe the character touching the button when you press the “Fire1” key.
(18) Smoothly Button Pressing
However, you will notice that the hand immediately snaps to the button during the animation and then snaps back down again at the end. This is because we are using a weight of 1.0 for the IK pose versus the current animation pose. So what we really want is to smoothly transition from the animation to the IK override.
This can be handled by animating the buttonWeight float value. The Mecanim animation system can be used for animating all sorts of things, including float values such as the buttonWeight.
In the Project View (Assets), navigate to and select ModelsAndAnimations YBot button push > ybot@Button Pushing. In the Inspector, scroll to the Curves section and expand it. You will see that there is a buttonClose curve already created for you.
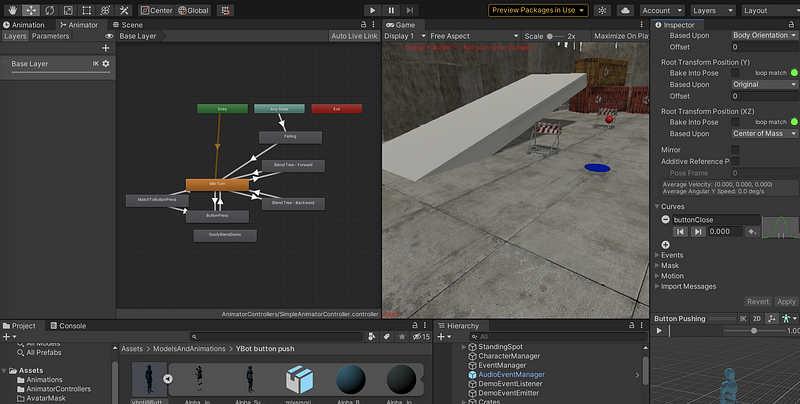
Scrub through the animation preview and you will see that the buttonClose parameter is 1.0 during the time that the hand is pressing the button. Outside of that period of time, buttonClose is a value less than 1.0. This animation curve can be used to smoothly transition the IK weight and, therefore, create a smooth correction of the animation to get the character to properly click the button.
So in the script, we should change the buttonWeight declaration line to use the buttonClose animation curve value read from the Animator,
float buttonWeight = anim.GetFloat("buttonClose");Now run the game and try out the button press again. It should animate nicely with the hand going to the correct location.
2. Submission Details
(1) Update the HUD
Update the HUD to show your name. Edit the Name game object under the “FramerateCounter — NAME TEXT IS HERE”.
(2) Modification Check List
a. SomeDude_NoRootMotion:
- [10 pt] disable turn animation by NOT passing turn input to the Animator (only turning programmatically)
b. SomeDude_RootMotion:
- [20 pt] add running animations to forward blendtree and move the blend ratios around as appropriate so that the player can easily control the character
- [20 pt] add public scalars that allow adjustment of animation speed and root motion scale (translation and rotation). Adjust the scalars slightly faster than default until you are happy with control speed and overall animation quality.
- [20 pt] Match Target and Inverse Kinematics addition for button press animation.
c. Minion_RootMotion:
- [15 pt] Replace/modify the forward and turn animations to include some comical hopping steps.
- [15 pt] Add animation events that generate minion squeaky footstep events to your forward animation.
d. Format Requirements [Up to 20 pts deducted]
- Update the name that appears on the HUD. The placeholder is found under the framerate overlay canvas.
- Make sure to provide builds of your project with the auditor configured and generating no errors from your build. You will need to set Project Settings > Player::Product Name to “Last_FirstInit_m1”.
- Follow Assignment Packaging and Submission formatting and use the Auditor for checking.
(3) Select Auditor
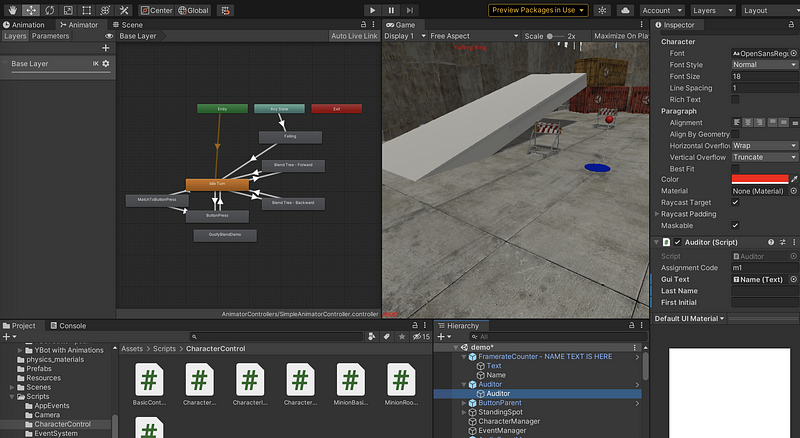
Drag the Auditor prefab from the Prefabs folder to Hierarchy. In Hierarchy, navigate to Auditor\Auditor. Now in the Inspector, go to the Auditor component and set Assignment Code = m1. We should also assign the proper Last Name and First Initial.
(4) Game Building
- File > Save to save the file
- Select File > Build Settings
- Choose MacOS, Intel 64-bit + Apple Silicon
- Create a new folder named
Last_FirstInit_m1(replace with your name Info). This is the root folder. - Create a path
<root>/Build/OSX. Name the buildLast_FirstInit_m1and save it here. - Select File > Build Settings again
- Choose Windows, x86_64
- Build it in the path
<root>/Buildand name itWindows.
(5) Create UNTESTED file
Because one of the builds (.app or .exe) has not been tested, we should add a file UNTESTED to the folder, if we don’t test it.
$ touch UNTESTED
(6) Clean Up the Root
We have to clean the root before we submit.
$ rm -rf .git
$ rm -rf Library
$ rm -rf temp
$ rm -rf Obj
$ rm -rf Logs
$ rm *.sln
$ rm *.csproj
(7) Create the Readme File
In the root directory,
$ touch Last_FirstInit_m1_readme.mdAdd some information on how to test your build.
(8) Submission
We should submit a ZIP file of the root directory. The name of this file should be <lastName_firstInitial>_m<milestone number>.zip .