Video Game Design 8 | Game AI Case Study
Video Game Design 8 | Game AI Case Study
- Game AI
(1) Minion with NavMeshAgent
- Utilize the main camera looking down on your scene, uncheck the Third Person Camera (Script)

- Duplicate the
Minion_noRootMotionand rename itAI_Minion - Remove all the components related to human character control including
CharacterInputController,MinionBasicControlScript,MinionScript - Add a
NavMeshAgentcomponent to theAI_Minion - Create a new script called
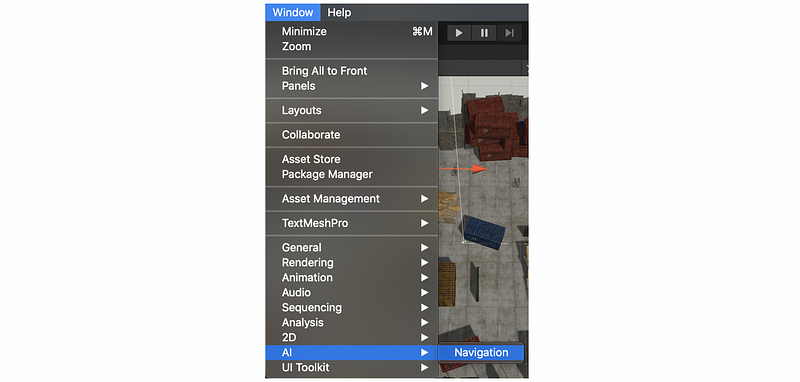
MinionAIin folder Asset > GameAI. Add this script component to theAI_MinionGameObject. - Select Window > AI > Navigation to open up the Navigation tag
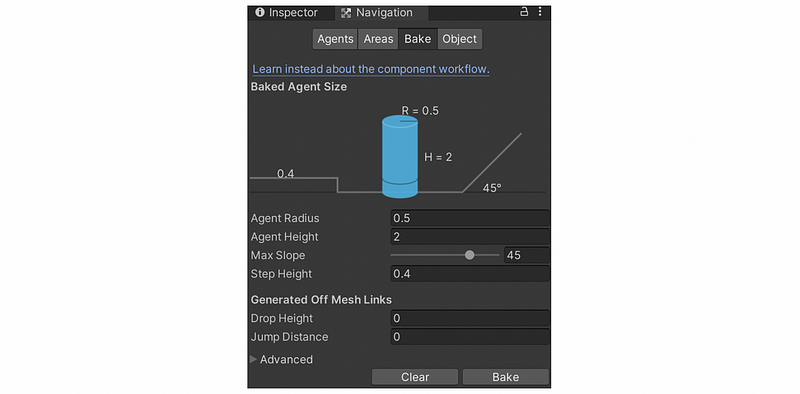
- Under the Navigation tag, select Back and make sure all the settings are proper. Then click on the Back button. We are expected to see that the playground turns blue. If it is not blue, check the box
Show NavMesh, and make sure you haveGizmosmode on.
- Require (by
RequireComponent) and reference (byGetComponent) the componentUnityEngine.AI.NavMeshAgentcalledagentin scriptMinionAI - Grab a reference (by
GetComponent) to the Minion’s Animator calledanimas well in scriptMinionAI - Add a
publicarray ofGameObjects toMinionAInamedwaypoints - Add an
int currWaypointproperty inMinionAI - Make sure that
currWaypointis first initialized with a value that will causesetNextWaypoint()to go to the 0th item. (This means that-1might work in this case) - Create a private method
setNextWaypoint(). This method should analyzecurrWaypointandwaypointsto incrementcurrWaypointand loop back to zero ifcurrWaypointis too big for the array. - Additionally, the
navMeshAgentobject should be updated of the new waypoint withSetDestination(). You will set to,
waypoints[currWaypoint].transform.position
- Add error handling in the script if the array is zero length. You may have to call
Debug.LogError. - In
Start()function, let’s callsetNextWaypoint() - In
Update()also callsetNextWaypoint(), but only if thenavMeshAgenthas reached the target waypoint. You can figure this out withnavMeshAgent.remainingDistance, but you will also want to check thatnavMeshAgent.pathPendingis not true so that being near a waypoint doesn’t cause rapid iteration through the waypoints before the new path can be found. - More complicated
NavMeshAgentimplementations may necessitateNavMeshAgent.hasPathandNavMeshAgent.pathStatus(complete,partial, orinvalid). We don’t have to check these conditions in this case study. - In the editor, create 5 waypoints out of
GameObjects of 3D > Cube calledWaypoint1,Waypoint2,Waypoint3,Waypoint4, andWaypoint5, respectively. Uncheck the box ofBoxColliderto cancel the colliders of them. - Create a material called
TransRedto make these waypoints seem transparent red but visible to us. We have to set the alpha value of Albedo and change the Rending Mode toFaderather thanOpaque. Apply this material to the waypoints. - Go back to select the
AI_MinionGameObject. Manually increase the size of the array as appropriate to5. - Populate our
AI_Minion’s waypoints (in Inspector) with theseWaypoint…GameObjects - Before running the game, we should confirm that our
AI_Minionis not on top of any other characters. We should also confirm that all the waypoints are navigable and reachable from each other and the Minion. - Now run the game. We are expected to see the minion translate around from waypoint to waypoint. He will likely be sunk into the ground and will not be making any step animations.
(2) Enhance Bouncy Step Animation
- Modify your
AI_Minion’sNavMeshAgentcomponent Base Offset in Inspector to0.75. This will fix the issue with the model sinking into the ground. - Modify
MinionAIscript inUpdate()to tell the animator the forward animation parameter according to thenavMeshAgentcomponent’s speed. It should look something like,
anim.SetFloat(“vely”, agent.velocity.magnitude / agent.speed)
- Now test the game. You should see the minion hopping around and not sunk into the ground.
(3) Moving Waypoint with Predictions
- Next up, let’s add a moving waypoint that the Minion uses prediction to track down. Duplicate a
Waypointobject and rename it asMovingWaypoint. - Use Mecanim with an approach similar to the elevator from M2 to create an animation of it. Make sure the waypoint is always just above the navmesh (blue area) and not going over an obstacle or through a wall.
- Then, save and use the following component script
VelocityReporterin Asset > Scripts > GameAI. This is a script for getting a velocity from the present object. With this script, we can get the velocity information of theMovingWaypointeasily. Add this script as a component toMovingWaypoint.
using System.Collections;
using System.Collections.Generic;
using UnityEngine;
public class VelocityReporter : MonoBehaviour
{
    private Vector3 prevPos;
    public Vector3 rawVelocity
    {
        get;
        private set;
    }
    public Vector3 velocity
    {
        get;
        private set;
    }
    public float smoothingTimeFactor = 0.5f;
    private Vector3 smoothingParamVel;
    // Use this for initialization
    void Start () {
        prevPos = this.transform.position;
    }
    // Update is called once per frame
    void Update()
    {
        rawVelocity = (this.transform.position - prevPos) / Time.deltaTime;
        velocity = Vector3.SmoothDamp(velocity, rawVelocity, ref smoothingParamVel, smoothingTimeFactor);
        prevPos = this.transform.position;
    }
}
- Then create a new script called
TargetPrediction, and this script should implement the logic of prediction. To get the velocity of the target, we can useGetComponent()to get theVelocityReporterfrom a reference to theMovingWaypoint.
MovingWaypoint.GetComponent<VelocityReporter>();
- For prediction, implement a simple distance function to determine lookahead time as we have discussed in class. Then use the
MovingWaypoint’s velocity and position to extrapolate based on this look-ahead time. To calculate the length of aVector3object, we have to callmagnitude. Theagent.speedis the max speed we have for the agent whereagentis thenavMeshAgentobject we have used in scriptMinionAI. We should callSetDestinationto make thefutureTargetour target. Here is the formula with pseudo interface names, and you may need to implement this on your own.
Dist = (target.pos - agent.pos).Length();
lookAheadT = Dist/agent.maxSpeed;
futureTarget = target.pos + lookAheadT * target.velocity;
- Add this script as a component to the object
AI_Minion. Test it out by chasing only theMovingWaypoint. If everything is okay, we are able to see the future target position. We should finally combine this logic toMinionAIscript, but it will not be an easy task if we don’t have a state machine.
(4) Convert MinionAI script into a state machine
- Don’t confuse the discussion of AI state machines with the Mecanim Animator state machine. State machines can be used for lots of things. There is one for the animation system, and you will be implementing a different one for your AI. These state machines may likely interact in some way but are independent implementations. This is to say, the AI state machine is only about the script and nothing about the GUI.
- The AI state machine we will implement should have at least two states.
State0state can be for the 5 stationary waypoints.State1state can be for the one moving waypoint. The states should loop forever (e.g.state0->state1->state0->state1-> …). - The recommended state machine for this AI is based on the procedural approach called a procedural state machine. We will first create a
enumobject calledAIState. - You can refer to the following script and see how to implement this state machine.
public enum AIState {
    Patrol,
    GoToAmmoDepot,
    AttackPlayerWithProjectile,
    InterceptPlayer , AttackPlayerWithMelee,
    ChasePlayer
    //TODO more? states...
};
public AIState aiState;
// Use this for initialization
void Start ()
{
    aiState = AIState.Patrol;
}
void Update () {
    // state transitions that can happen from any state might happen here
    // such as:
    // if(inView(enemy) && (ammoCount == 0) &&
    // closeEnoughForMeleeAttack(enemy))
    // aiState = AIState.AttackPlayerWithMelee;
    // Assess the current state, possibly deciding to change to a different state
    switch (aiState)
    {
        case AIState.Patrol:
        //if(ammoCount == 0)
        // aiState = AIState.GoToAmmoDepot; //else
        // SteerTo(nextWaypoint);
        break;

        case AIState.GoToAmmoDepot:
        //SteerToClosestAmmoDepot()
        break;
        //... TODO handle other states
        default:
        break;
    }
}
2. Submission
(1) Update the HUD
Update the HUD in both scenes to show your name. Edit the Name game object under the “FramerateCounter — NAME TEXT IS HERE”.
(2) Modification Check List
- [30 pt] AI-controlled Minion visits 5 stationary visible waypoints
- [20 pt] Minion is animated with steps and not sunk into the ground
- [30 pt] AI-controlled Minion heads off moving visible waypoint
- [20 pt] AI is controlled by a procedural state machine of at least 2 states
(3) Game Building
- Edit > Project Settings > Player > Product Name:
Last_FirstInit_m4 - File > Save to save the file
- Select File > Build Settings
- Choose MacOS, Intel 64-bit + Apple Silicon
- Create a new folder named
Last_FirstInit_m4(replace with your name Info). This is the root folder. - Create a path
<root>/Build/OSX. Name the buildLast_FirstInit_m4and save it here. - Select File > Build Settings again
- Choose Windows, x86_64
- Build it in the path
<root>/Buildand name itWindows.
(4) Create UNTESTED file
Because one of the builds (.app or .exe) has not been tested, we should add a file UNTESTED to the folder, if we don’t test it.
$ touch UNTESTED
(5) Clean Up the Root
We have to clean the root before we submit.
$ rm -rf .git
$ rm -rf Library
$ rm -rf temp
$ rm -rf Obj
$ rm -rf Logs
$ rm *.sln
$ rm *.csproj