Web Development 1 | Environment Configuration and An Introduction to HTML
Web Development 1 | Environment Configuration and An Introduction to HTML

- Atom Installation
Atom is a free and open-source text and source code editor that can be useful for web development. To install the atom, let’s first go to the installation page of the Atom to download it. For, macOS users, we should directly download it and then move the unzipped file to the Applications folder.
To make the best use of Atom, we must also install some of the packages of plugins, for example,
- atom-beautify
- atom-ternjs
- autoclose-html
- emmet
- csslint
- pigments
- language-ejs
These packages can be downloaded and installed from the “Atom > Preference > Install > Search box”. If there’s a firewall problem (like if we are in China), then this article may help you deal with the possible installation problems.
2. An Introduction to HTML
(1) HTML Intro
HTML stands for Hypertext Markup Language and it is a kind of a markup language. You may encounter other markup languages for example XML (extensible markup language), or GML (generalized markup language). The codepen is a website for us to generate and preview websites. For example, if we use the following code, it will generate a page for us,
<html>
  <body>
    <h1> Hello World </h1>
  </body>
</html>

(2) HTML tags
To know which tag (i.e. we use the h1 tag in the example above) could we use in an HTML file, we can go and see the documentation of the HTML.
Most of the tags need a starter and an ender, however, some of the tags don’t. For example, the <br> (change line) and the <hr> (add a horizontal line) must not have an ending tag according to the documentation. Some of the tags. Let’s check them out by the following code,
<html>
  <body>
    <hr>
    <h1> Hello World </h1>
    <h2> By <br> Adam Edelweiss </h2>
    <hr>
  </body>
</html>

(3) HTML Attributes
HTML attribute gives more information to the browser to specify modifications to that HTML. By default, the size of the horizontal line in our previous case is 1 pixel, but we can use the HTML attribute to change it to 3 pixels.
<html>
  <body>
    <hr size="3">
    <h1> Hello World </h1>
    <h2> By <br> Adam Edelweiss </h2>
    <hr size="3">
  </body>
</html>

Well, the result is really bad because even though we can find something of the line changed, it is not what we expect it to be. How’s it? This is because the <hr> tag automatically sets the shade attribute of the line to be true and it really affects our output. To change the shade, we have to add a no shade attribute to the <hr> tag (we only changed one of the two lines so that we can easily make a comparison between them ).
<html>
  <body>
    <hr size="3" noshade>
    <h1> Hello World </h1>
    <h2> By <br> Adam Edelweiss </h2>
    <hr size="3">
  </body>
</html>

(4) HTML Alignment
However, this can still be quite strange because we always want our header to lay in the center of the webpage. The way we can make it happens is through a <center> tag. This tag can change the alignment of our content to the center.
<html>
  <body>
    <center>
      <hr size="3" noshade>
      <h1> Hello World </h1>
      <h2> By <br> Adam Edelweiss </h2>
      <hr size="3">
    </center>
  </body>
</html>

(5) HTML Comments
To start a comment in HTML, we can use the following format,
<!-- this is a comment -->
Or a shortcut of “command + /” can be used.
(6) Atom for HTML
Now, let’s move to Atom. Let’s create a new project folder named webdev, and then create a new file named index.html in it. Then we type in html and then press enter (not tab)
html

After this, Atom will auto-create an HTML template for us.
<!DOCTYPE html>
<html lang="en" dir="ltr">
  <head>
    <meta charset="utf-8">
    <title></title>
  </head>
  <body>
</body>
</html>
Note that this is an HTML5 template, and if we want to generate an HTML4 code template, we have to write,
html:4t
and then press enter,
<!DOCTYPE HTML PUBLIC "-//W3C//DTD HTML 4.01 Transitional//EN" "http://www.w3.org/TR/html4/loose.dtd">
<html lang="en">
<head>
  <meta http-equiv="Content-Type" content="text/html;charset=UTF-8">
  <title>Document</title>
</head>
<body>

</body>
</html>
Notice that the HTML4 code is much heavier than HTML5 and in our case, HTML5 is okay for us to use and we don’t have to use HTML4. The reason why we can generate this template is that we are using the emmet plugin. Here’s a cheat sheet of emmet that we can refer to when using emmet.
(7) HTML structure
The template of the HTML5, as we can see, consists of a head and a body. The head is part of the HTML file that holds information about the webpage and it tells the browser how it should handle the page.
For example, we can assign a title to our webpage in the <title> tag under the <head>.
<title>Adam's Personal Site</title>
Then we open this page by Reveal this file in the finder and then double click on it,

Then from the browser, we can find out that the title of this webpage is now changed.

There’s also a meta element under the header tag. In the meta tage of the template, we are actually telling the browser that when it opens up the file, that all the text inside our page is encoded using the utf-8 encoding system.
<meta charset="utf-8">
Some other metadata that can be used to display on a website including,
<meta name="description" content="">
<meta name="keywords" content="">
<meta name="author" content="">
<meta name="viewport" content="">
(8) Atom Beautify
Sometimes our code is able to display the page but it is not easy for human reading. That’s why we have to beautify our code. In Atom, we don’t have to do this manually, instead, the atom-beautify plugin will do this for us. Suppose we have the following code,
<!DOCTYPE html>
<html lang="en" dir="ltr">
  <head>
    <meta charset="utf-8">
    <title>Adam's Personal Site</title>
  </head>
  <body>
<h1>Adam Edelweiess</h1>
  </body>
</html>
Then we press “control + option + B”, the code will be beautified for us,
<!DOCTYPE html>
<html lang="en" dir="ltr">
<head>
  <meta charset="utf-8">
  <title>Adam's Personal Site</title>
</head>
<body>
  <h1>Adam Edelweiess</h1>
</body>
</html>
(9) Bold and Italic
We have two ways for bold fonts, <strong> and <b>. Also, we have two ways for italic fonts, <em> and <i>. The difference of these two tags is that the former one (strong or em) does not only change the font style, it also make the word/text emphasized (more important) in the HTML file. However, the later one (b or i) only changes the font style. For example,
  <h1>Adam Edelweiess</h1>
  <p>
    A <b>human</b> <strong>being</strong>, <em>maybe</em> <i>not</i>.
  </p>

To make the page more pretty with more information, I used the page of,
And here I am willing to recreate a page with the same information. The codes are as,
<!DOCTYPE html>
<html lang="en" dir="ltr">
<head>
  <meta charset="utf-8">
  <title>Adam's Personal Site</title>
</head>
<body>
  <center>
    <hr size="3" noshade>
    <h1>Adam Edelweiess</h1>
    <p>
      A <b>human</b> <strong>being</strong>, <em>maybe</em> <i>not</i>.
    </p>
    <hr size="3" noshade>
  </center>
  <p>
    My name is Adam Edelweiss, and well, this is a fake name. Like most of you
    guys who are reading this page, I am also curious about you. If you wanna get
    in touch with me, try to find me out! If you have already known me, just keep
    the secret and make the hide-n’-seek game exciting for the other players.
  </p>
</body>
</html>

Now, let’s move on.
(10) HTML Lists
To add an unordered list in the HTML file, we have to use the <ul> and <li> tag>. For example,
<ul>
  <li> hello </li>
  <li> hello </li>
  <li> hello </li>
  <li> hello </li>
</ul>

Now, let’s add two of the tips from the article About me.
<ul>
    <li>Of course, I am a Chinese guy! Because some of my articles are written
      in Chinese.</li>
    <li>The headshot of mine is the character M-200 in the game Girls’ Frontline.
       I am not a player but I do consider that this character is pretty cute.</li>
</ul>

To add an ordered list in the HTML file, we have to use the <ol> and <li> tag>. For example,
<ol>
  <li> hello </li>
  <li> hello </li>
  <li> hello </li>
  <li> hello </li>
</ol>

Now, let’s add some other stuffs,
<ol>
    <li>I have another personal blog.</li>
    <li>I am still a student.</li>
    <li>I love traveling and hiking.</li>
</ol>

Actually, we can change the starting number of an order list and we can also change the format of the order. For example,
<ol type="i">      // using Roman numeral type
<ol start="3">     // start the order from 3
(11) HTML Images
In this part, we are going to add an image to our page. The source of the image is from thedogapi (If you have remember this) and the link to our image is this link.
We have to include two parameters if we want to create a image element in the HTML, src and alt. src means the source of the image and this is our link to the image. alt means the alternative text when the browser have trouble loading the image, the image will then be replaced by the this text. For example, the template is,
<img src="" alt="">
Note that img tag is a self-closing tag.
In our case,
<img src="https://cdn2.thedogapi.com/images/FTQ1C29sk.jpg" alt="headshot">


It is sad to see that the final result is too large and we want to make it smaller. To change the size of our image, we can add an attribute called width,
<img src="https://cdn2.thedogapi.com/images/FTQ1C29sk.jpg" alt="headshot" width="10%">

Now, we have a pretty-looked page as we want.
(11) HTML Anchor
The HTML anchor tag (or a tag) is a link that we can use to redirect the current page to some other pages. The main attribute that we are going to concerned with is the href (pronounced as H-Ref) attribute, which contains a URL or a URL fragment that the hyperlink points to.
Now, we would like to add a hyperlink on our page. I am going to add a link that points to my medium homepage, which is,
<a href="https://adamedelweiss.medium.com/">Medium</a>

(12) HTML Tables
To create a table in an HTML file, we have to use the <table> tag. under the table tag, <th> tag means the table header, <tr> tag means the table row, and <td> means a table data (a cell of table). For example, the following code is going to given us a table with reader information,
<table>
    <tr>
    <th>Id</th>
    <th>Name</th>
    <th>Join Date</th>
    </tr>
    <tr>
      <td>1</td>
      <td>John</td>
      <td>2020-12-01</td>
    </tr>
    <tr>
      <td>2</td>
      <td>Emily</td>
      <td>2020-12-05</td>
    </tr>
</table>

Sometimes, we may have the situation that we have to scroll down to view the whole table. In this case, we may want the table headers and the table foot remains in the table when we scroll down the page (by some javascript), then <thead>, <tbody>, and <tfoot> can be used to build a table. We don’t have to use them now but we should know them in the JS part.
Also, it can be noticed that our table doesn’t have any boarders. Even though we can use the “border” attribute, it is deprecated (which means not preferred) by HTML and this is because the “border” attribute can be replaced by CSS (which we are going to talk about later). Anyway, we are going to use the “border” attribute because we do not know anything about CSS now.
<table border="1">

Eh, this result is incredibly ugly and we don’t like this. We want to add more space between the borders and this can be achieved by the “cellspacing” attribute (deprecated).
<table border="1" cellspacing="3">
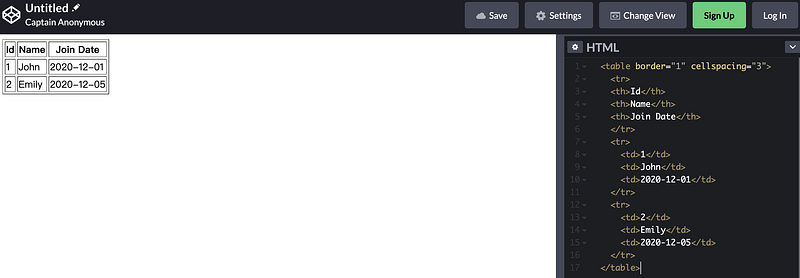
Well, that seems a little bit better now.
(13) HTML Forms
Sometimes we want the user sending us some messages, that’s when we use forms in our page. Until we learn something about the JavaScript, we can not actually make it functional for us. But we can also create a feature that is pretty close to a message box.
Suppose now we want to create a login page and we have to collect the username and the password of a user, then it should be,
<form class="" action="index.html" method="post">
  <label for="">Your Name: </label>
  <input type="text" name="" value="">
  <label for="">Your Password: </label>
  <input type="password" name="" value="">
  <input type="submit" value="save">
</form>

where, to tell where a form starts and ends, we should use,
<form class="" action="index.html" method="post"></form>
to give a label of input box, we should use,
<label for=""></label>
to add an input, we should use,
<input type="" name="" value="">
where the type can be various and they can be found at this link. For example,
<input type="text" name="" value="">         # some text input
<input type="password" name="" value="">     # some masked input
<input type="checkbox" name="" value="">     # some checkboxes
<input type="color" name="" value="">        # choose a color
<input type="file" name="" value="">         # upload a file
<input type="range" name="" value="">        # add a slide bar
<input type="email" name="" value="">        # an email input
However, the outcome is pretty ugly because our form is in the same line. Instead of using <br>, the table is actually a better idea for our layout. Now, let’s recall the table part and think about putting the login form to a table,
<form class="" action="index.html" method="post">
    <table>
      <tr>
        <td><label for="">Username: </label></td>
        <td><input type="text" name="" value=""></td>
      </tr>
      <tr>
        <td><label for="">Password: </label></td>
        <td><input type="password" name="" value=""></td>
      </tr>
      <tr>
        <td><label for="">I agree to privacy policy.</label></td>
        <td><input type="checkbox" name="" value=""></td>
      </tr>
      <tfoot>
        <td><input type="submit" name="" value="login"></td>
      </tfoot>
    </table>
</form>

We can also create a email message box that can be used for user to contact with us,
<form class="" action="index.html" method="post">
    <table>
      <tr>
        <td><label for="">Email: </label><input type="email" name="" value=""></td>
      </tr>
      <tr>
        <td><label for="">Name: </label><input type="text" name="" value=""></td>
      </tr>
      <tr>
        <td><textarea name="name" rows="8" cols="80"></textarea></td>
      </tr>
      <tr>
        <td>
          <input type="submit" name="" value="submit">
        </td>
      </tr>
    </table>
  </form>

However, when we click on the submit button, it will redirect us to the index page and this is not what we want. To change it to an emailing console, we can change the action attribution of the <form> tag,
<form class="" action="adam@example.com" method="post">
Also, we have to change the name of each of the inputs. For example,
<input type="email" name="email" value="">
<input type="text" name="name" value="">
<textarea name="text" rows="8" cols="80">
Then we randomly type in something and then we click on the submit button, it will open our email console,

and we can find the following stuff in the content of the email.
email=abc%40ewx.com&name=TTTTNB&text=sdfsfdsf
Because we are not using any Javascript now so that our email can’t understand exactly what we mean. But we are going to come back in the Javascript part.